Show Builder basics
Create a show in the browser: the layout, the timeline, saving, version history and working on a show with your team.
The Show Builder ("the Builder") is where you assemble a drone show. You place figures on a timeline, the Builder works out how the drones fly from one figure to the next, and you refine timing, motion and light until the show is ready for Pre flight and export. This chapter covers the everyday workflow: creating shows, the Builder screen, the timeline and viewport, saving and version history, and working on a show with teammates. Figures and the transitions between them have their own chapter, Figures and transitions.
Who can use the Builder#
The Builder is part of every plan (see Plans and limits). Its pages are in the menu on the left: Show Builder (your shows), Library and Tracks.
Your account also sets the largest show you can build:
| Account | Drones per show |
|---|---|
| Free | 300 |
| Core | 500 |
| Premium | 5000 |
| Custom plan | Up to 10,000, as arranged |
The limit of your own account applies, also when you use the Builder through a team. Drone-count buttons above your limit show a padlock. If you pick or enter a larger number anywhere in the Builder, a dialog explains the limit ("Your account allows 300 drones per show. Core allows 500 and Premium 5,000 drones per show.") and the value is set to your limit instead. On Free and Core the dialog has a See plans button, which opens the Pricing page in a new tab; above Premium, write to contact@droneshow.store. 10,000 drones per show is the system maximum for every account; it can't be raised.
Opening and leaving the Builder#
You can open the Builder from several places:
- Show Builder in the menu lists all your shows. + New show starts a new one; a click on a show card opens that show.
The Builder saves a new show once it has its first figure, so opening the start screen and leaving again doesn't add an empty show to your list.
- A project that was sent from the Builder has an Open in builder link in the header of its project page, which opens the show it came from.
- A team page lists the shows shared into that team; click one to open it.
To leave, click Show Builder (with the back arrow) at the top left of the Builder. It takes you back to your list of shows. There is nothing to save first: the Builder saves as you work (see Saving and autosave).
Your shows#
Show Builder in the menu lists every show you have built, together with the shows teammates have shared into your teams. They're in the order they were created, newest first, so editing a show doesn't move its card.
To pin a show to the top, click the star on its card, or choose Add to favorites from its ⋯ menu. Starred shows get their own Favorites section above the others, and the rest follow under All shows. Favorites are your own: starring a team show doesn't change anyone else's list. Search applies to favorites too.
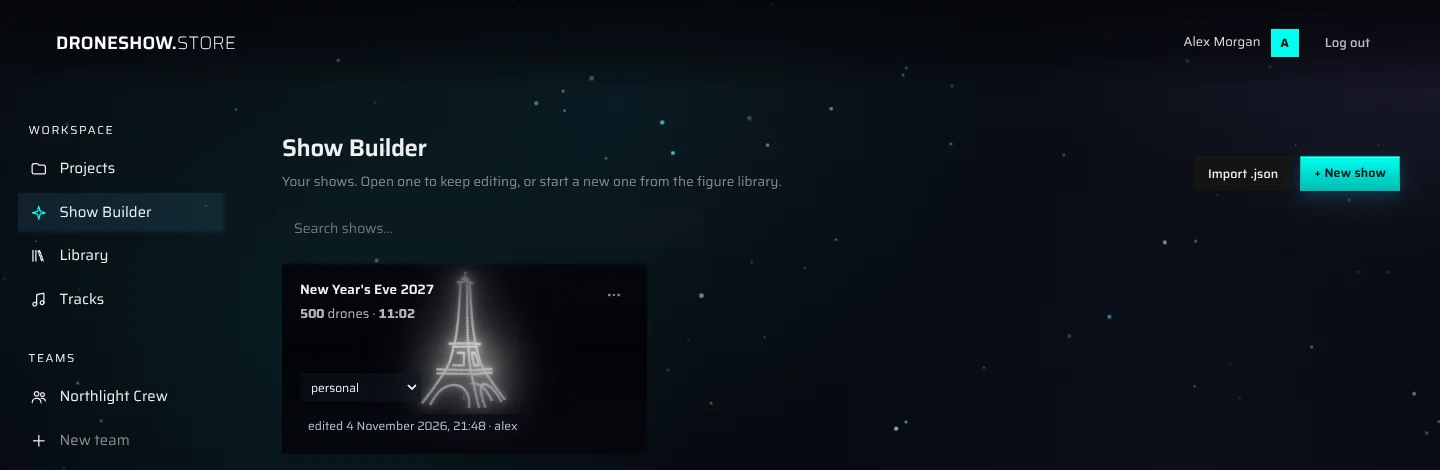
Each card shows:
- the show name, the number of drones and the length;
- a preview image, if one was saved from the Builder (see Saving a preview image);
- the team the show is shared with. On your own shows, if you belong to a team, a selector takes its place: choose personal or a team name to share or unshare the show;
- edited with the date, time and the person who saved it last, and shared with you on a teammate's show.
Type in Search shows… to filter the list by name. Click anywhere on a card to open the show in the Builder.
Card actions#
Open the ⋯ menu on a card:
| Item | What it does |
|---|---|
| Add to favorites / Remove from favorites | Pins the show to the Favorites section at the top, or takes it out. |
| Rename… | Renames the show. The new name appears here, in the Builder and for teammates at once. |
| Duplicate | Makes an independent copy called "name copy". |
| Export as .json | Downloads the show as a .json project file, for a backup or to move the show to another account. |
| Delete… | Deletes the show permanently. Type delete to confirm. A show shared with a team is deleted for your teammates too. |
Rename…, Duplicate, Export as .json and the team selector need a copy of the show in this browser. For one of your shows that this browser has never opened, the menu offers only Add to favorites and Delete from the server…; open the show once to get the other actions. On a teammate's show there is no Delete.
Importing a show#
Import .json (top right) adds a show from a .json project file exported earlier. The import becomes a new show with its own identity, so it never overwrites the original. A file that isn't a show is refused with "File doesn't look like a show (missing droneCount / figures / sequence)."
When you have no shows of your own yet, the page offers three ways in: Tell us about your show (the guided flow), Start from scratch (an empty show) and Open the example. They stay at the top of the page while your only show is the example.
The example show#
New accounts get a copy of an example show, named Example: …, so there's a finished show to play and take apart from the start. The copy is yours: open it, change it, rename or delete it. Open the example opens your copy, or makes a fresh one if you deleted it, and starts playing it. The example is there only when droneshow.store has picked one.
Sharing a show with a team#
Only the owner of a show can share it. Pick the team in the selector on the card; a note confirms "“name” is now shared with team." Choose personal to take it back. Team members can then open and edit the show according to their team permissions (see Teams). If you see "Open this show in the builder once before sharing it.", open the show, then try again.
Creating a new show#
Click + New show on the Show Builder page. Inside the Builder you can also open the ⋯ menu (More actions) at the right end of the header and choose New show…; the show you were working on stays saved.
The start screen#
The start screen, Let's build a drone show, offers up to four ways to begin:
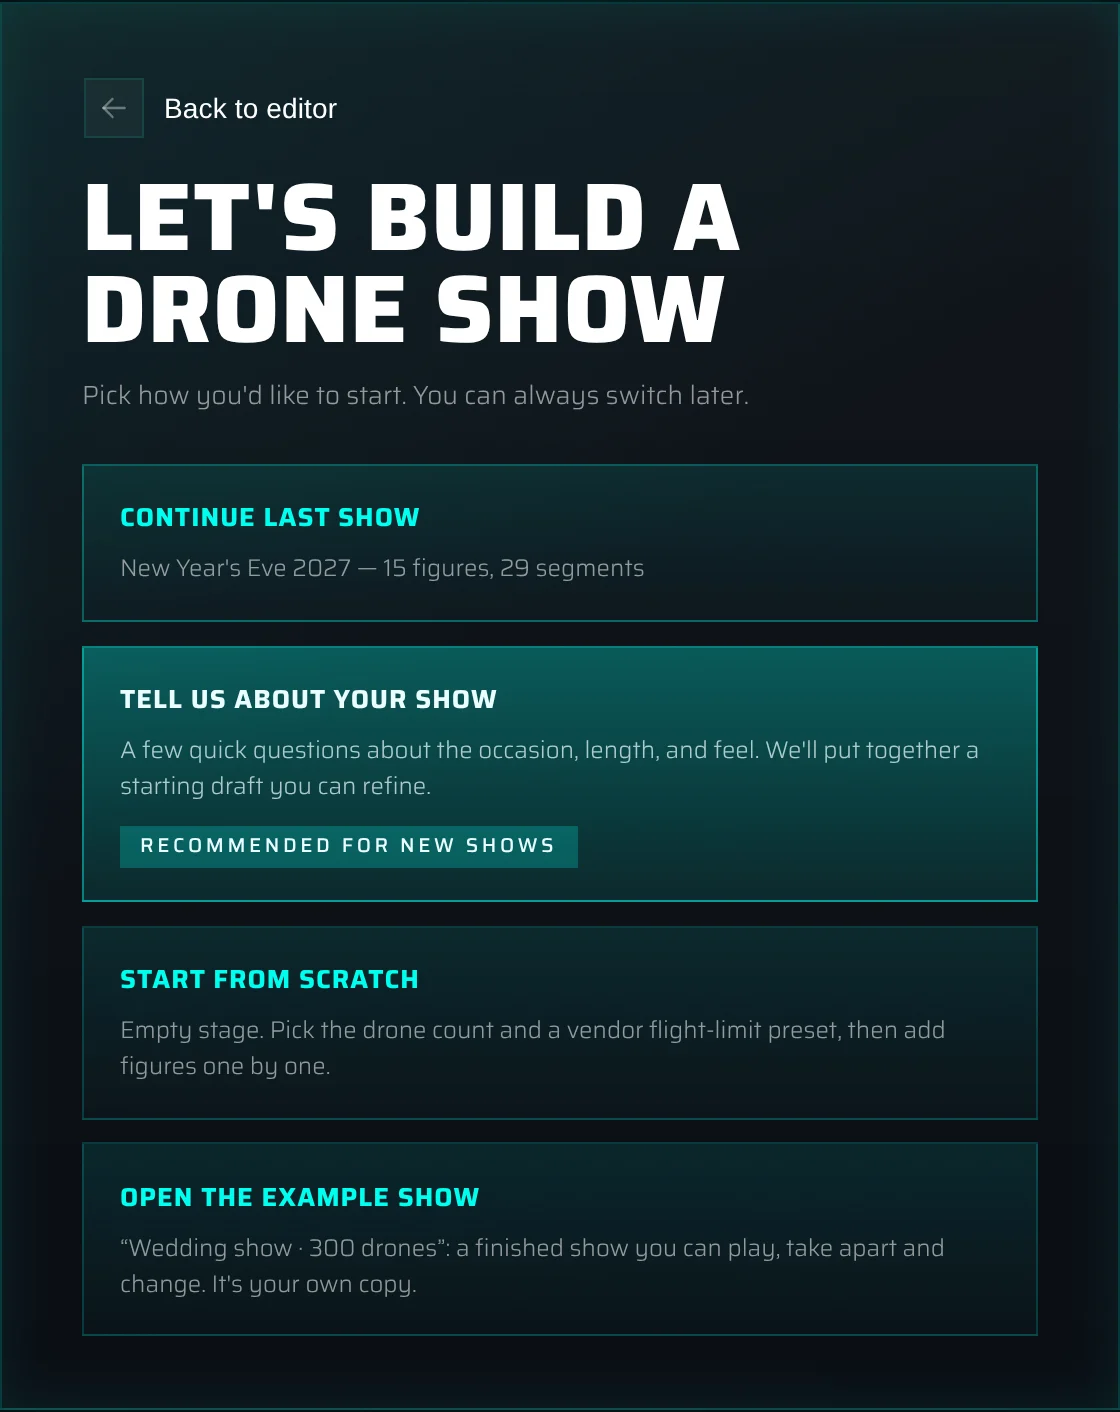
- Continue last show appears when the Builder still holds your last show and it has at least one figure. It shows that show's name and how many figures and segments it has, and takes you back to it.
- Tell us about your show (marked Recommended for new shows) is a guided four-step flow that suggests figures for you.
- Start from scratch creates an empty show: you choose only the drone count and the flight limits.
- Open the example show opens your copy of the example show (see The example show), when there is one.
When the Builder still holds your last show, you can close the start screen without creating anything: click Back to editor at the top (it takes you to your last show), click outside the card or press Esc.
The start screen also appears when you return to the Builder without picking a specific show. The last show you worked on is then loaded only after you choose Continue last show.
Tell us about your show#
The guided flow has four steps: 1. Basics, 2. Theme & music, 3. Figures and 4. Review. Use Next and Back to move between them, or Cancel on the first step.
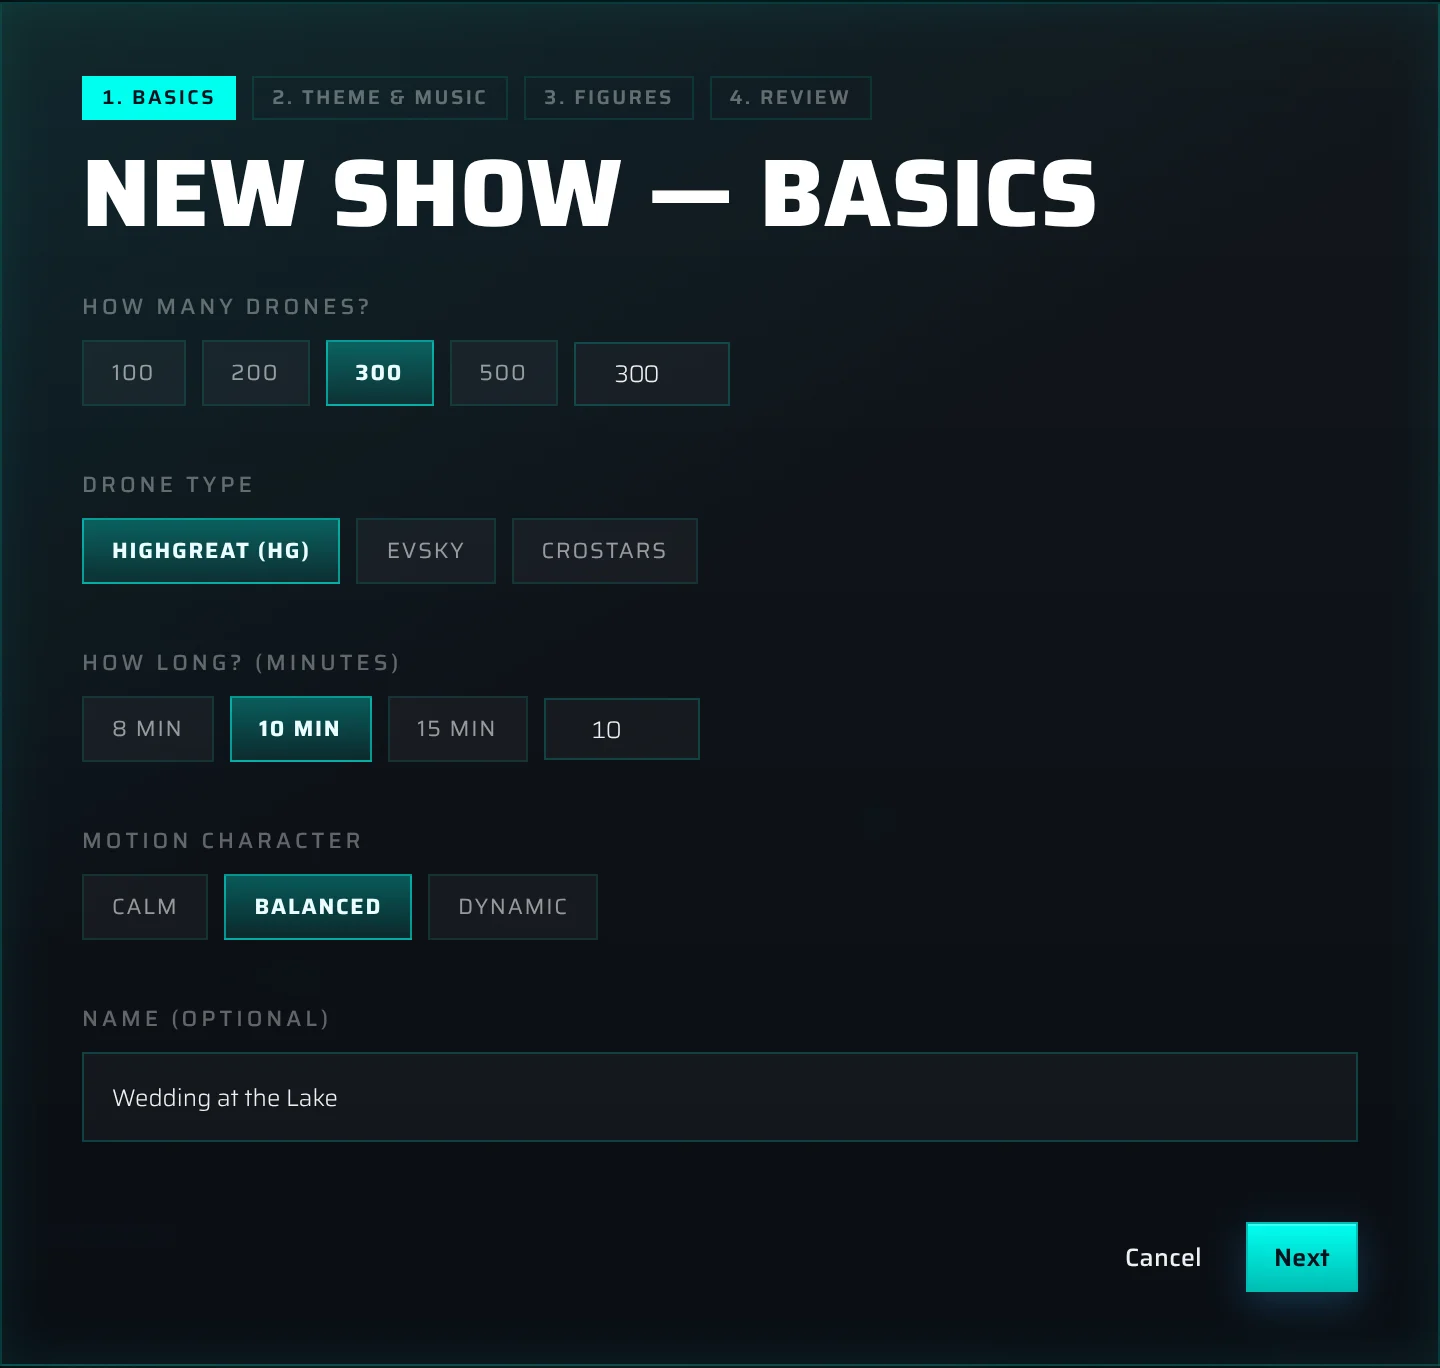
Step 1: Basics
| Field | What to choose |
|---|---|
| How many drones? | 100, 200, 300 or 500, or type any number up to your account's limit. |
| Drone type | HighGreat (HG), EVSKY or Crostars. This sets the show's frame rate (30, 24 and 25 fps respectively) and the takeoff defaults used later on the Pre flight tab. Crostars also applies the Crostars flight limits, in place of the motion character. |
| How long? (minutes) | 8, 10 or 15 minutes, or type a value in half-minute steps. The length decides how many figures are suggested in step 3. The finished show is as long as its figures and transitions, which you see on the Review step. |
| Motion character | How fast the drones may fly (see the table below). Balanced is the default. |
| Name (optional) | Leave it empty and the Builder names the show after the occasion and the drone count, for example Wedding show · 300 drones. You can rename it at any time. |
| Motion character | Up speed | Down speed | Horizontal speed | Acceleration | Min distance |
|---|---|---|---|---|---|
| Calm | 2.5 m/s | 4 m/s | 4 m/s | 2.5 m/s² | 1.6 m |
| Balanced | 4 m/s | 4 m/s | 6 m/s | 4 m/s² | 1.6 m |
| Dynamic | 5 m/s | 4 m/s | 8 m/s | 6 m/s² | 1.6 m |
Step 2: Theme & music
- What is the show for?: Wedding, Corporate, Holiday, Kids / family, Art piece or Other.
- Mood: Romantic, Calm, Energetic, Playful, Epic or Festive. The mood also sets how the transitions move: Romantic, Calm and Epic shows get the Smooth ease; Energetic, Playful and Festive shows get Slow finish.
- Notes (optional): colours, specific figures, references. They are taken into account when figures are suggested.
- Music (optional): Add music uploads a track and analyses its beats (Analyzing…). You can't go on while the track is being analysed. When it's done you see the track name, its tempo in BPM and its length; × removes it. The music is a layer on top of the show: a track longer than the show simply isn't played to the end. See Colour, effects and music for working with music.
Step 3: Figures
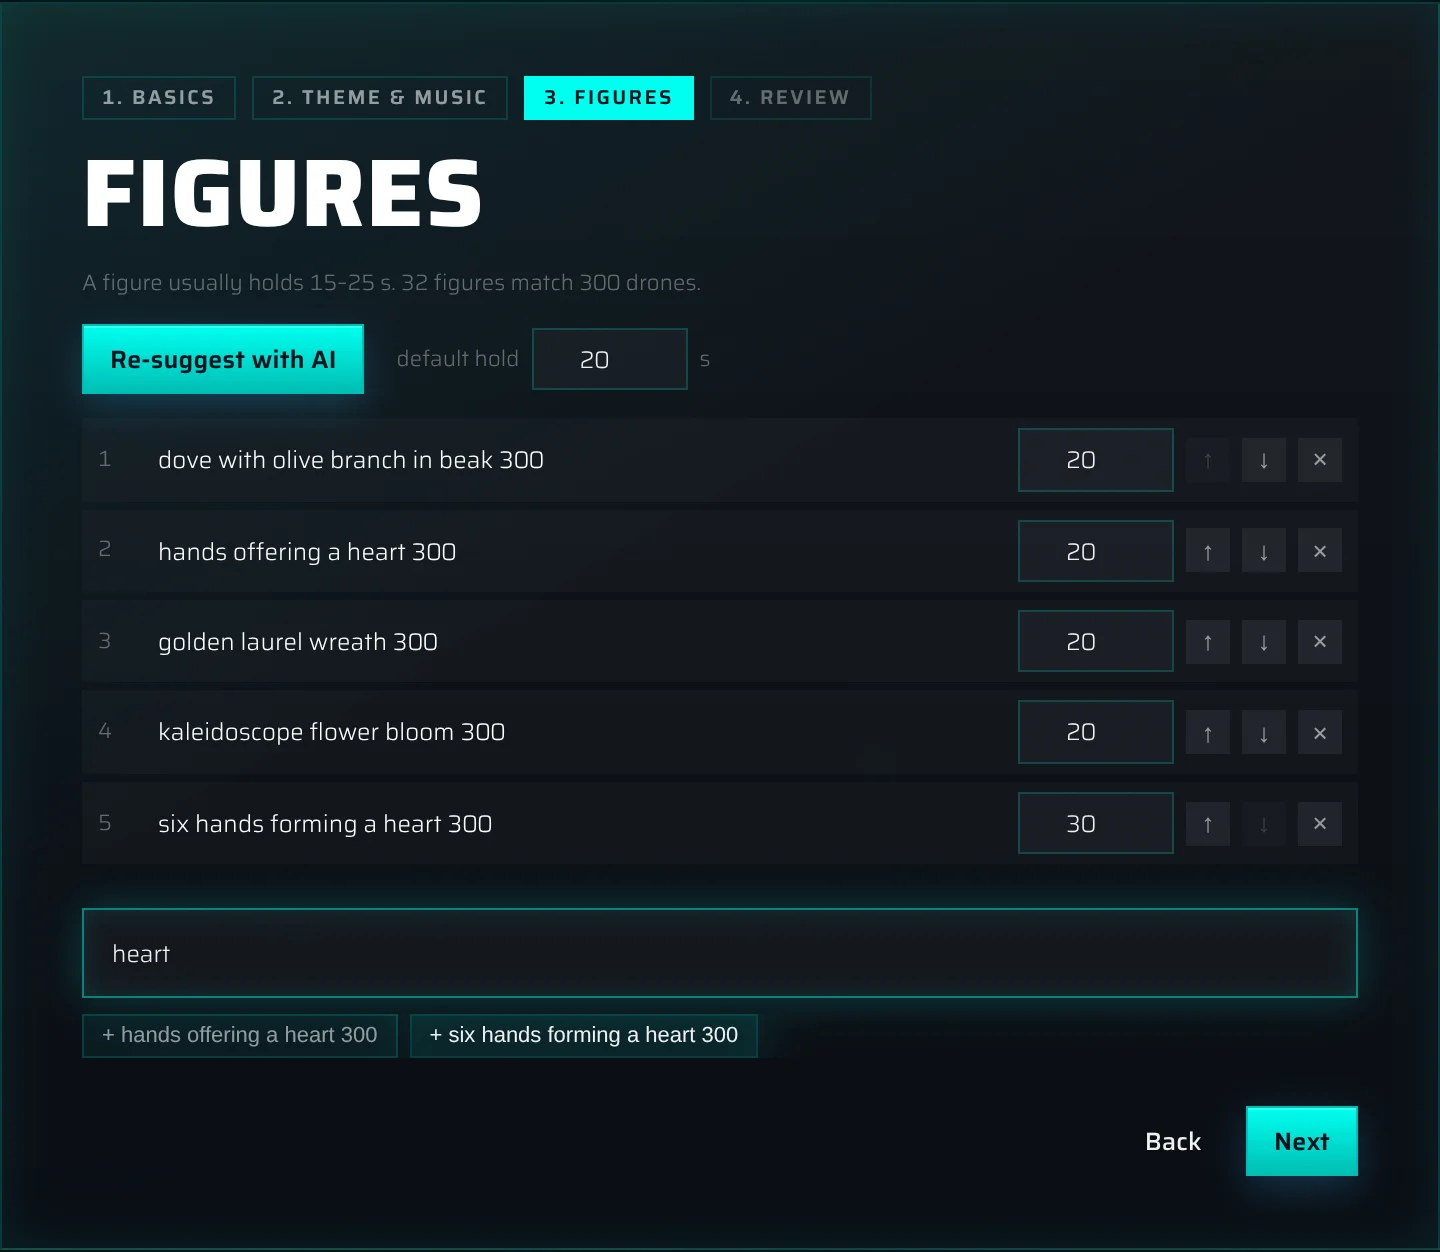
The line at the top tells you how many figures match your drone count. Two kinds of figures are offered: library figures, which fit any drone count, and your own figures made for exactly that number of drones (see Figures in a show).
- Click Let AI suggest a set. The AI assistant picks figures that suit your occasion, mood and notes; how many depends on the length you chose and the default hold. Click Re-suggest with AI for another set. If the assistant can't help (for example, your AI allowance is used up), you see "The AI couldn't suggest figures: … Add figures from the library below." and the list stays as it was.
- Set default hold: how many seconds each figure stays on screen. Changing it applies the new value to every figure in the list. A figure usually holds 15–25 s.
- Adjust the list: type a hold time per figure, move figures with ↑ and ↓, remove them with ×.
- To add figures yourself, type in search library to add… and click a + entry in the list below it. If nothing matches, the Builder offers Order this figure: our designers can make it for you (see Order a figure the library doesn't have).
You need at least one figure to continue.
Step 4: Review
The Builder assembles the show ("Assembling… computing transitions"). The table lists every block in order: Scene rows are figures, Morph rows are the transitions between them, with their start time, start frame and length. The line above it sums up the figures, segments and total length (and the tempo, with music). If you added music, the block boundaries are moved onto nearby beats.
Click Create show. The show opens in the Builder and appears in your list of shows.
Start from scratch#
New blank show asks for two things:
- Drones: type a number or pick one of 100, 144, 200, 300, 450, 500 or 1000.
- Limits preset: the speed and spacing limits of your drone system (see Speed presets). The line below the selector shows the preset's values. The default is HighGreat [RIFF].
Click Create show. You get an empty show named after today's date, for example Show · 5 Nov; add figures with + Figure on the timeline. You can change the preset later in the show parameters.
The Builder screen#
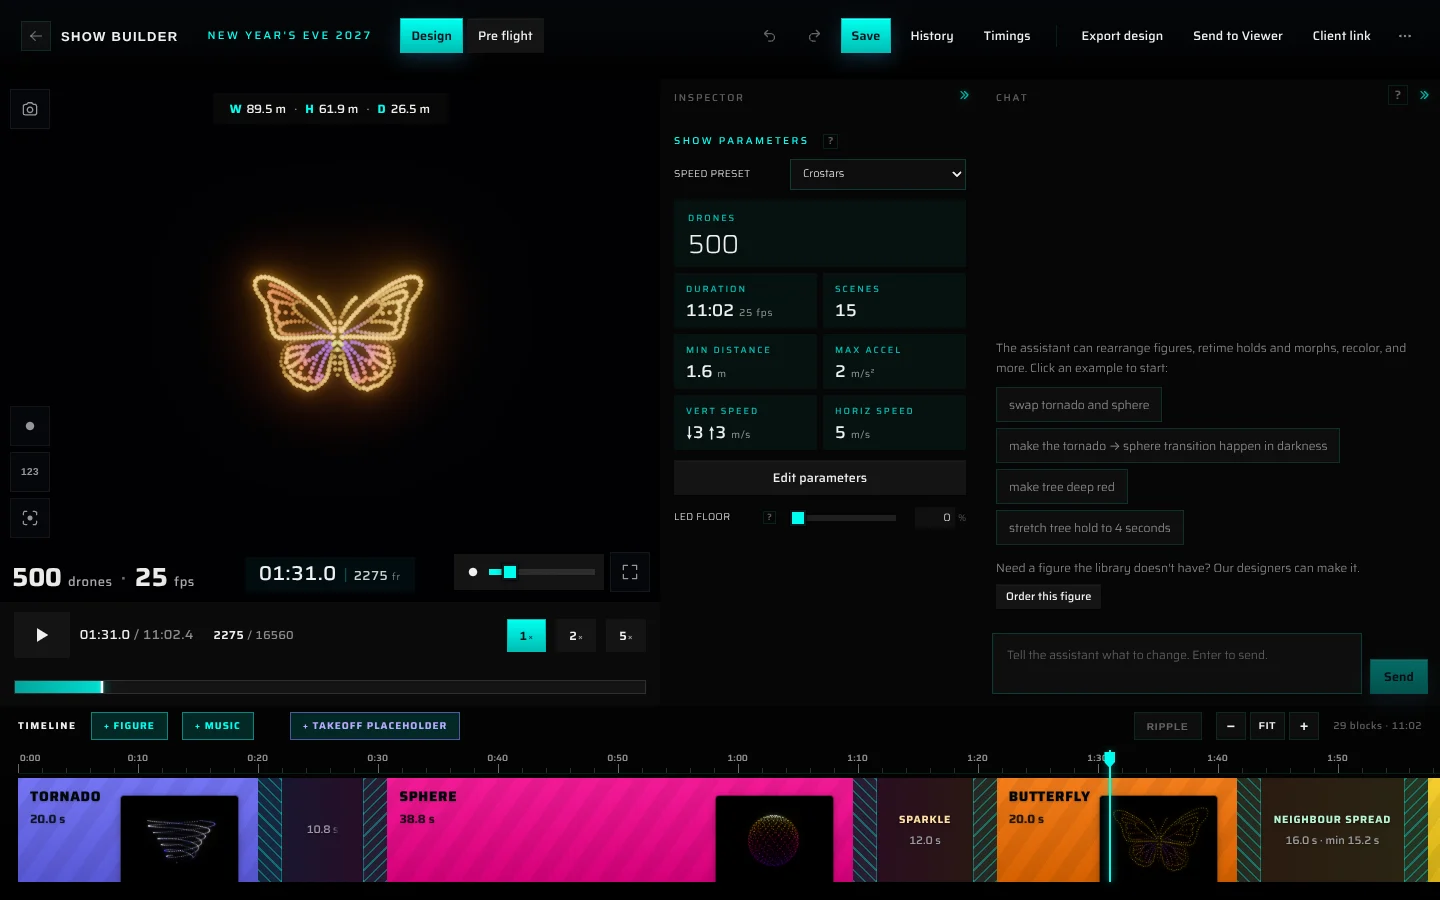
The header#

From left to right:
| Control | What it does |
|---|---|
| Show Builder | Back to your list of shows. |
| Show name | Click to rename the show. Enter saves the name, Esc cancels. A name the Builder made up is shown dimmed and underlined until you choose one; the first time you export the show or send it to the viewer, the Builder asks for a name, because it goes into the file names and the viewer. |
| Design / Pre flight | The two tabs. Design is the show itself: timeline, figures, transitions and effects. Pre flight is site placement, takeoff and landing, simulation and flight files; see Pre flight and export. |
| Undo / Redo arrows | Step back and forward through your changes (see Undo and redo). |
| Save | Saves the show and adds a named point to its version history. Shows Saved ✓ for a moment. |
| History | Opens the version history. |
| Timings | Opens the show timings table. |
| Export design | Downloads the show itself, without takeoff and landing, as a .usd file. On the Pre flight tab this button becomes Export full. |
| Send to Viewer | Publishes the show to a project in the 3D viewer (see Sending a show to the viewer). On Pre flight it becomes Send full to Viewer. |
| Client link | A link to send your client: the show on its own page, with comments on (see A link for your client). |
| ⋯ (More actions) | New show… opens the start screen. |
Notices about teammates (the edit lock, a newer version, a deleted show) appear in a bar at the top centre; see Working on a show with your team.
The Design tab#
The Design tab has four areas:
- the viewport (top left): the 3D view of the show, with the transport bar under it;
- the Inspector (top middle): settings for the selected block, or the show parameters when nothing is selected;
- the Chat (top right): the AI assistant, see The AI assistant;
- the timeline (bottom, full width).
To resize the Inspector or the Chat, drag its left edge. To fold one away, click its header strip (or the double chevron); it shrinks to a narrow strip with its name, and a click on the strip opens it again. The Builder remembers sizes and folded panes in this browser.
The figure browser (+ Figure) and the colour effect library open over the top row. The timeline stays usable underneath, so you can drag figures straight onto it.
Show parameters#
When no block is selected, the Inspector shows Show parameters: the settings that apply to the whole show.
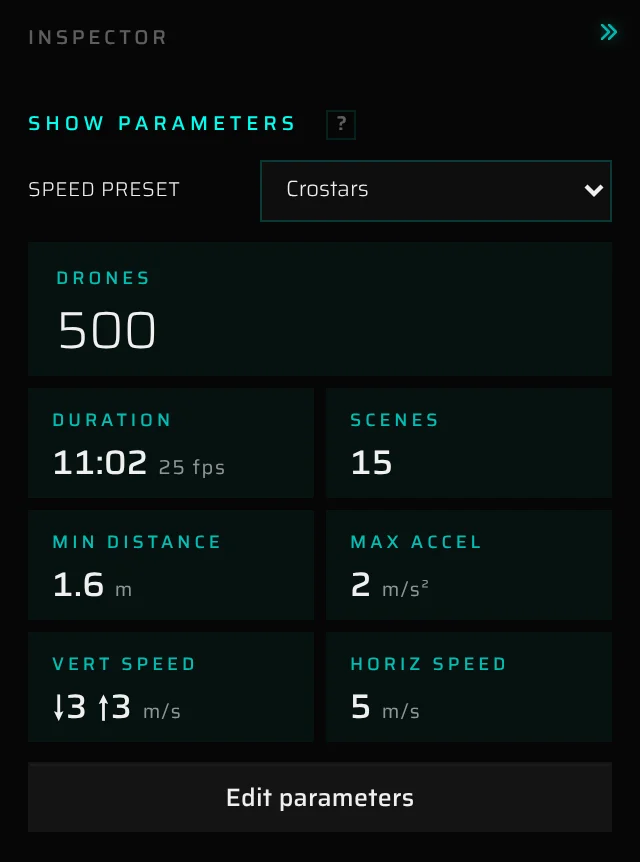
- Speed preset: the preset that sets the flight limits and the frame rate. Choosing one applies it to the whole show and recalculates it. If you have edited the limits by hand and they match no preset, the selector shows Custom.
- The tiles show Drones, Duration (length and frame rate), Scenes (number of figures), Min distance, Max accel, Vert speed (down ↓ and up ↑) and Horiz speed.
- Edit parameters turns the limit tiles into input fields (the Duration tile becomes FPS). Click Apply to apply all changes at once, as one undo step, or Cancel (Esc) to drop them. FPS must be a whole number from 1 to 120, and every limit must be above zero; otherwise a message under the tiles says what to fix.
After a change to the limits, transitions that have become too short for the new limits are marked on the timeline (see Transitions that are too short). Nothing is removed.
The Drones tile can't be edited. To change the drone count of an existing show, ask the assistant in the Chat (see The AI assistant). This only works when every figure in the show is a library figure: your own figures have a fixed drone count and can't be resized.
Speed presets#
The Speed preset list has presets for several drone systems, among them HighGreat [EMO], HighGreat [RIFF], Evsky, FlyStack, Drotek [default vel], Damoda and Crostars. Each preset sets the frame rate, the minimum distance between drones, the vertical and horizontal speed limits and the acceleration limit of that system; the tiles show the values once you pick one. Use the preset of the drones that will fly the show, or edit the values to match your fleet.
The timeline#
The timeline runs along the bottom of the Design tab. Time runs from left to right; the ruler on top shows minutes and seconds.

The timeline header holds:
- + Figure: opens the figure browser (see Adding figures);
- + Music, or the loaded track with its tempo and Offset (see Add music to a show);
- + Takeoff placeholder, while the show has none (see Takeoff placeholder);
- Clear (×), while a block is selected;
- Ripple, and the zoom buttons −, Fit and +;
- a summary such as "29 blocks · 11:02" (with music, also the tempo).
When the show is empty, the timeline says "Show is empty — press "+ Figure" to add the first one, or ask the chat to generate a show."
Blocks#
The show is a row of blocks of two kinds, always alternating:
- Figure blocks (holds): a figure on screen. The block shows the figure's name, how long it holds and a small preview, tinted with the figure's main colour. When a block is too narrow for the name, it shows the scene number instead (for example "03").
- Transition blocks (morphs): the flight from one figure to the next. The block shows its colour effect and its length with the minimum it needs, for example "12.0 s · min 11.8 s". The wedges at its ends show how long the departures and arrivals are spread out.
Hover over a block for a summary: name, start time, length and, for a transition, its settings.
Selecting a block#
Click a block to select it. The Inspector shows its settings, and if the playhead is outside the block, it jumps to the block's start. Click the block again, click Clear (×) or press Esc to deselect.
While a block is selected:
- playback loops over the block plus 3 seconds before and after it, so you can see how it blends into its neighbours. The transport bar zooms to that window, marks Segment start and Segment end and shows scoped;
- the assistant in the Chat works on that block only (see Work on one block: Hard focus);
- the show parameters are hidden. Deselect the block to see them again.
Reordering blocks#
Drag a block and drop it on another block of the same kind: the two swap places. A figure swaps with a figure, a transition with a transition, so figures and transitions keep alternating. While you drag, the blocks slide to show the result. Dropping on a block of the other kind does nothing.
Without a mouse, use Order in the Inspector: Earlier and Later swap the selected block with the previous or next block of the same kind.
Changing durations#
To change how long a block lasts, drag the edge between two blocks:
- By default the two neighbours trade time: one grows, the other shrinks by the same amount, and everything after them keeps its timing. This keeps the rest of the show in sync with the music.
- Hold Shift while you drag, or switch on Ripple in the timeline header, to ripple instead: only the block on the left changes, and the rest of the show moves later or earlier.
While you drag, the exact time of the edge appears on it (minutes:seconds.tenths). Edges move in whole frames. With music loaded, an edge snaps to a nearby beat, bar start, section change or strong hit (within a quarter of a second). If you drag close to the left or right side of the timeline, it scrolls along.
There is always some empty space after the last block, so you can grab the last block's right edge and make the show longer.
- When you drag, a figure block stops at 0.5 s.
- A transition can be made shorter than the drones need. It is then marked in orange; see Transitions that are too short.
- To type an exact length, select the block and use Duration in the Inspector. A change there moves the rest of the show (like ripple).
Deleting blocks#
Hover over a block and click its × ("Delete this segment"). Deleting a figure also deletes the transition leading into it (or, for the first figure, the one after it), so the figures on either side stay connected by one transition.
The right-click menu#
Right-click a block for a short menu:
- on a figure block, Add figure after opens the figure browser; the figures you add go right after this block;
- on a transition block, Set to minimum time sets the transition to the shortest time the drones need. The figure before it absorbs the difference, so the next figure keeps its start time.
Playhead, scrubbing and zoom#
The playhead is the line across the ruler and the lanes.
- Click the ruler to jump to a moment; drag along it to scrub. Grabbing the ruler pauses playback and keeps your block selection.
- Clicking or dragging on the music lane also moves the playhead, and clears the block selection.
- Zoom with − and +, or hold Ctrl (⌘ on a Mac) and turn the mouse wheel over the timeline; the zoom keeps the moment under the pointer in place. The mouse wheel alone scrolls the timeline sideways.
- Fit zooms out so the whole show fits the width of the timeline. The timeline can only zoom out so far, so on a typical screen a show longer than about five minutes still needs scrolling.
- Drag the top edge of the block lane to make the blocks taller or shorter. The music lane has the same handle.
Playback and the viewport#
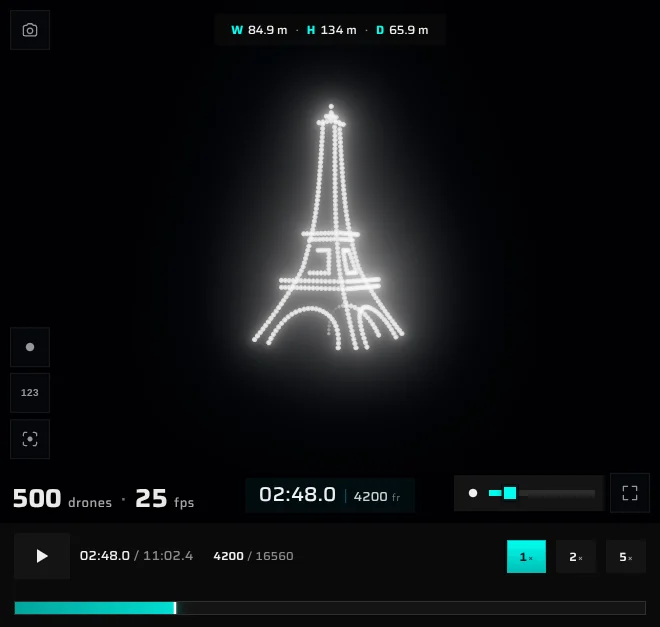
The transport bar#
Under the viewport:
- the play / pause button (or Space anywhere on the Design tab, except while typing in a field);
- the current time and the total length (minutes:seconds.tenths), then the current frame and the total number of frames;
- 1×, 2× and 5×: playback speed, for a quick run-through;
- the bar itself: click or drag on it to move through the show.
Playback starts over from the beginning when it reaches the end. While library figures are still being prepared, resampling… appears next to the speed buttons. A loaded music track plays along in sync (at 1× only).
The camera#
- Drag to orbit, right-drag to pan, use the mouse wheel to zoom. On a touch screen, one finger orbits and two fingers pinch to zoom and pan.
- Until you move the camera yourself, it frames the whole show automatically. The Refit button re-frames the view and turns automatic framing back on.
Viewport controls and readouts#
| Control | Where | What it does |
|---|---|---|
| Camera button (Save preview) | Top left | Saves the current view as the show's card image in your list of shows. |
| W · H · D | Top centre | Width, height and depth of the formation on the current frame, in metres. |
| White dot | Left | Shows every drone in pure white, which makes shapes easier to judge. |
| 123 | Left | Shows each drone's number next to it. |
| Refit (frame corners) | Left | Re-frames the camera to the show. |
| "500 drones · 25 fps" | Bottom left | The show's drone count and frame rate (the rate the show is built and exported at, not your screen's frame rate). |
| Timecode | Bottom centre | The playback position (minutes:seconds.tenths) and the frame number. |
| Point size slider | Bottom right | The size of the drone dots on screen. The Builder remembers it. |
| Fullscreen | Bottom right | Shows the viewport full screen. |
After every edit the Builder recalculates the show; a small Solving… N% badge shows the progress, and the viewport keeps showing the previous version until the new one is ready. If the show can't be built, a notice under the viewport says why (for example a missing figure or a drone count over your limit).
Saving a preview image#
The image on a show's card in your list of shows is a snapshot of the viewport:
- Play or scrub to a good moment and frame it with the camera.
- Click the camera button at the top left of the viewport.
- Preview saved appears next to it. The show's card now uses this image.
Saving and autosave#
The Builder saves your work as you go:
- every change is stored in this browser within a couple of seconds, so a crash or a closed tab loses nothing;
- a few seconds after you stop editing, the show is saved to your account. That copy is what your list of shows, your teammates and your other devices see.
You never have to press Save to keep your work. Press it when the show reaches a state worth remembering: it saves at once and adds a Saved version entry to the version history.
If the connection drops, keep working: your changes stay in this browser and are sent once the server can be reached again.
Undo and redo#
- Undo: the left arrow in the header, or Ctrl+Z (⌘+Z).
- Redo: the right arrow, or Ctrl+Shift+Z or Ctrl+Y (⌘+Shift+Z / ⌘+Y).
The shortcuts work on any keyboard layout, but not while you are typing in a field. The Builder keeps the last 100 steps. After a page reload, the last 50 steps in each direction come back, as long as you are in the same browser and the show hasn't changed in the meantime. A slider drag counts as one step. Renaming the show and changing the takeoff placeholder are not undo steps.
Version history#
History in the header opens Version history: the saved versions of the show on the server.
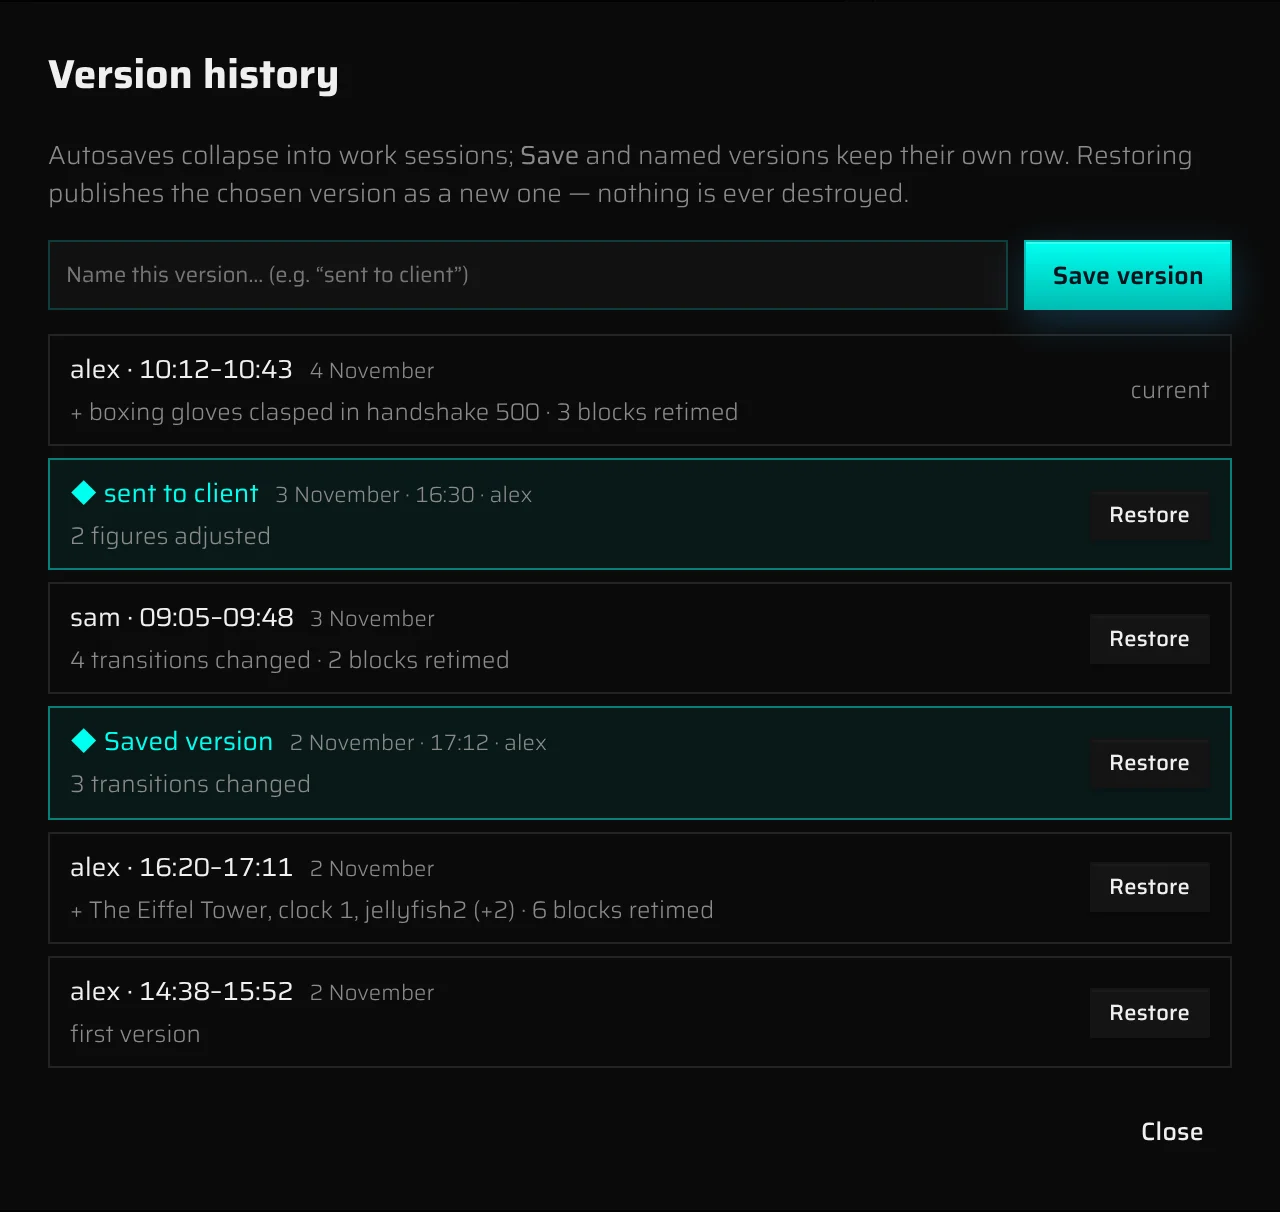
There are two kinds of entries:
- Named versions (marked ◆): created by Save, by Save version in this dialog, and by every restore. They show their name (or Saved version), the date, time and who saved them.
- Work sessions: your autosaves, collapsed into one entry per session. Saves by the same person less than 15 minutes apart belong to one session. The entry shows who worked and when (for example "alex · 10:12–10:43") and a one-line summary of what changed, such as "2 blocks retimed · 4 transitions changed".
The entry you are working on is marked current. Hover over an entry for its drone count and exact time.
To name the current state, type a name in Name this version… (e.g. “sent to client”) and click Save version (or press Enter). Naming versions before you send a show to a client makes it easy to find exactly what they saw.
To go back to an older version:
- Click Restore on its entry.
- The Builder loads that version and the dialog closes.
Restoring never destroys anything: the restored version is saved as a new entry ("Restored rev …") on top of the history, and everything that came after it stays in the list. If a teammate is editing the show right now, the restore is refused ("Restore failed: someone else is editing right now").
A brand-new show has no entries yet: "No server snapshots yet — they appear after the first save."
Show timings#
Timings in the header opens Show timings: the running order of the figures, for a client, a pyro team or a show caller.
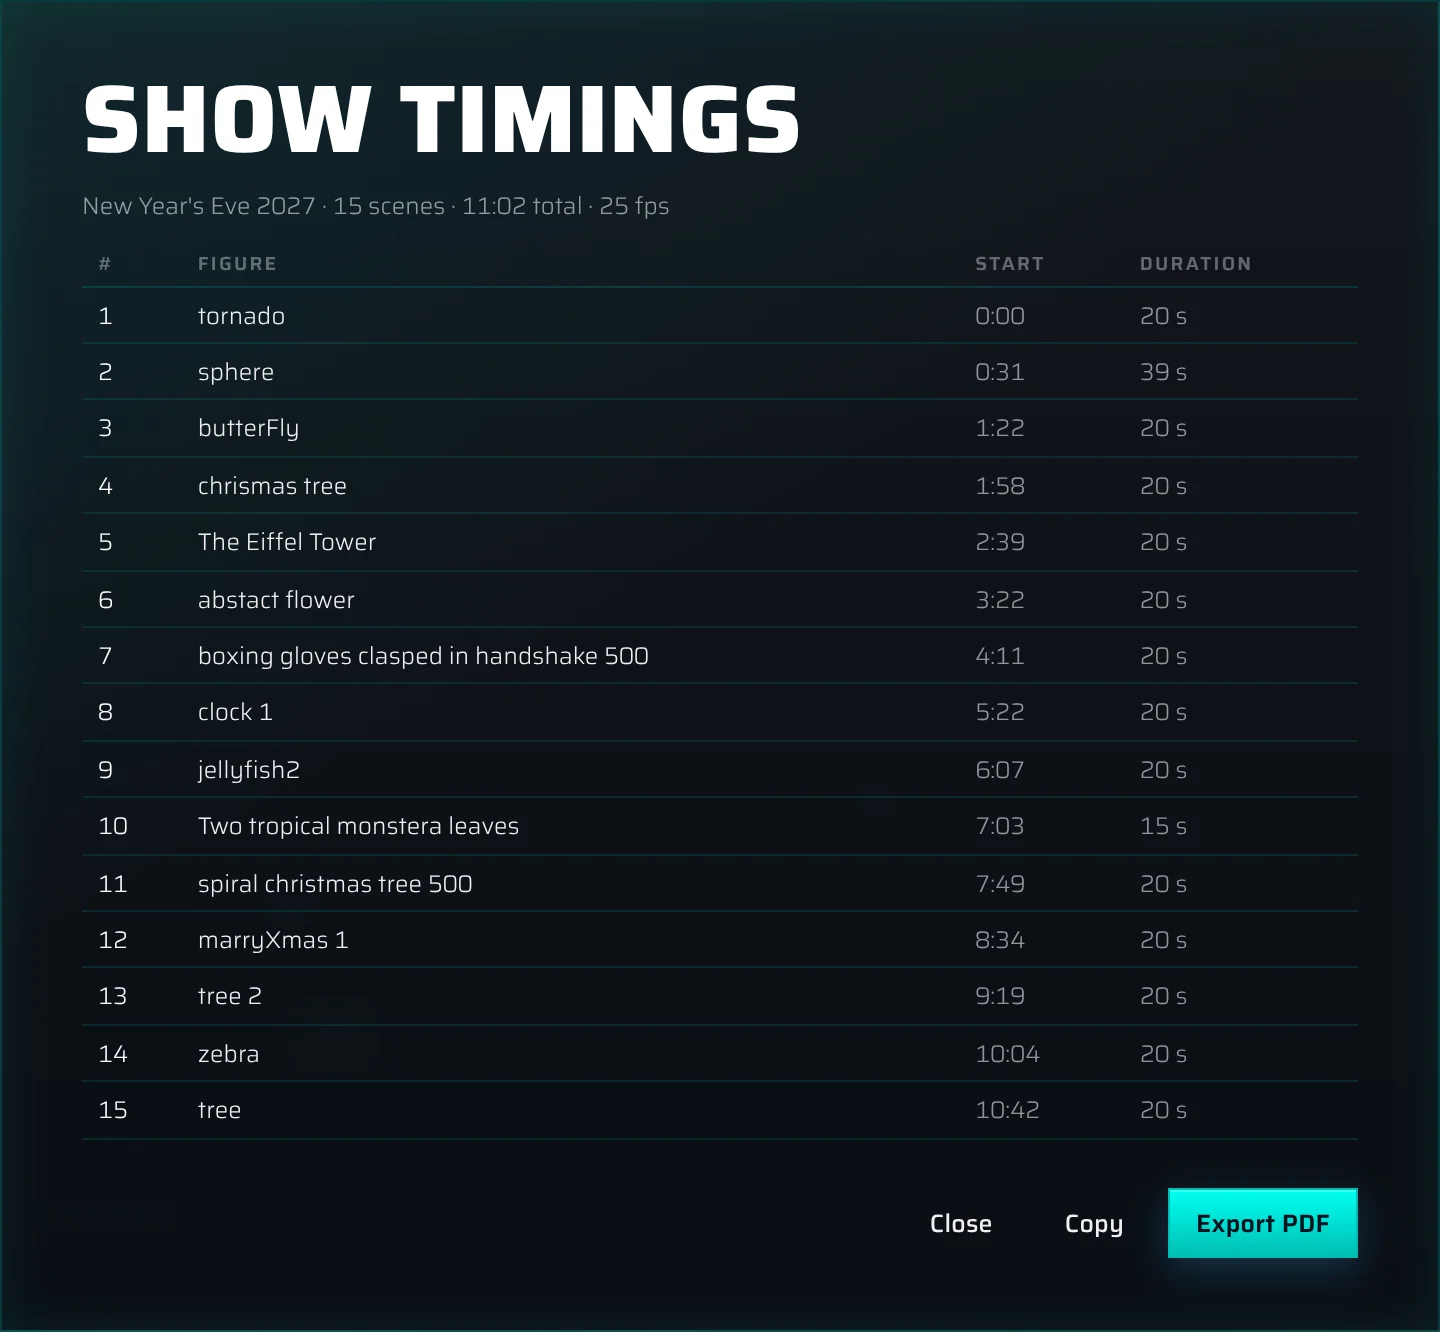
- The line on top sums up the show: name, number of scenes, total length, frame rate and, with music, the tempo.
- The table lists every figure (scene) with its number, name, start time and duration. Transitions are not listed separately; their time is part of the start times. A takeoff placeholder, if the show has one, appears as the first row "Takeoff (placeholder)" without a number, so the scene numbers stay the same.
- With music loaded, times are shown to a tenth of a second; without music, to the second.
| Button | What it does |
|---|---|
| Copy | Copies the list as plain text that reads well in a messenger or email. Shows Copied! when done. If the browser blocks the clipboard, select the table and copy it by hand. |
| Export PDF | Opens a print-ready page and the print dialog; choose "Save as PDF". If nothing opens, allow pop-ups for this site. |
| Close | Closes the dialog. |
The table follows the Design timeline. The automatic takeoff and the landing of the full flight aren't in it; see Timings and the full flight.
Working on a show with your team#
A show shared with a team (see Sharing a show with a team) can be opened by every member with access to it, but only one person edits it at a time.
The edit lock#
Opening a show just to look at it doesn't block anyone. Your first change takes the edit lock, and the Builder keeps it while the show is open in your tab.
If a teammate holds the lock, a bar appears at the top:

🔒 read-only — editing: name means your changes stay on this computer and are not saved to the team. To edit anyway, click Take over: the lock moves to you, the teammate's Builder becomes read-only, and your copy is saved as the newest version. Nothing of theirs is lost; their last save is in History.
The lock is freed as soon as the editor closes the tab or leaves the Builder. A tab that stays in the background stops renewing its lock, and the lock is freed after a short while.
When someone else saves first#
If a newer version of the show reaches the server while you have it open:
- You have no unsaved changes: the Builder loads the newer version straight away and shows ↻ updated to email's version (with the email address of whoever saved it) for a few seconds. Ctrl+Z still brings your previous state back.
- You have unsaved changes: a bar says email saved a newer version. Keep working as long as you like; nothing is lost, because your copy is safe on this computer and theirs is on the server. When you're ready, choose:
- Open theirs: loads their version. Your own edits stay in the undo history (Ctrl+Z).
- Publish mine: saves your version as the newest one. Theirs stays available in History.
The same bar can appear when you edited the show in another browser tab or on another device.
When a show is deleted while it's open#
If the show is deleted from the list of shows (by a teammate, or by you on another device) while it's open, a bar says 🗑 deleted from the team by email — not saving. Your copy stays on screen but is no longer saved. Choose:
- Restore to bring the show back under the same link;
- Save as new to keep working on a copy named "name (copy)". The deleted show stays deleted.
Sending a show to the viewer#
Send to Viewer publishes the show into a project in the 3D viewer, with its music, so you can review it there, analyse it and share a review link with your client.
- Click Send to Viewer in the header.
- The Builder saves the show, packs it and uploads it. The button shows the progress: Sending…, Queued…, Converting 45%, and Ready ✓ at the end.
- When the conversion is done, Show is ready in the viewer asks whether to open the project: Open project or Stay here.
If the viewer can't convert the show, Conversion failed offers Open project, where you can see the error and retry.
- The first send creates a new project named after the show. Later sends of the same show go to the same project, even if you renamed the show or the project in the meantime.
- Each send adds the show to the project as a new entry. Shows sent earlier stay in the project untouched, so you keep a record of what the client has already seen.
- The show's music is attached to it. If the music can't be transferred, the show still arrives, without music.
- If you placed the show on a site on the Pre flight tab, its location becomes the project's location in the viewer.
- The project in the viewer gets an Open in builder link back to this show.
- Sending counts toward your account's projects, shows and storage (see Limits and quotas). If a send is refused, Send to Viewer failed shows the reason.
On the Design tab you send the show itself. On the Pre flight tab the button becomes Send full to Viewer and sends the full flight, with takeoff and landing; see Send the full flight to the 3D viewer. If the show hasn't been built yet, you see "Nothing to send yet".
A link for your client#
Client link in the header gets you a link to send your client in one step:
- If this version of the show isn't on its viewer page yet, the Builder sends it first, exactly like Send to Viewer (the button reads Sending…). When the page already has it, nothing is sent again.
- The project's share page is set to Client preview with Comments on (see Choose what visitors see): your client can watch, switch cameras and leave comments, the engineering tools are hidden, and you get their comments by email.
- Link for your client shows the link: Copy link, Open the page to see what your client sees, or Share settings to change what the page shows.
Every new version you send lands on the same page and opens first; earlier versions stay in the page's show list. To take one off the page, hide it in the project (see Hide a show from the link).
Export design downloads the show as a .usd file to your computer instead of sending it. During the export a progress badge shows the step (Packing the show, Uploading, Converting to USD, Downloading), the percentage and the time left. Flight files for your drone system are made on the Pre flight tab.
Keyboard shortcuts#
| Key | Action |
|---|---|
| Space | Play / pause (Design tab) |
| Ctrl+Z | Undo |
| Ctrl+Shift+Z or Ctrl+Y | Redo |
| Esc | Deselect the block; close the figure browser or the effect library; stop picking drones in the viewport; leave the start screen |
| Ctrl + mouse wheel over the timeline | Zoom the timeline |
| Mouse wheel over the timeline | Scroll the timeline sideways |
| Shift + drag a block edge | Ripple: move the rest of the show |
| Alt + drag on the music lane | Slide the music against the show |
| Right-click a block | Block menu (Add figure after, Set to minimum time) |
| Double-click a card in the figure browser | Add the figure to the show |
| Enter / Esc in a name field | Save / cancel the new name |
On a Mac, use ⌘ instead of Ctrl. Shortcuts don't fire while you are typing in a text field.
Something missing or unclear? Write to contact@droneshow.store.