Projects and uploads
Organise shows into projects, upload show files, add music, cameras and site layers, and keep an eye on your storage.
Everything you upload lives in a project: one per event, venue or client job. A project holds one or more shows, one music track, cameras, site layers (GPS anchor, KML overlay, 3D scene, satellite map) and one share link for your client. This chapter walks through the Projects page, the project page, uploading shows, and the limits that apply.
The Projects page#
The Projects page is where you land after signing in. You can always get back to it with Projects in the menu on the left. It lists every project you can open, newest first.
Usage at a glance#
The strip at the top of the page has three counters: Projects, Shows and Storage. Each one shows what you use against your account's limit (for example 3 / 5), with a bar underneath. A bar turns red if you are over a limit. While the numbers are being worked out, a counter reads Computing…. A fourth card, Plan, names your plan; on Free and Core it links to the Pricing page.
What counts, and what happens when you reach a limit, is covered in Limits and quotas.
Find a project#
The row above the project cards narrows the list down. The filters combine with each other.
- Search projects… matches the project name and the customer as you type. Capital letters don't matter.
- The customer chips list the six customers with the most projects, each with its number of projects. Click a chip to show only that customer's projects. Click it again, or click All, to clear the filter.
- Uploaded and Builder chips appear only if you have both kinds of project: ones you uploaded files into, and ones created by sending a show from the Show Builder. Click one to see only that kind, and click it again to clear it.
If nothing matches, the page says so and offers Clear search (or Clear search and filter when a customer chip is active).
Change the view#
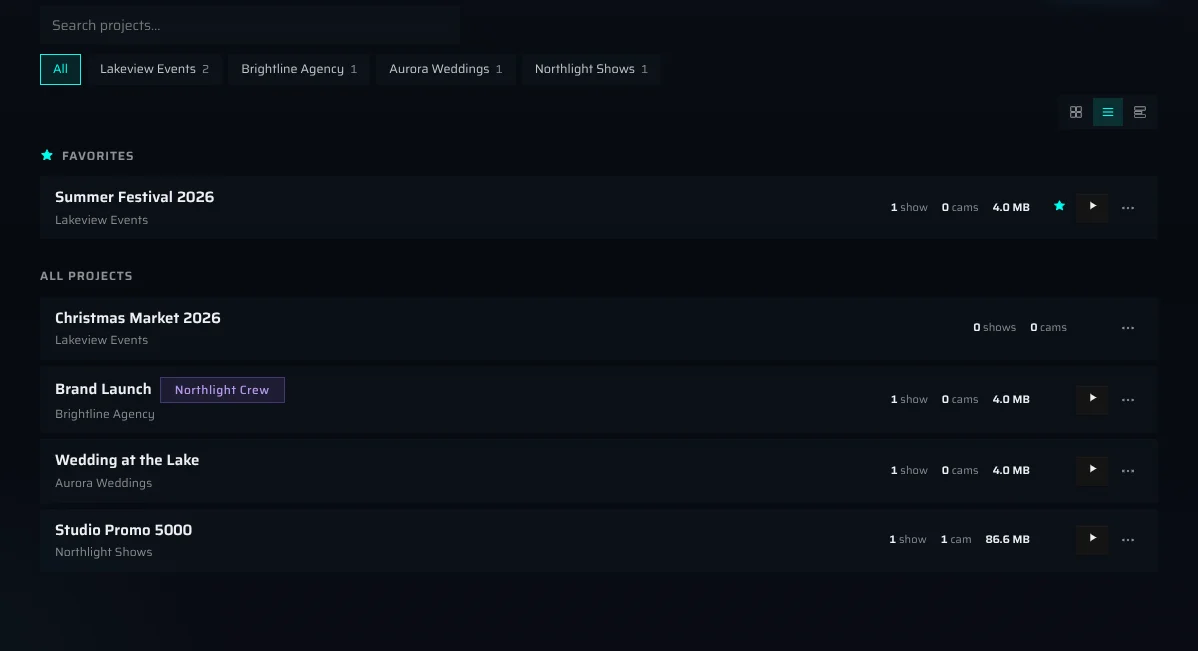
The three buttons at the right end of the filter row change how the list looks. Your choice is remembered in this browser.
| Button | What you get |
|---|---|
| Cards | A grid of project cards (the default). |
| List | One compact row per project. Handy when you have many projects. |
| By customer | Cards grouped under each customer, the customer with the most projects first. Projects without a customer come last, under Unassigned. |
Favourites#
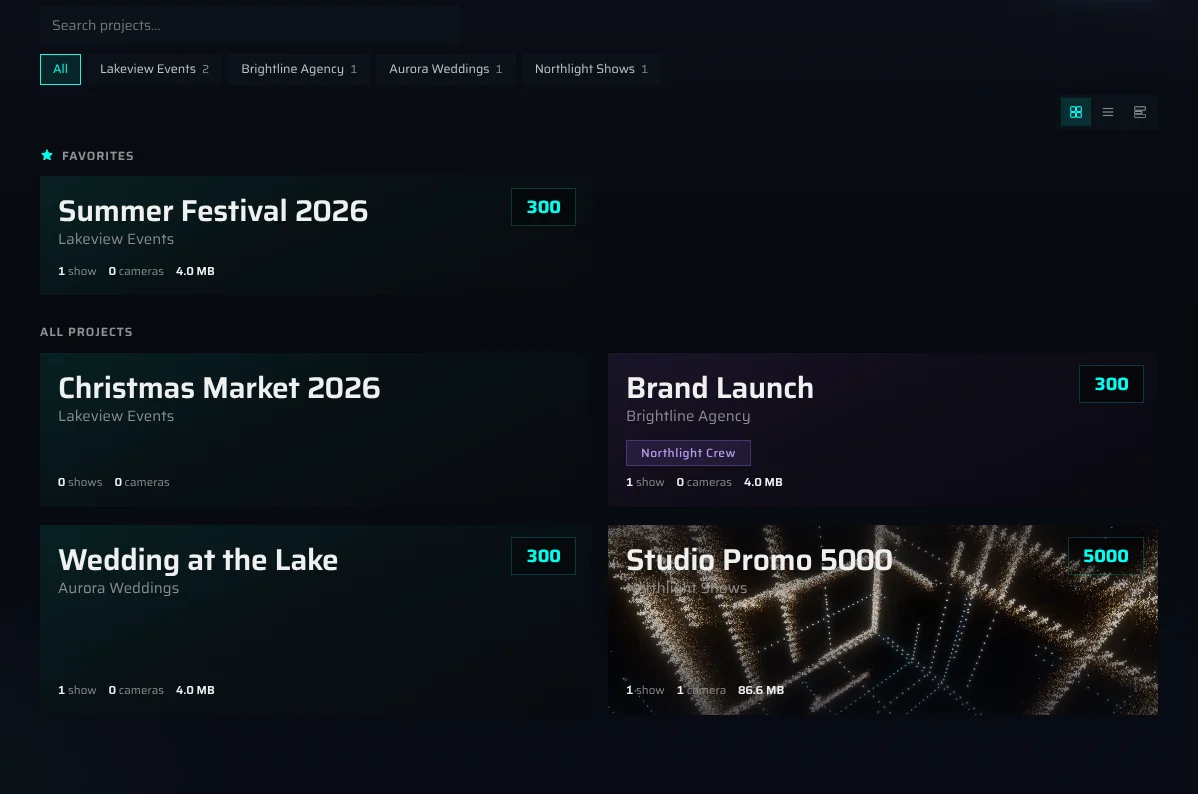
To pin a project to the top, click the star on its card, or choose Add to favorites from its ⋯ menu. Starred projects get their own Favorites section above the others, and the rest follow under All projects. Search and filters apply to favourites too.
Stars are personal: your teammates don't see yours. You can also star a project with the star next to its name on the project page.
Project cards#
A project card shows:
- the project name, with a small builder tag if the project was created from the Show Builder;
- the customer;
- the team name and a violet tint, if the project is shared with a team;
- the largest drone count of any show in the project, in the card's corner (on touch screens, in the stats row);
- the number of shows and cameras, and the disk space the project uses;
- the project's social-share preview as the card background, once you have captured one (see Social-share preview).
Click a card to open the project page. The quick actions appear when you point at a card, and are always visible on touch screens:
- The star adds the project to your favourites, or removes it.
- The triangle (Open latest show in the viewer) opens the newest ready show in the 3D viewer. It appears only when the project has a ready show.
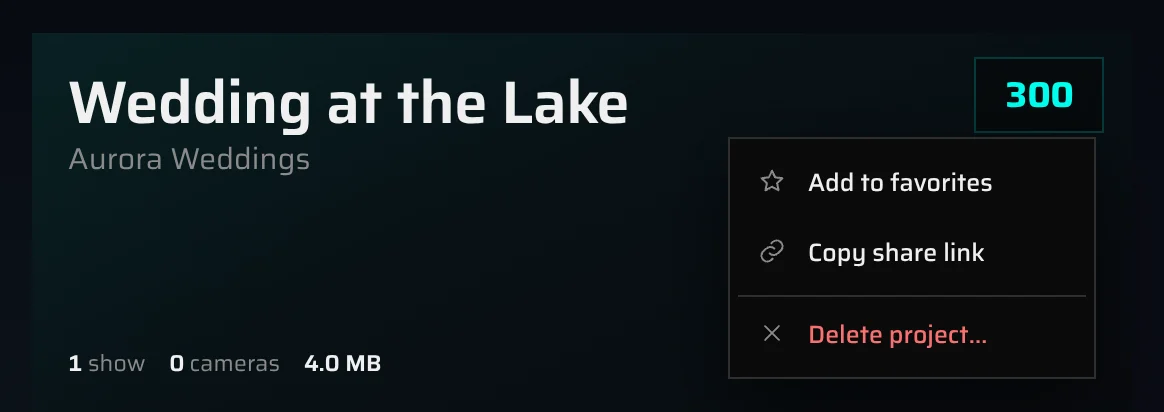
- ⋯ opens a menu with Add to favorites (or Remove from favorites), Copy share link and Delete project…. A check mark briefly confirms the copy.
In List view each project is one row with the same information, except the drone count and the preview, and the same actions.
Your projects and team projects#
The Projects page shows two kinds of project together:
- your own projects, including the ones you have shared with a team;
- projects that teammates have shared into a team you belong to.
Shared projects carry the team's name and a violet tint ("Shared with your team — teammates see this project too"). To see one team's projects on their own, open the team under Teams in the menu. Teams, members and permissions are covered in Teams.
If the list doesn't load#
If the server can't be reached, the page shows Can't load right now with a Retry button. This usually clears up within a minute. If your session has expired, you are taken to the sign-in page instead.
On a phone#
On a narrow screen the menu turns into tiles above the list (see On a phone), the card actions are always visible, and the drone count moves into each card's stats row.
Create a project#
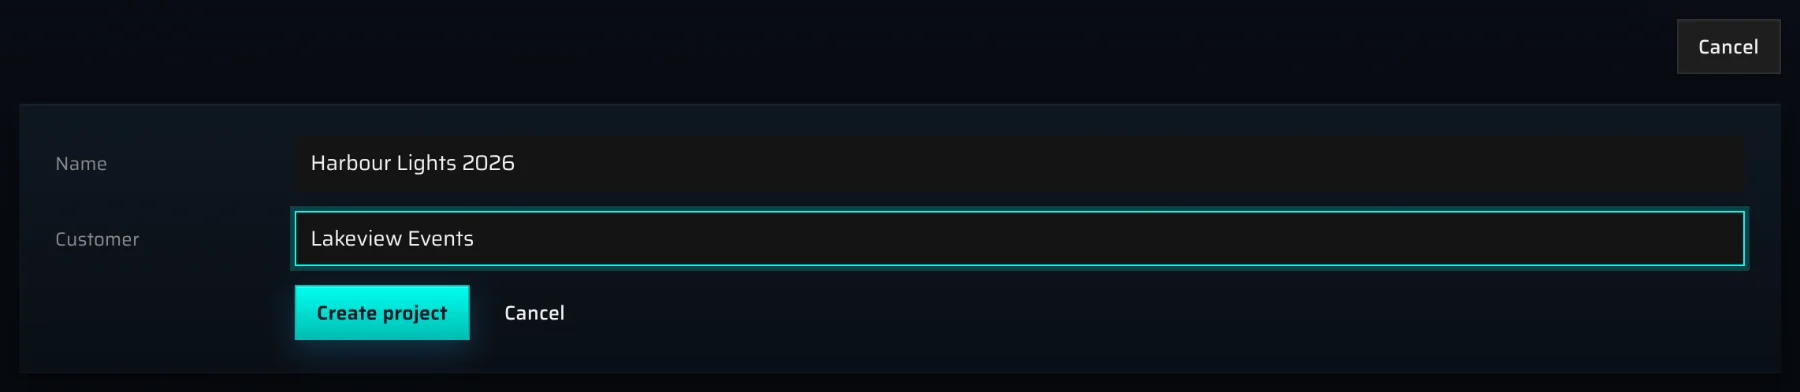
- On the Projects page, click + New project.
- Type a Name, for example "Riga 2026". Names can be up to 200 characters.
- Optionally, type a Customer.
- Click Create project. To close the form without creating anything, click Cancel.
The new project appears at the top of the list. Open it to upload your first show.
A project can't be created if:
- you already have a project with the same name. Capital letters don't count as a difference, so "riga 2026" and "Riga 2026" clash: "You already have a project with this name."
- you created another project a moment ago: "Please wait a few seconds before creating another project."
- you have reached your project limit. See When you reach a limit.
To create a project directly inside a team, use + New project on the team's page. See Create a project in the team.
The welcome project#
New accounts start with a ready-made demo project. It is already converted and playable, so you can try the viewer and the share link before you upload anything of your own. It counts towards your limits like any other project. Delete it once you no longer need it.
The project page#
Click a project on the Projects page to open its project page. This is where you upload shows and manage everything else that belongs to the project.
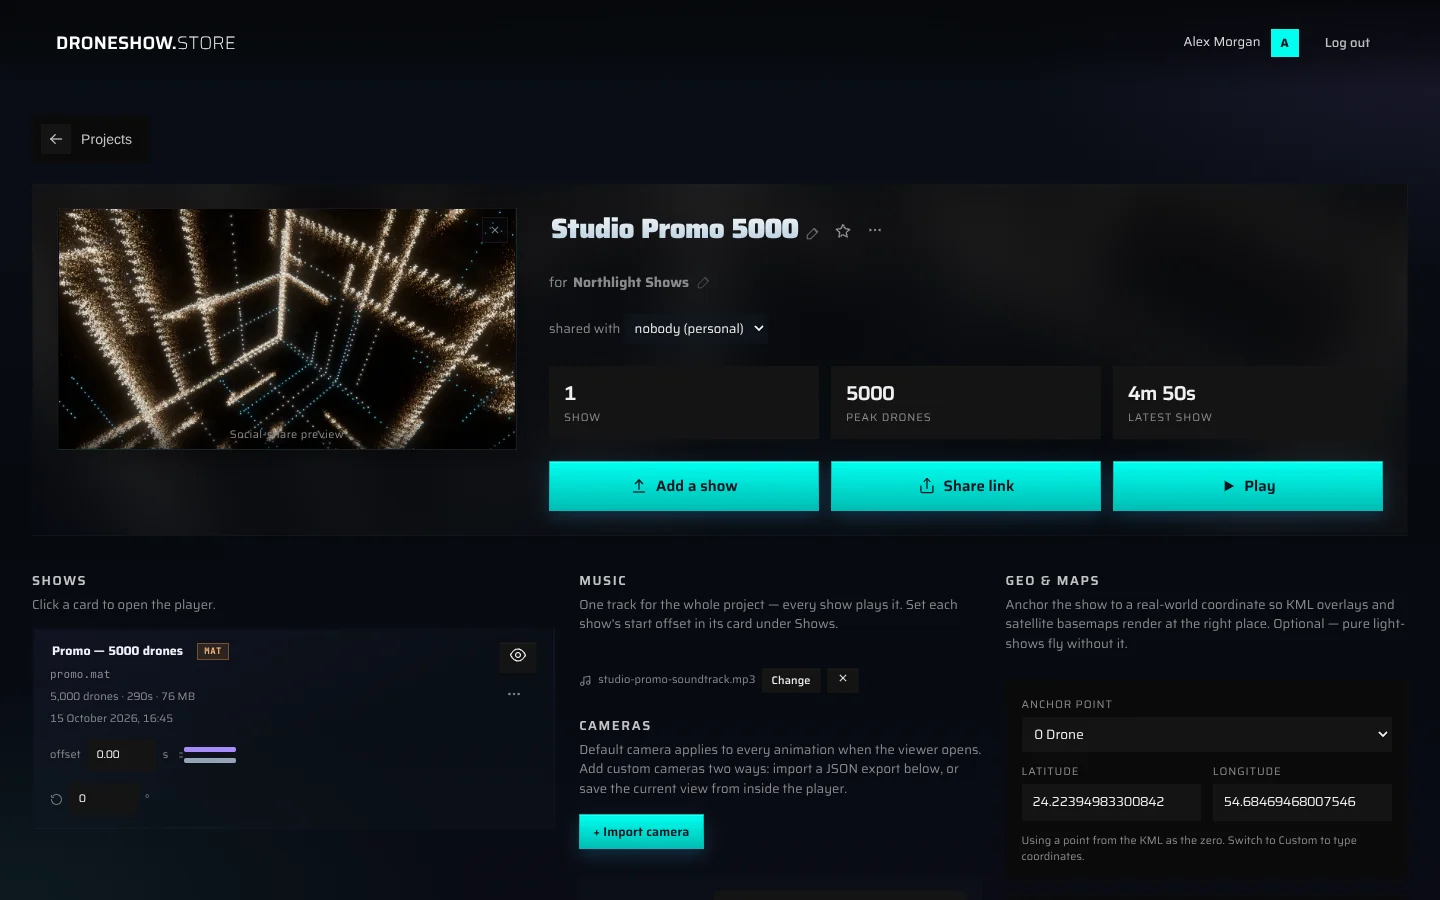
Header#
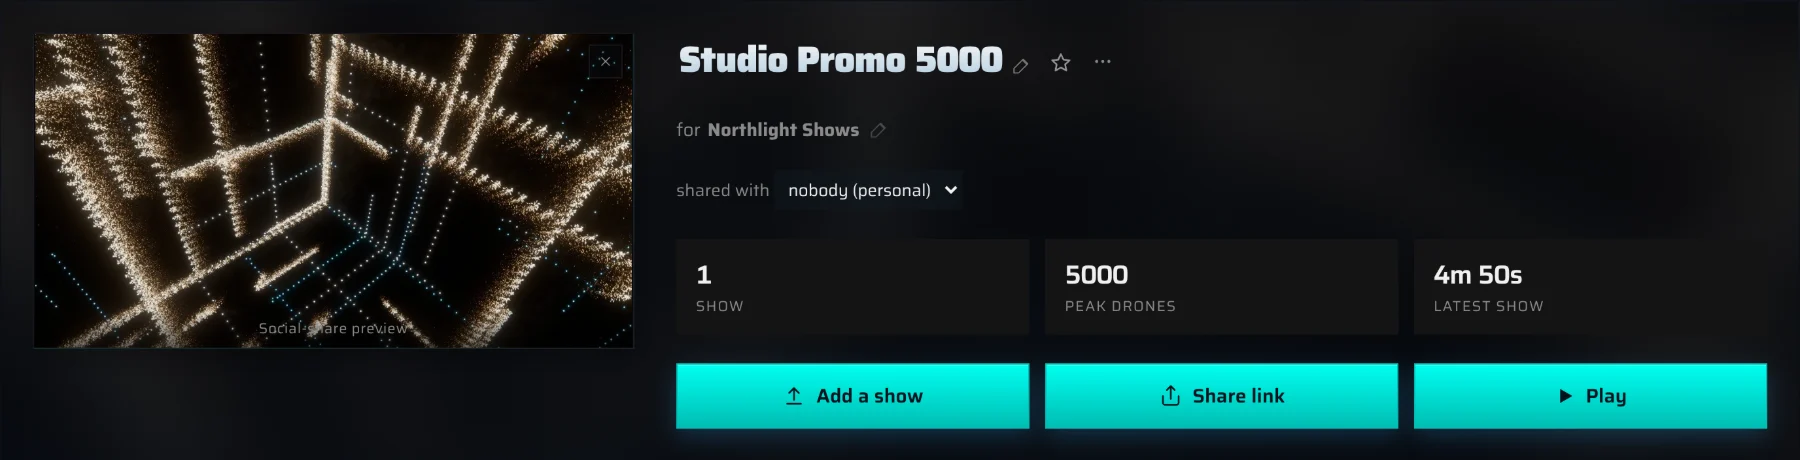
From top to bottom:
- Projects takes you back to the projects list.
- Open in builder appears only on projects created from the Show Builder. It reopens the show the project came from. You need access to the Show Builder.
- The project name: click it (or the pencil next to it) to rename the project. Press Enter or click away to save, or Esc to cancel. The share link keeps working after a rename.
- The star adds the project to your favourites.
- ⋯ has Delete project…. See Rename or delete a project.
- for customer shows the customer. Click it to change it, or click + add customer if there isn't one yet.
- shared with moves the project between your personal space and a team. You see it only if you own the project and belong to at least one team. See Share a project with a team.
- The stats:
- shows counts the ready shows, with "(+converting)" while others are still being processed;
- peak drones is the largest drone count of the ready shows;
- latest show is the length of the newest ready show.
Social-share preview#
The picture on the left of the header is the Social-share preview: the image messengers and social networks show when someone posts your share link. Until you capture your own, the project page shows a default card.
To capture a preview, open any show of the project in the 3D viewer, frame the view you want and click the camera button at the top left. A project has one preview, so a new capture from any of its shows replaces the old one. The preview also becomes the background of the project's card and of the project page header. See Capture the social-card preview and The social preview card.
To go back to the default card, click ✕ on the preview (Reset preview to default) and confirm with Reset preview.
Main buttons#
| Button | What it does |
|---|---|
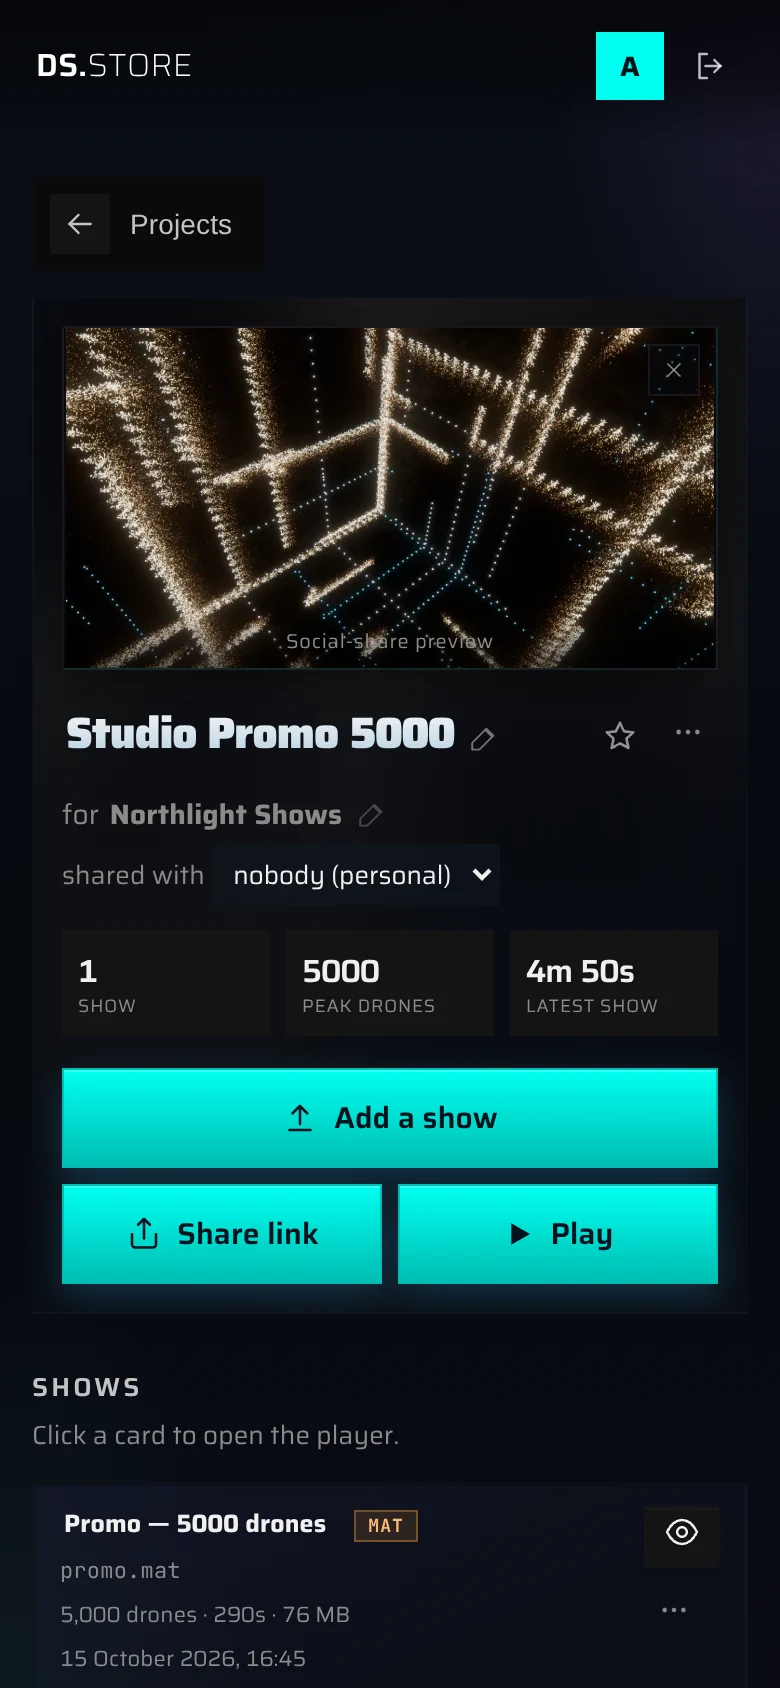
| Add a show | Opens the upload window. See Upload a show. |
| Share link | Copies the project's share link, and the button briefly reads Copied to clipboard. On a phone it opens the share menu instead, so you can send the link straight to a messenger. If the browser blocks copying, a window shows the link for you to copy by hand. See Sharing and client review. |
| Play | Opens the 3D viewer on the show you last watched in this project (in this browser), or on the newest ready show. It stays greyed out until a show is ready ("Upload a show to enable playback"). |
The share link looks like https://app.droneshow.store/p/riga-2026-…. The first part follows the project name, and the part after it is a private code. Anyone with the link can open the share page without an account.
Page layout#
On a wide screen the page has three columns: Shows, then Music and Cameras, then Geo & maps. The Share page settings sit below them. In a narrower window, Geo & maps moves below the first two columns. On a phone everything is one column: Add a show takes a full row, and Share link and Play share the row below it.
Upload a show#
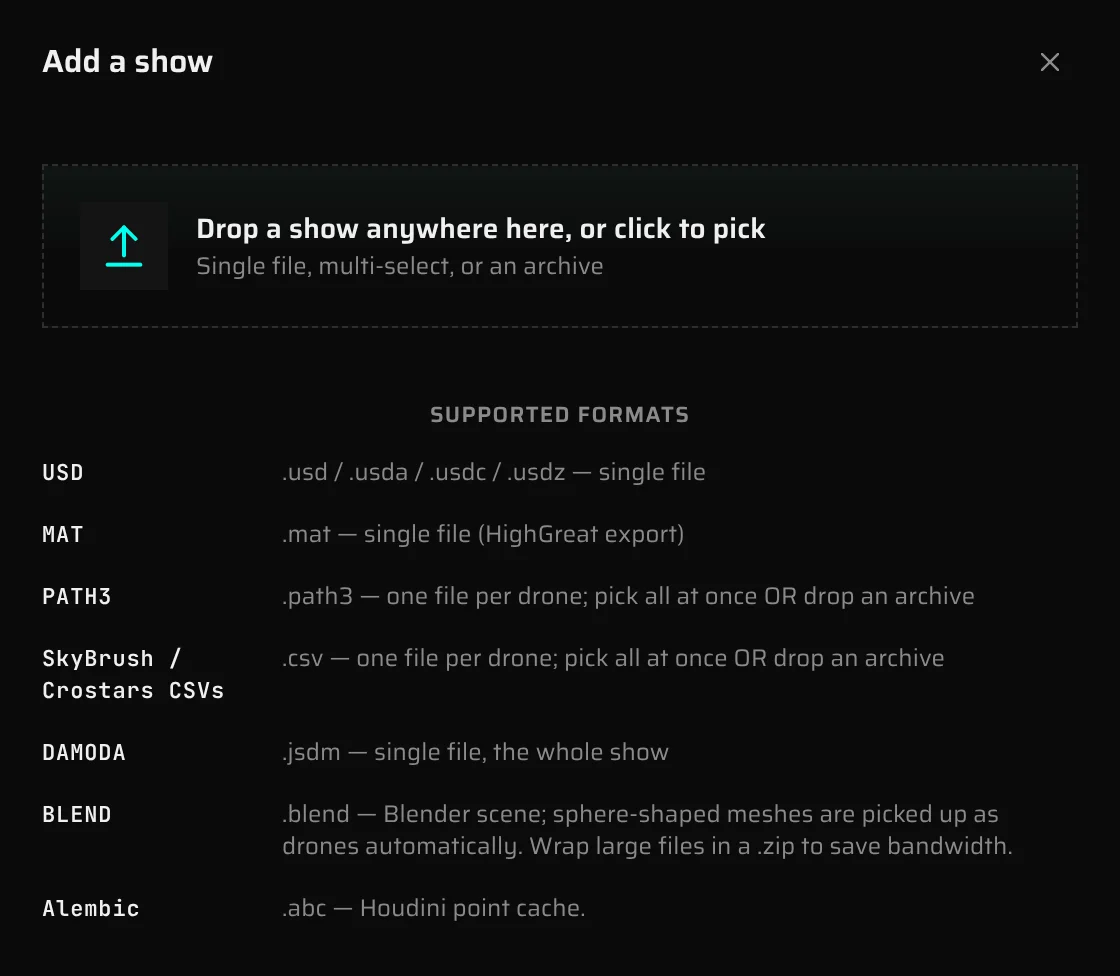
Each upload creates one show in the project. You can upload:
- a single show file (USD, Alembic, Blender, DAMODA, MATLAB);
- a set of per-drone files (Skybrush CSV, Crostars CSV, PATH3);
- an archive that contains per-drone files, one Blender file or one DAMODA file.
Upload a single file#
- Open the project and click Add a show.
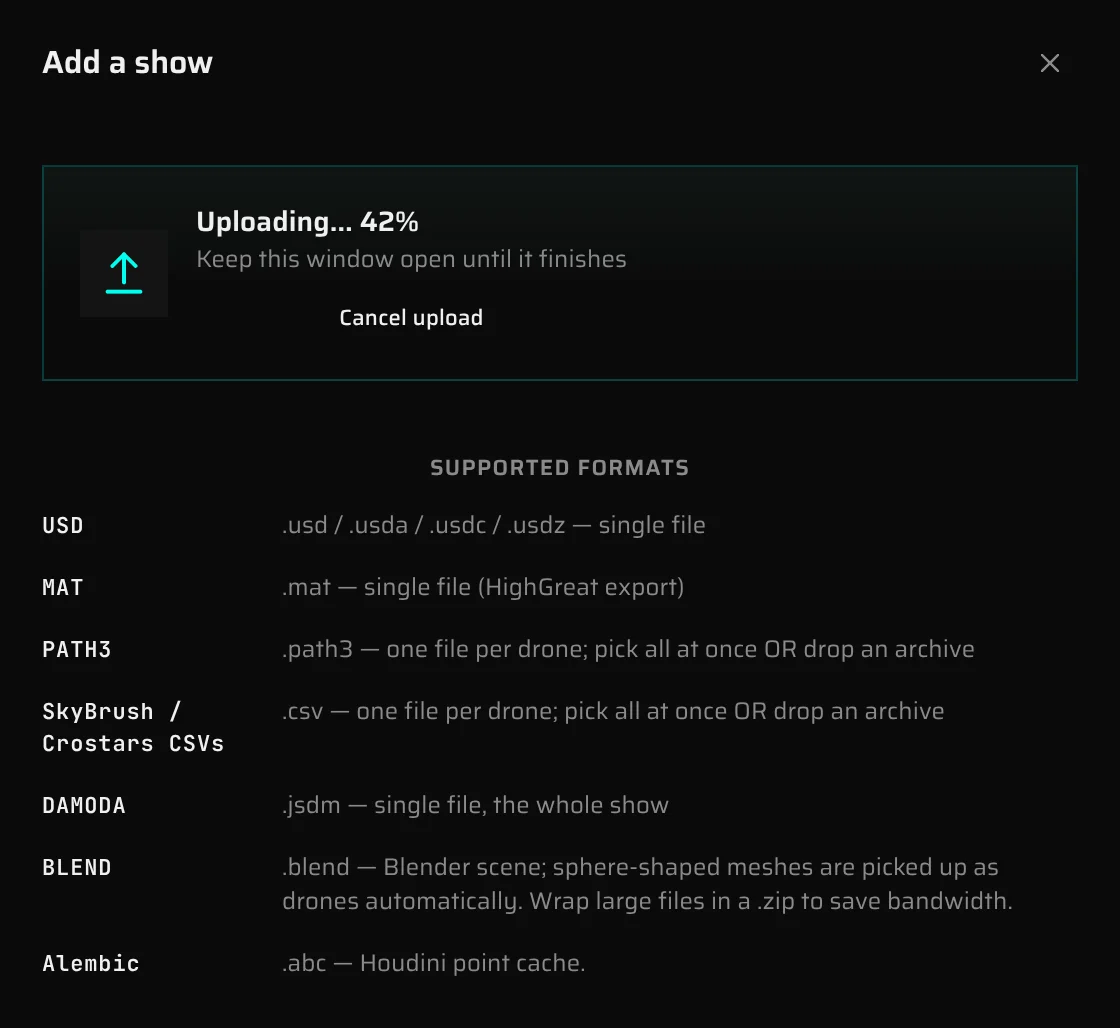
- Drop the file anywhere in the window, or click the dashed area ("Drop a show anywhere here, or click to pick") to choose it.
- Wait for the upload to finish. The window closes by itself, and the new show appears under Shows with a progress bar.
The new show is named after the file, without its extension. Click the name to change it.
To add several shows, upload them one after the other: one upload is always one show.
Upload a show made of per-drone files#
Skybrush CSV, Crostars CSV and PATH3 shows come as one file per drone. Upload them together as one show:
- Click Add a show.
- In the file picker, open the folder and select all the drone files at once (Ctrl+A, or Cmd+A on a Mac). You can also drag them all into the window together.
All the files in one selection must be of the same type: all .csv or all .path3, with nothing else mixed in. Otherwise the upload stops before it starts, with "Multi-file upload only supports per-drone bundles (.path3 or .csv) of a single type."
The show is named after the first file of the selection. Rename it on its card.
Upload an archive#
You can upload a .zip, .tar, .tar.gz or .tgz archive that contains:
- per-drone files (
.path3or.csv); - exactly one Blender file (
.blend); - a DAMODA show (
.jsdm).
USD, Alembic and MATLAB files can't be read from inside an archive, so upload those directly. The format badge on the new show names what was inside the archive: a .zip of PATH3 files reads PATH3.
While the file uploads#
- The window shows Uploading… 42%. At 100% it changes to Finishing on the server… while the server stores the file.
- Keep the window open until it finishes. While a file uploads, Esc and clicking outside the window do nothing.
- To stop the upload, click Cancel upload (or ✕), then confirm with Cancel upload. Keep uploading lets it continue. A cancelled upload adds nothing to the project. If the upload had already finished by the time you confirmed, a message tells you so, and you can delete the new show if you don't want it.
- If you close or reload the tab during an upload, the browser asks first. If you go to another page of the app, the upload is cancelled.
- One upload, including a whole multi-file selection, can be up to 8 GB. Your show and storage limits are checked before the transfer starts.
Processing status#
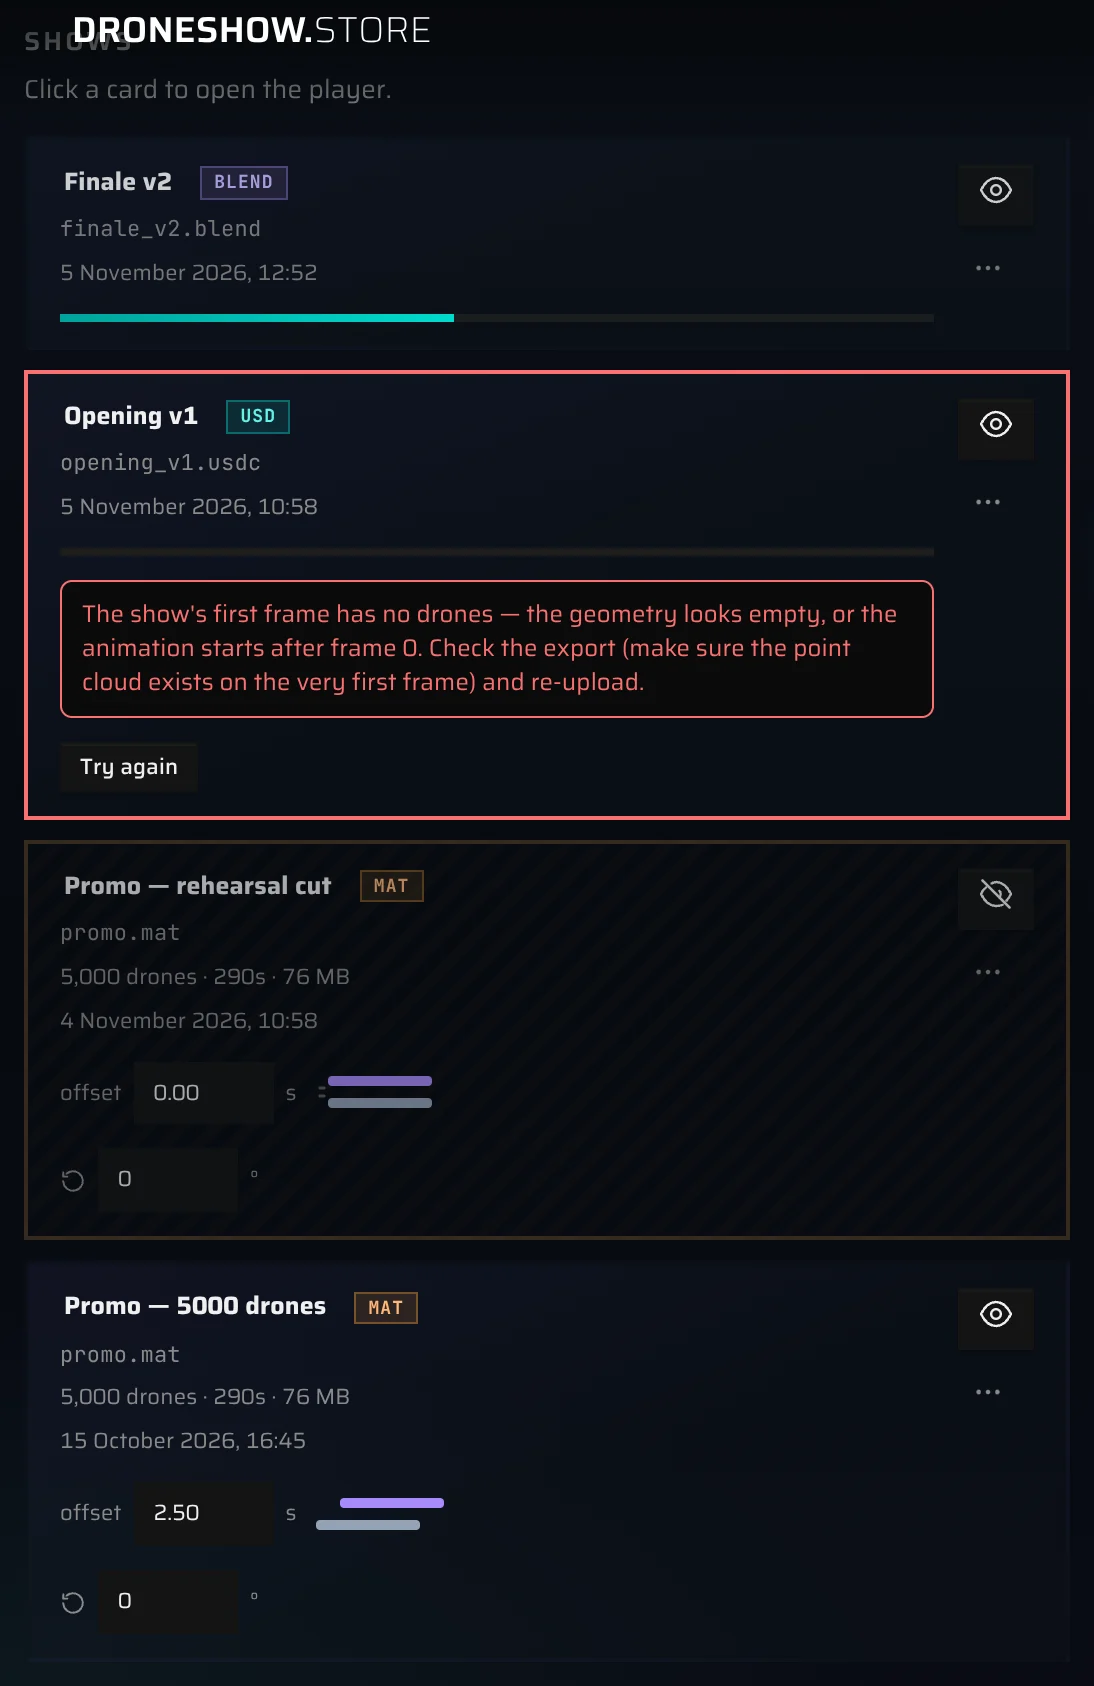
After the upload, the server converts the file into a form the 3D viewer can stream. The show's card under Shows tells you where it is:
| Status | What you see | What it means |
|---|---|---|
| Queued | A slightly dimmed card with an empty progress bar. | Waiting for its turn. Only a few conversions run at a time, so shows uploaded together wait for each other. |
| Converting | A slightly dimmed card whose progress bar fills up. | The file is being converted. |
| Ready | The drone count, length and size, and the offset and rotation fields. | Playable. Click the card to open it. |
| Failed | A red border, a short error message and Try again. | The conversion stopped. See When a show fails. |
The page updates by itself while something is being processed. You can leave the page or close the tab: processing carries on on the server, and the card shows the new status when you come back. A card that isn't ready can't be opened in the viewer.
If the server restarts in the middle of a conversion, the show goes back into the queue and starts again by itself.
Ready means playable#
A ready show plays straight away. The safety analysis (distances between drones, speeds and accelerations) keeps running in the background for a while longer, and you can follow it in the viewer's analysis panel. See Show analysis.
When the analysis has finished, the server deletes your original upload (see What happens to your original files). That's why the size on the card often drops shortly after a show turns ready.
When a show fails#
Read the message on the card first. Most failures come from the file itself: an empty first frame, a missing drone layer, an unexpected column, a USD file that references other files. Troubleshooting lists the common messages and their fixes.
To run the conversion again on the file that's already uploaded:
- Click Try again on the failed card.
- Confirm with Try again in the "Re-queue this show?" window.
Try again helps when something went wrong on the server's side. If the file itself is the problem, fix it, upload it again as a new show, and delete the failed one.
These messages come from the server rather than from your file:
| Message (beginning) | What to do |
|---|---|
| The conversion ran for more than … and was stopped. | Click Try again. Contact us if it keeps happening. |
| The conversion process was killed - most likely the server ran out of memory on this show. | Try again later, or contact us. |
| The conversion process stopped unexpectedly… | Click Try again. |
| The conversion was cut off by a server restart… | Click Try again. |
| The show file is no longer on the server - please upload it again. | Upload the file again. |
If Try again itself fails, the Couldn't re-queue window explains why. "show file missing on disk - please re-upload." means the file has to be uploaded again. "The previous attempt is still running" means you should wait a moment and refresh the page.
Manage shows#
Shows are listed newest first under Shows. A ready show's card shows:
- the show name, and a badge with the format that was read (for example USD, BLEND, PATH3, SkyBrush CSVs);
- the name of the uploaded file;
- the number of drones, the length in seconds and the disk space the show uses;
- the date and time of the upload, which helps tell two uploads of the same file apart;
- the offset field (only if the project has music) and the rotation field;
- the eye button and the ⋯ menu.
Open a show#
Click a ready card to open it in the 3D viewer. When you come back, the list scrolls to the show you opened last. Everything you can do in the viewer is covered in The 3D viewer.
Rename a show#
Click the show's name, type the new one and press Enter (or click away). Esc cancels. Names can be up to 200 characters.
Rotate a show#
The field with the rotate icon turns the show around its vertical axis, in degrees, from −360 to 360. Type a value and press Enter or click away to save it. The rotation applies in the viewer and on the share page. Use it when a show faces the wrong way relative to the site, the map or your cameras.
Set the music offset#
When the project has music, every ready show has an offset field in seconds. It sets where the project's track starts relative to this show:
- 0: music and show start together;
- a positive value delays the music: at
2.5, the music starts 2.5 seconds after the show; - a negative value starts the music early: at
-1.2, the music is already 1.2 seconds in when the show begins.
The small diagram next to the field shows which one starts first. The value is saved when you press Enter or click away, and can be up to 300 seconds either way. To find the right value by ear, set the offset in the viewer, where you hear the change straight away. See Adjust the sync offset.
Hide a show from the share link#
The eye button decides whether the show appears on the share page:
- open eye: Public, visible on the share link;
- crossed-out eye: Hidden, not visible on the share link.
Hidden cards are dimmed with striped amber, so they stand out in a long list. You and your teammates still see and play hidden shows. Use this for work in progress you don't want the client to see yet. See Hide a show from the link.
Delete a show#
- Open the show's ⋯ menu and choose Delete show….
- Confirm with Delete show.
The show and its files are removed permanently. This frees its storage and its place in your show limit.
Music#
A project has one music track, and every show in the project plays it. Each show has its own offset into the track (see Set the music offset).
To add music:
- Under Music, click + Add music.
- Drop an audio file into the window, or click to pick one. You can also pick a file you used before under Saved tracks.
- The track is attached straight away, and the window closes.
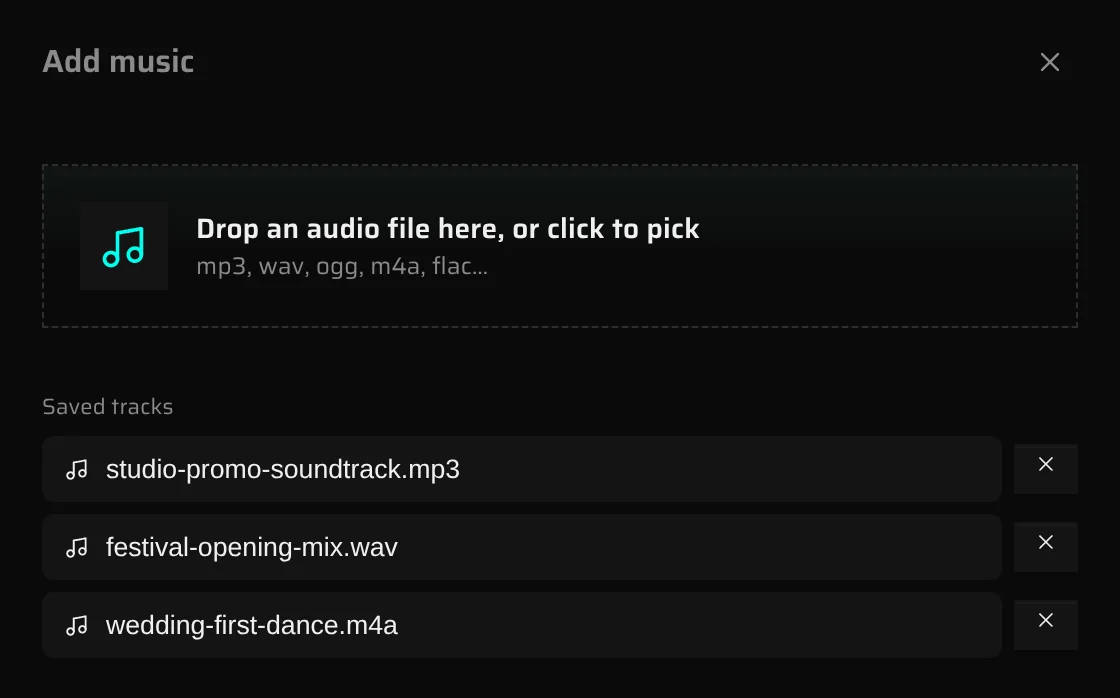
Every file you add this way is also saved to your personal Saved tracks, so you can reuse it in other projects without uploading it again. If you add the same file twice, it's kept once. To take a track off the list, click ✕ next to it (Remove from library). Projects that already use the track keep their copy.
Once a project has music, the Music row shows the file name with:
- Change, which opens the same window to pick another track;
- ✕, which removes the music after you confirm with Remove music.
Accepted files are .mp3, .wav, .ogg, .oga, .m4a, .aac and .flac, up to 256 MB.
Cameras#
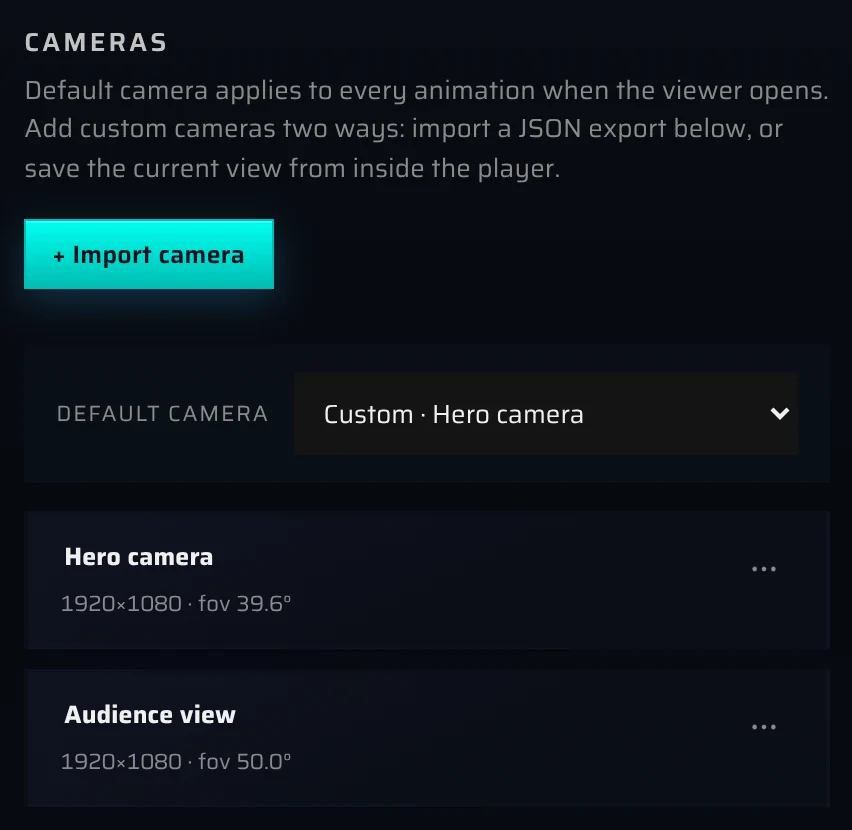
The Cameras section sets which camera the viewer opens with, and lists the project's own cameras.
Default camera#
The Default camera list decides how the viewer opens every show of the project, for you and for visitors of the share page. You can choose:
- Orbit (auto-fit), a free camera framed around the show;
- Top-down;
- Front (ortho);
- Side (ortho);
- any of your own cameras, listed as Custom · name.
The first camera you add becomes the default automatically. If you delete the camera that is the default, the project goes back to Orbit.
Import a camera#
You can import a camera exported from Houdini as a small JSON file:
- Click + Import camera.
- The Import camera window shows the expected format. Click Choose .json file.
- Pick one or more
.jsonfiles. The button shows Importing… until they are in.
The camera is named after its file; rename it in the list. In the viewer, imported cameras appear in the Cameras row next to the built-in ones.
You can also save the current view as a camera from inside the viewer. Views saved there appear under Custom views in the viewer, and are listed here too. See Save the current view as a camera.
Manage cameras#
Each camera in the list shows its name, its resolution and its field of view.
- To rename a camera, click its name, type, and press Enter.
- To delete it, open its ⋯ menu, choose Delete camera… and confirm with Delete camera.
A project can have up to 10 cameras, at most 6 of them views saved in the viewer. When you reach the limit, the import fails with "project already has 10 cameras (cap: 10). Delete one to add another."
Geo and maps#
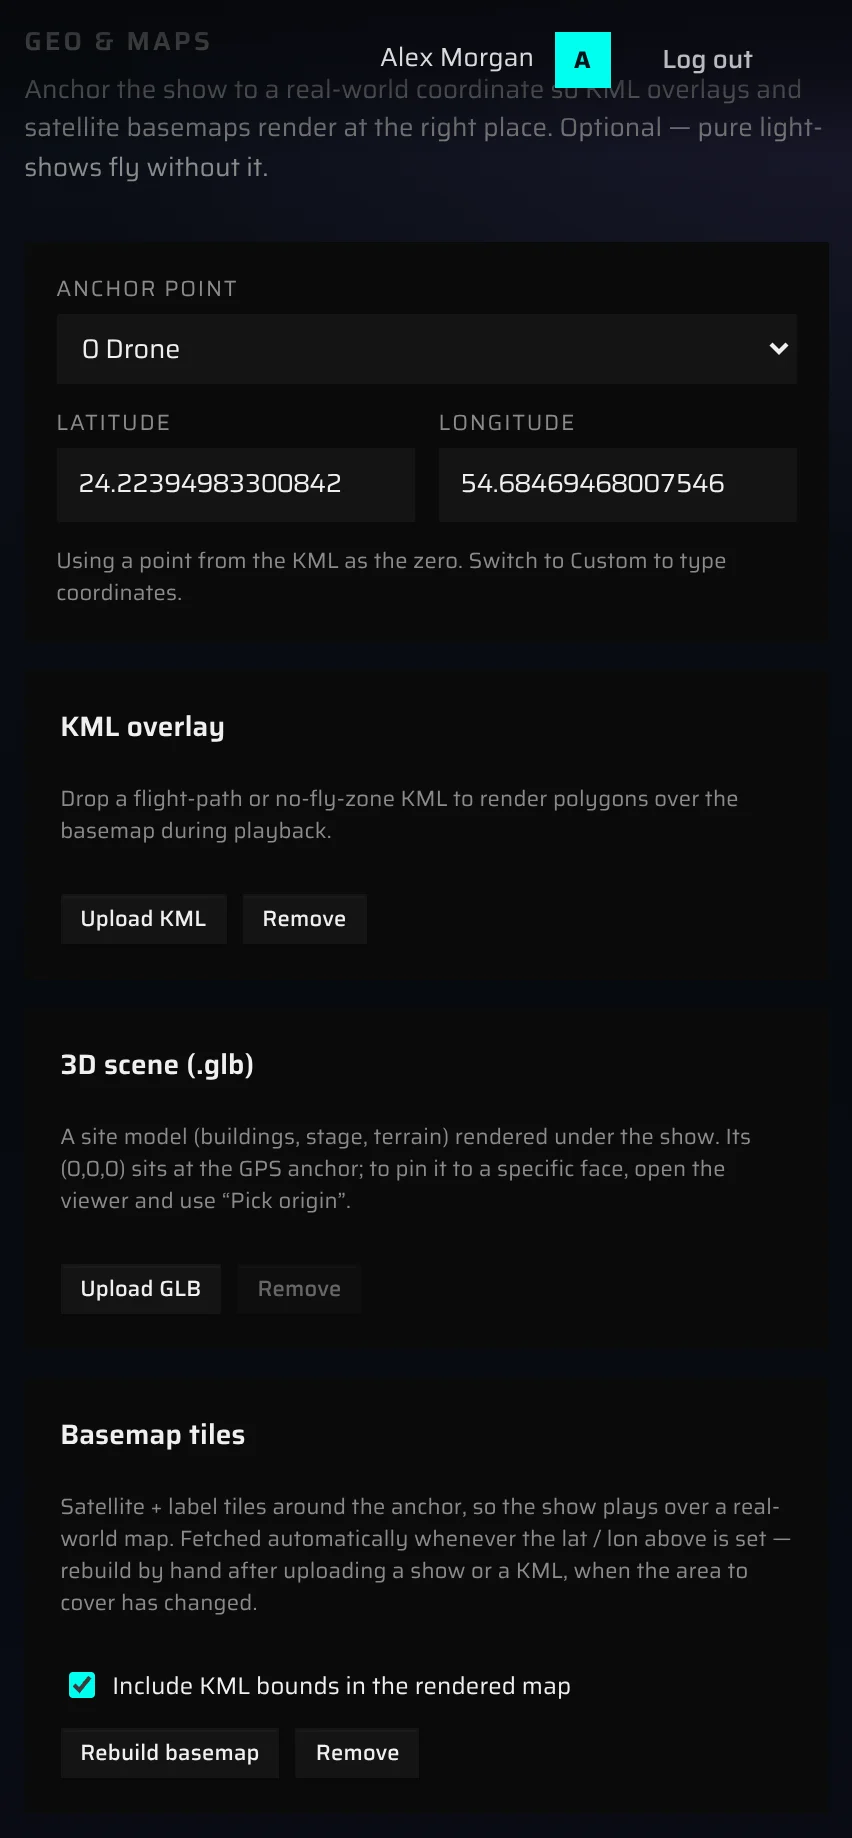
The Geo & maps section places the show in the real world. It is optional: a show plays perfectly well without it. Use it when you want the show over a satellite map, together with the flight area from a KML file or a 3D model of the venue.
GPS anchor#
The anchor is the real-world point where the show's origin (0, 0, 0) sits. KML overlays, the 3D scene and the satellite map are all placed relative to it.
- Type the Latitude and Longitude in decimal degrees, for example
41.7151and44.8271. - Press Enter or click outside the field to save.
As soon as both values are set, the satellite map for that spot is fetched (see Basemap). Latitude must be between −90 and 90 and longitude between −180 and 180; other values aren't saved. Text that isn't a number is refused with Invalid latitude or Invalid longitude. To move the anchor, type new values.
If you have uploaded a KML file that contains points, an Anchor point list appears above the fields. Keep Custom (enter coordinates) to type the values yourself, or pick a point from the file. Points are grouped by the shape they come from: the file's named points first, then the corners of each shape, named after it (for example Flight area p1, Flight area p2). Picking a point fills in the fields and locks them. Switch back to Custom (enter coordinates) to type again.
KML overlay#
A KML file adds lines and polygons, such as the flight area or no-fly zones, over the map during playback.
- On the KML overlay card, click Upload KML.
- Pick a
.kmlor.kmzfile of up to 32 MB. The button shows the upload percentage.
The overlay appears once the project has a GPS anchor. You can upload the file before setting the anchor, and pick the anchor from its points afterwards. To take the overlay off, click Remove and confirm. To have the overlay switched on when the viewer opens, for you and for share visitors, tick KML on by default in the viewer's settings (see Site layers).
3D scene#
A .glb model of the venue (buildings, stage, terrain) is shown under the show.
- On the 3D scene (.glb) card, click Upload GLB (or Replace GLB if there is one already).
- Pick a
.glbfile. The button shows the upload percentage.
The model's own origin (0, 0, 0) sits at the GPS anchor. To pin the show to a different spot on the model, open the viewer and use Pick origin under 3D scene origin in the settings; Reset origin goes back to the model's own origin. See 3D scene origin. To take the model off the project, click Remove and confirm.
The file can be up to 8 GB, and it counts towards your storage.
Basemap#
The Basemap tiles card manages the satellite image shown under the show.
- The map is fetched automatically whenever you set or change the GPS anchor.
- Rebuild basemap fetches it again. Do this after uploading a new show or a new KML file, because the area the map covers depends on them. The button reads Building… while it works, and stays greyed out until the anchor is set ("Set the lat / lon first").
- Include KML bounds in the rendered map widens the map, the next time it is built, to cover everything in the KML file as well as the show. Without it, the map covers an area around the newest show, a few times larger than the show itself.
- Remove clears the map from the project.
To have the map switched on when the viewer opens, tick Map on by default in the viewer's settings. See Site layers.
Share page settings#
The Share page section below the columns decides what your client can do on the share page. Two presets set most of it in one click:
- Client preview: cameras, fullscreen and sound, without engineering tools. For a client who only watches.
- Technical review: adds the settings drawer, analysis, measurements, drone numbers, highlight, gray tint, ground grid and video export. New projects start with this preset.
Below the presets, a switch for each feature (including Comments and Kiosk mode) lets you make your own mix. Each switch is saved as soon as you click it. What every switch does is explained in Choose what visitors see.
Share a project with a team#
If you own a project and belong to at least one team, the project page shows shared with under the project name.
- Open the shared with list.
- Pick a team. To make the project personal again, pick nobody (personal).
The change is saved straight away. Team members then open and edit the project according to their team permissions. The project stays in your own Projects list, now marked with the team's name, and it still counts towards your limits because you own it.
Only the owner can move a project into a team or back. See Team projects for what each member can do.
Rename or delete a project#
To rename a project, click its name on the project page (see Header).
To delete a project:
- Choose Delete project… from the ⋯ menu, either on the project's card or next to its name on the project page.
- Type
deletein the confirmation window. - Click Delete project.
This permanently removes the project with all its shows, cameras, music, site layers and uploads, and the share link stops working. It can't be undone. If you delete a project from its own page, you are taken back to the projects list.
In a team, you can delete a teammate's shared project only if you have the manage permission in that team.
Limits and quotas#
Every account has three limits: the number of projects, the number of shows, and storage. The usage strip on the Projects page shows where you stand.
Plan limits#
| Plan | Projects | Shows | Storage |
|---|---|---|---|
| Free | 5 | 10 | 1 GB |
| Core | 30 | 120 | 15 GB |
| Premium | Unlimited | Unlimited | 40 GB |
| Team, Custom | As agreed | As agreed | As agreed |
On Premium, the usage strip shows the technical ceiling behind "unlimited": 500 projects and 1000 shows. Plans and upgrades are covered in Plans and limits; current prices are on the Pricing page.
Some limits apply to single files whatever your plan, such as 8 GB per show upload or 256 MB per music track.
When you reach a limit#
When an action would take you past a limit, it is refused before anything is stored, and a window explains why:
| Limit | Message |
|---|---|
| Projects | You already have 5 of 5 projects. Delete an old one, or upgrade your plan for more. |
| Shows | You already have 10 of 10 shows. Delete an old one, or upgrade your plan for more. |
| Storage | You're using 1.00 GB of 1.00 GB. Free up space by deleting an old project or show, or upgrade your plan for more. |
The window's title says what you were trying to do, for example Upload failed or Could not create project. On Free and Core it has a See plans button that opens the Pricing page. On Premium and custom plans the message asks you to write to contact@droneshow.store instead.
If you end up over a limit, for example after moving to a smaller plan, everything you already have keeps working. Only new projects, shows and uploads are refused until you are back under the limit.
What uses storage#
Storage counts the files kept for your projects:
- the playback data and analysis report of every show;
- original uploads, while they are being processed, and the uploads of failed shows;
- each project's music;
- KML files, satellite maps and 3D scene models;
- social-share previews.
Every show counts towards the show limit, whatever its status, failed shows included. A project shared into a team counts towards its owner's limits.
What happens to your original files#
The server keeps your original file only as long as it needs it. Once a show has been converted and its analysis has finished, the original upload is deleted, whatever the format: the .blend, the .usd, the CSV or PATH3 files, or the archive they came in. What stays is what the viewer needs: a compressed playback copy of the drones' positions and colours, the analysis report, your music and the preview image. Rigs, materials, drivers and anything else in your source file aren't kept.
In practice:
- you can't download the original file back from the app, so keep your own copy;
- the analysis can't be recalculated later on the server: upload the show again if you need a fresh analysis;
- a show that failed keeps its original until you delete it, so that Try again can reuse it;
- deleting a project removes everything in it at once.
Something missing or unclear? Write to contact@droneshow.store.