The 3D viewer
Play a show in the browser, switch cameras, measure, check speeds and spacing, and render a video.
The 3D viewer plays a show from your project right in the browser, together with its music, cameras and site layers. Use it to check a show before it flies, to review it with your team, and to present it or export a video for a client. Your clients see the same viewer through the share link, with only the tools you allow — see Sharing and client review.
Open a show#
- Open a project from your Projects list.
- Click a show card under Shows, or click Play to open the show you watched last (or the newest one if you haven't watched any yet).
You can also start the newest show straight from the projects list with the play button on a project card (Open latest show).
The show starts playing as soon as its first part has loaded. Sound starts muted — see Music and sync offset.
A few things to know:
- Only shows that have finished processing open in the viewer. A card that is still converting shows a progress bar and can't be opened yet.
- The viewer remembers where you stopped in each show (in this browser) and continues from that point next time.
- If you reload the page, the viewer reopens the show you were watching.
Switch between shows#
When the project has more than one ready show, a dropdown appears next to the project name at the top left. Pick another show to load it. The playhead stays at the same time, so you can compare two versions of the same moment.
Shows you've hidden from the share link are marked (hidden) in this list. You still see them; your clients don't.
Leave the viewer#
Click the back arrow at the top left (Back to project hub) to return to the project page.
The viewer at a glance#
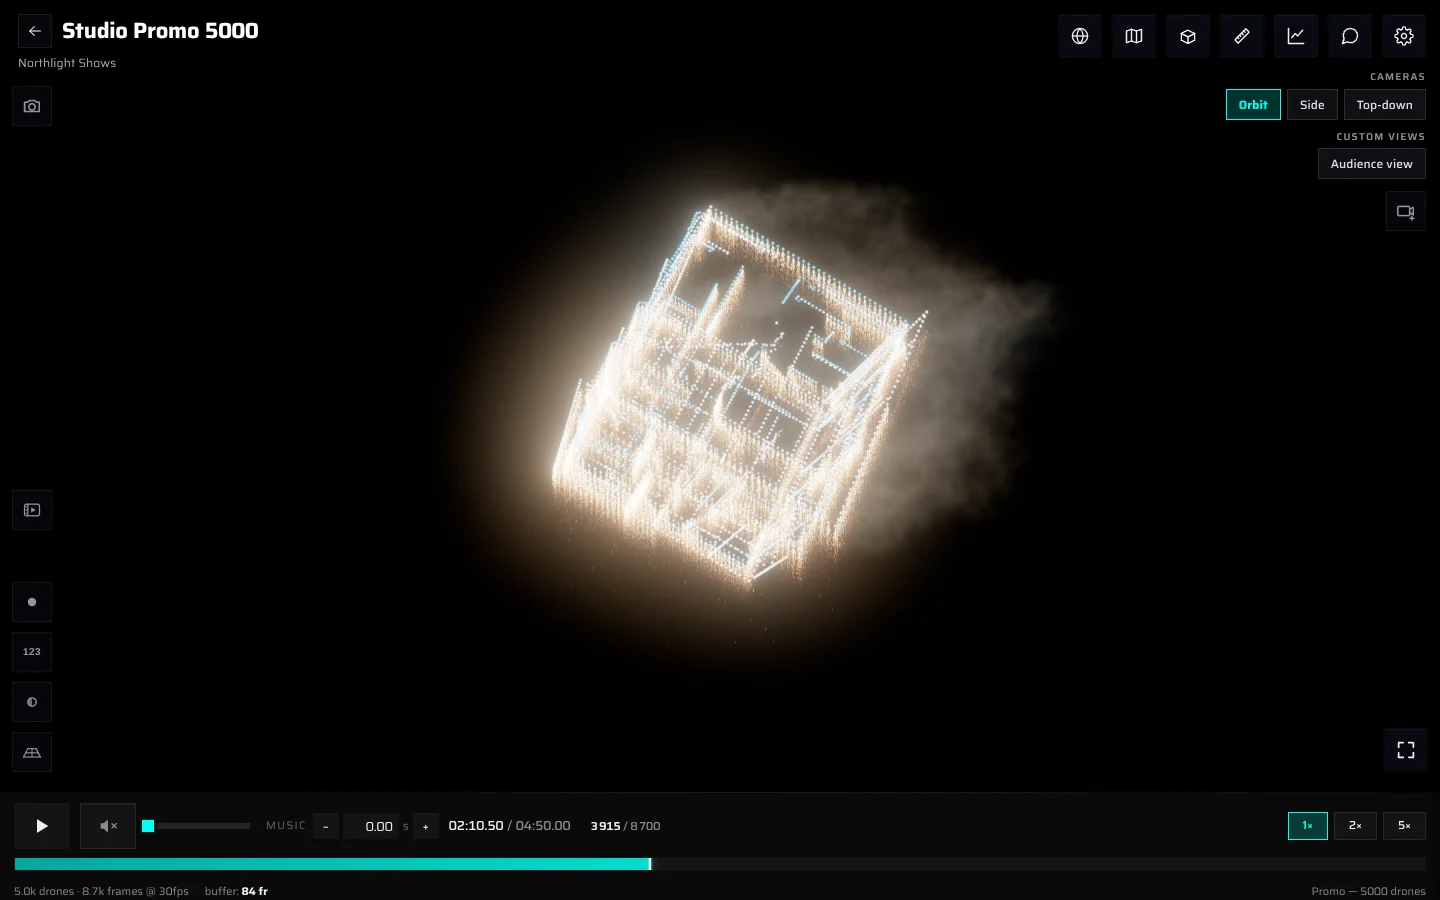
| Area | What's there |
|---|---|
| Top left | Back arrow, project name, customer name and the show picker. Below them, the camera button that captures the social-card preview. |
| Top right | Tool buttons: settings, comments, analysis, measurement and site-layer toggles. |
| Right, under the tool buttons | Camera chips and the button that saves the current view as a camera. |
| Left | Render video, then the review toggles: highlight, drone numbers, gray tint and ground grid. |
| Bottom right of the 3D view | Fullscreen button. |
| Bottom | Playback bar: play/pause, volume, music offset, time, frame counter, speed and the timeline. |
| Very bottom | Status bar: frame rate, drone count and download buffer. |
Tool buttons#
The buttons at the top right, from right to left. A button that is switched on is highlighted in cyan. Hover over a button to see its name (the gear has no tooltip).
| Icon | Name | What it does |
|---|---|---|
| Gear | Open settings | Opens the Settings drawer. |
| Speech bubble | Review comments | Opens the comments. |
| Chart | Show analysis | Opens the safety analysis: distances, speeds and accelerations. |
| Ruler | Measure (bounding box + dimensions) | Draws a box around the drones and shows its size in metres. See Measure the show. |
| Cube | Toggle show volume | Shows the space the whole show occupies. |
| Folded map | KML overlay | Shows the project's KML lines. Only appears when the project has a KML file and a GPS anchor. |
| Globe | Satellite basemap | Shows satellite imagery under the show. Only appears when the project has a map. |
| Diamond | 3D scene (.glb) | Shows the project's 3D site model. Only appears when the project has one. |
Move around the show#
| Action | Mouse | Touch screen |
|---|---|---|
| Rotate around the show | Drag with the left button | Drag with one finger |
| Pan (slide the view) | Drag with the right or middle button, or hold Shift and drag with the left button | Drag with two fingers |
| Zoom | Scroll wheel | Pinch |
In Top-down and the other straight-on views the camera doesn't rotate: you can only pan and zoom.
When a 3D site model is shown, the camera can't go below its lowest point.
Playback and the timeline#

The playback bar holds, from left to right:
- Play / Pause.
- The speaker button and volume slider (only when the project has music).
- The Music offset control (only when the project has music, on a computer). See Adjust the sync offset.
- The time: current position and total length, in minutes, seconds and hundredths (01:23.45).
- The frame counter: current frame and total number of frames (on a computer).
- Playback speed: 1×, 2× or 5×.
Under these controls is the timeline. Click anywhere on it to jump there, or drag the playhead. Dragging pauses playback and resumes it when you let go.
Coloured markers on the timeline are comments. Click one to jump to that moment and highlight the comment.
While the viewer is downloading the whole show in the background, a lighter bar on the timeline shows how much is already loaded. When the bar disappears, the whole show is loaded and every jump is instant.
Speed and looping#
- 1× plays in real time. 2× and 5× play faster, without sound — music only plays at normal speed.
- Playback loops: after the last frame, the show starts again from the beginning.
Find an exact frame#
There's no frame-by-frame button. To land on a specific frame, pause, then drag the playhead slowly while you watch the frame counter. The arrow keys move in steps of one second (see Keyboard shortcuts).
Buffering#
If the next part of the show hasn't downloaded yet, the 3D view shows Buffering… and playback waits. It continues by itself as soon as the data arrives.
Keyboard shortcuts#
These work anywhere in the viewer, as long as you're not typing in a text box and no slider is selected. If a shortcut does nothing, click the 3D view first.
| Keys | Action |
|---|---|
| Space | Play / pause |
| ← / → | Back / forward 1 second |
| Shift + ← / → | Back / forward 5 seconds |
| Home | Jump to the start |
| End | Jump to the end |
| Esc | Leave fullscreen; cancel Pick origin; close a camera menu |
| Enter | In the comment box: post the comment. In a number field: apply the value |
| Shift + Enter | In the comment box: start a new line |
| Shift + click on − / + | Change the music offset by 1 second instead of 0.1 second |
In confirmation dialogs, Enter confirms and Esc cancels.
Camera views#
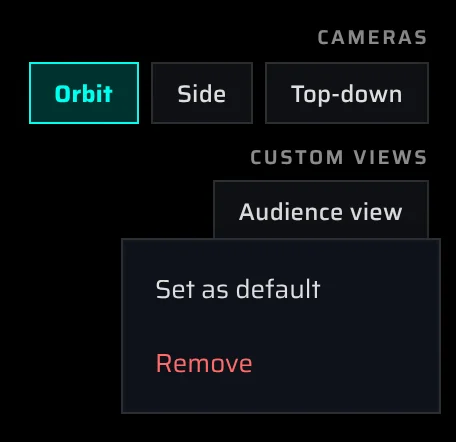
The camera chips sit at the right of the viewer, under the tool buttons. Click a chip to switch to that view. The active chip is highlighted.
| Chip | What you see |
|---|---|
| Orbit | A perspective view from the front, from just above the ground, framed to fit the whole show. You can rotate freely. |
| Side | A perspective view turned to face the formation head-on. The direction is worked out from the formation's shape, so it works even when the show is rotated on the site. |
| Top-down | Straight down, without perspective. You can pan and zoom, but not rotate. |
| Imported cameras | Cameras imported from a JSON file appear after the built-in chips, in the Cameras row. |
| Custom views | Views you saved in the viewer appear in their own row. |
Imported cameras and saved views are starting points, not locked shots. As soon as you drag, the viewer switches to orbiting and the Orbit chip lights up. Click the camera's chip again to jump back to it.
A saved view comes back exactly as you saved it. An imported camera keeps the direction it looks at the show from and its field of view, but the viewer always aims it at the centre of the show and sets its distance so the whole show fits in the frame.
Two more straight-on views, Front (ortho) and Side (ortho), have no chip. You can choose them as the project's Default camera in the Settings drawer.
On a narrow screen, such as a phone held upright, the chip row shows only Orbit and Top-down. Your own cameras are listed under Custom cameras — as chips when there are up to three, or in a Pick a camera dropdown when there are more.
Save the current view as a camera#
- Frame the view you want: rotate, pan and zoom.
- Click the button under the camera chips (Save current view as a new project camera).
- A tick confirms the save, and a new chip appears under Custom views.
The new view gets an automatic name, such as Aurora, Nebula or Orion. To rename it, go to the project page and click its name under Cameras. A saved view also remembers the point the camera rotates around, so orbiting from it feels the same as when you saved it.
A project can hold up to 10 cameras, of which up to 6 can be views saved in the viewer. When the limit is reached, Could not save view explains it; remove a camera to make room.
Set the default camera or remove a camera#
On a computer, right-click one of your own camera chips to open its menu:
- Set as default — the viewer and the share link open on this camera. If it's already the default, the menu shows Default camera ✓.
- Remove — deletes the camera after you confirm with Remove camera. Share links that opened on this camera fall back to Orbit. This can't be undone.
The built-in chips have no menu. You can also choose the default camera in the Settings drawer or on the project page.
Import a camera from a file#
Cameras exported from Houdini as JSON files are imported on the project page, under Cameras → + Import camera — see Import a camera. An imported camera is named after its file and appears in the viewer's Cameras row.
Settings drawer#
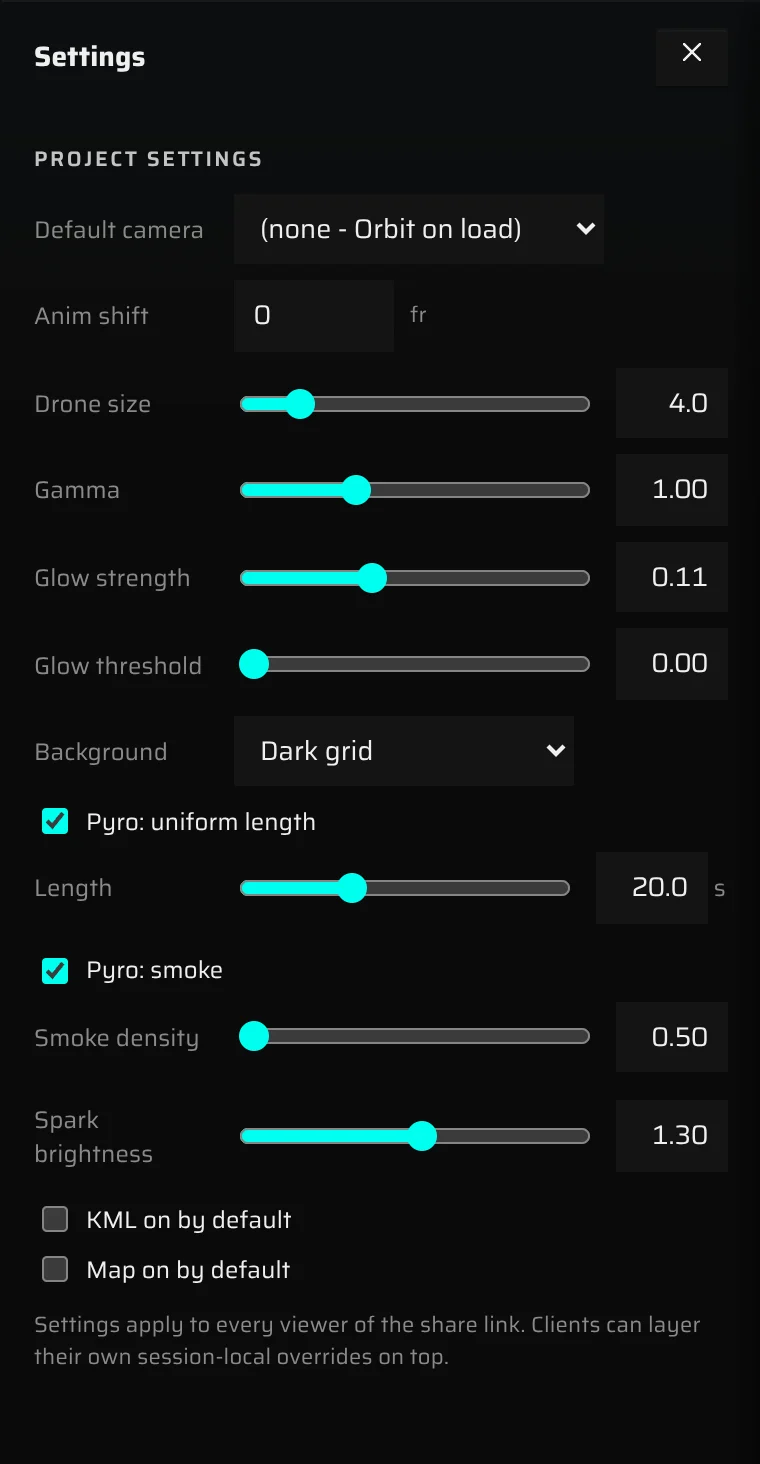
Click the gear (Open settings) to open the drawer. Close it with ✕ or by clicking outside it.
Everything under Project settings belongs to the project and applies to every show in it. Visitors of the share link get the same default camera, drone size, gamma, glow, background, and KML and map defaults. Changes save automatically and you see them in the 3D view right away. Visitors can still change a few things for themselves, such as drone size, without affecting your project.
Next to each slider is a number field. Type an exact value and press Enter, or press Esc to cancel the edit.
| Setting | What it does | Range (default) |
|---|---|---|
| Default camera | The camera the viewer opens with, for you and for visitors. (none - Orbit on load) opens on Orbit. Your own cameras are listed as Custom · name. | — |
| Anim shift | Slides the show along the timeline, in frames. See Anim shift. | Whole frames (0) |
| Drone size | Size of the drone dots. | 3–10 (6.0) |
| Gamma | Brightness curve for the drone colours. Above 1 brightens mid-tones and dim colours; below 1 darkens them. | 0.45–2.20 (1.00) |
| Glow strength | How much light spills around each drone. At 0 the drones are plain dots. | 0–0.30 (0.15) |
| Glow threshold | Only drones brighter than this glow. Raise it to keep dim drones and the background clean. | 0–1 (0) |
| Background | Void (no background), Dark grid, Studio or Night sky. | — |
| KML on by default | Turns the KML overlay on when the viewer opens, for you and for visitors. | Off |
| Map on by default | Turns the satellite map on when the viewer opens, for you and for visitors. | Off |
Anim shift#
Anim shift moves every show in the project along the timeline while the music and the timeline stay where they are — useful when the whole project needs to line up with the soundtrack.
- A positive value adds dark frames before the show starts (the drones wait in their first position with lights off). The end of the show is cut off by the same amount.
- A negative value trims the start of the show and leaves the end of the timeline dark.
The equivalent in seconds appears next to the field. Type a whole number and press Enter, or hold the middle mouse button on the field and drag: move up or down to pick the step size (100, 10 or 1 frames), then left or right to change the value.
To shift the music for a single show instead, use the sync offset.
Pyro settings#
These appear only when the loaded show contains pyro cues.
| Setting | What it does | Range (default) |
|---|---|---|
| Pyro: uniform length | Makes every pyro effect burn for the same time. When on, a Length slider appears. | 1–60 s (20 s) |
| Pyro: smoke | Draws smoke after each pyro effect (on by default). When on, a Smoke density slider appears; 1.00 is the standard look. | 0.50–1.50 (1.00) |
| Spark brightness | Brightness of the sparks. | 0–2.5 (1.00) |
3D scene origin#
This section appears when the project has a 3D site model (.glb). It shows the model's file name and two buttons:
- Pick origin — sets which point of the model sits at the project's GPS anchor. Click Pick origin, then click a surface of the model in the 3D view. While the viewer waits for your click, the button reads Click a face… (Esc to cancel). A click that misses the model keeps waiting; dragging still rotates the camera; Esc cancels.
- Reset origin — puts the model back on its own built-in origin.
The model must be visible in the 3D view while you pick (turn on 3D scene (.glb) first). You upload, replace and remove the model on the project page, under Geo & maps.
Measure the show#
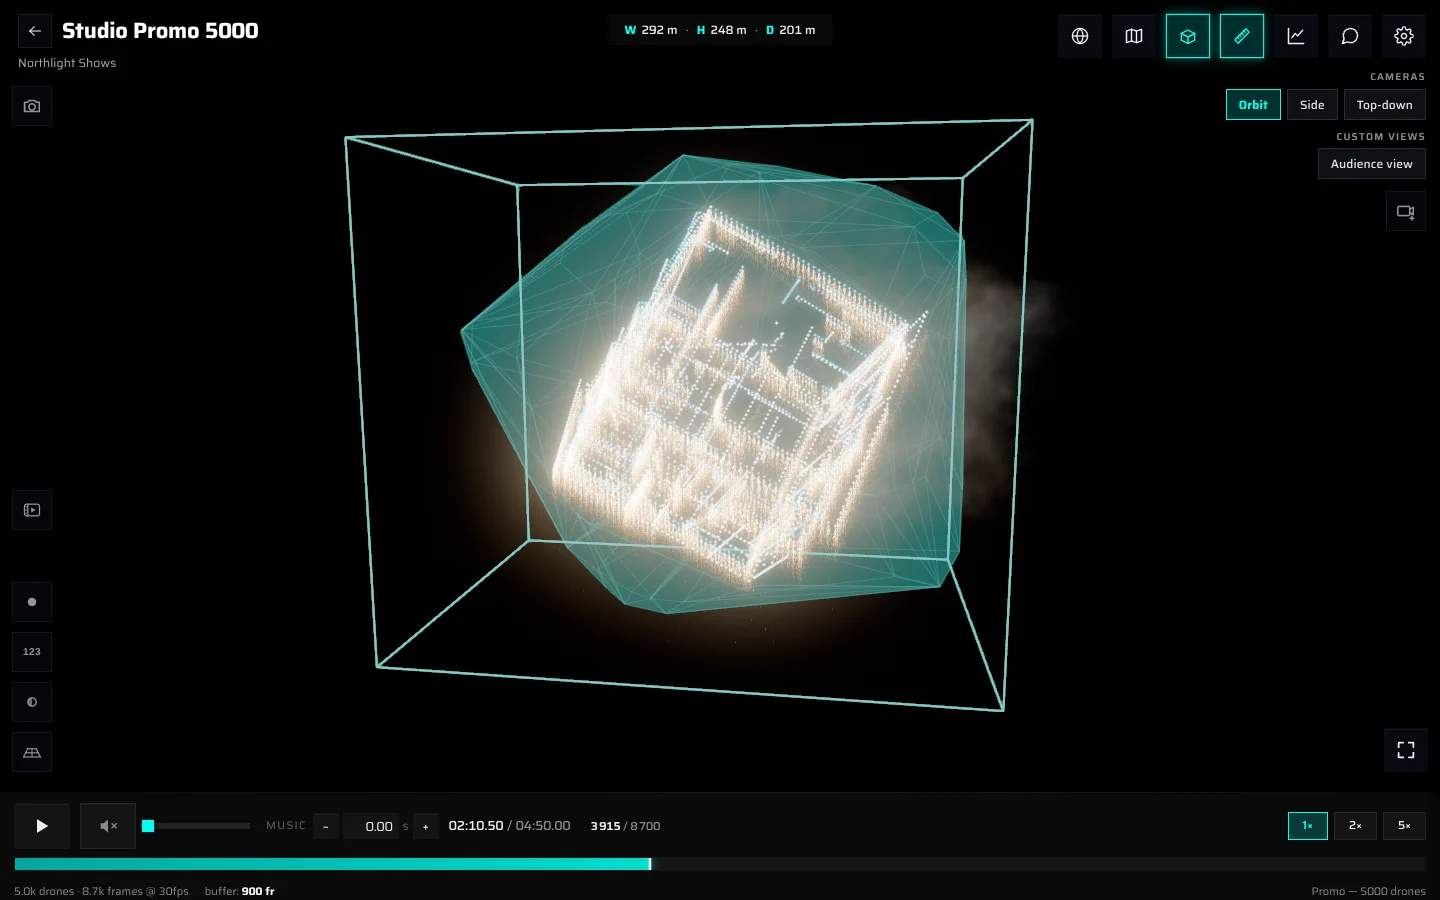
Bounding box#
Click the ruler (Measure (bounding box + dimensions)). A cyan box appears around the drones, and a label at the top of the 3D view shows its size in metres:
- W — length along the formation's longest horizontal direction.
- D — depth across it.
- H — height.
The box turns with the formation and updates as the show plays. Sizes of 100 m and more are rounded to whole metres; smaller sizes show one decimal.
Show volume#
Click the cube (Toggle show volume). The viewer draws a shape that encloses every position of every drone over the whole show — the airspace the show uses. Switching it on pauses playback; press Space to continue. The button shows a spinner while the shape loads.
Older shows may have no show volume: the button switches on, but nothing appears. Upload the show again to get one.
The box and the show volume never appear in rendered videos or in the social-card preview.
Review toggles#
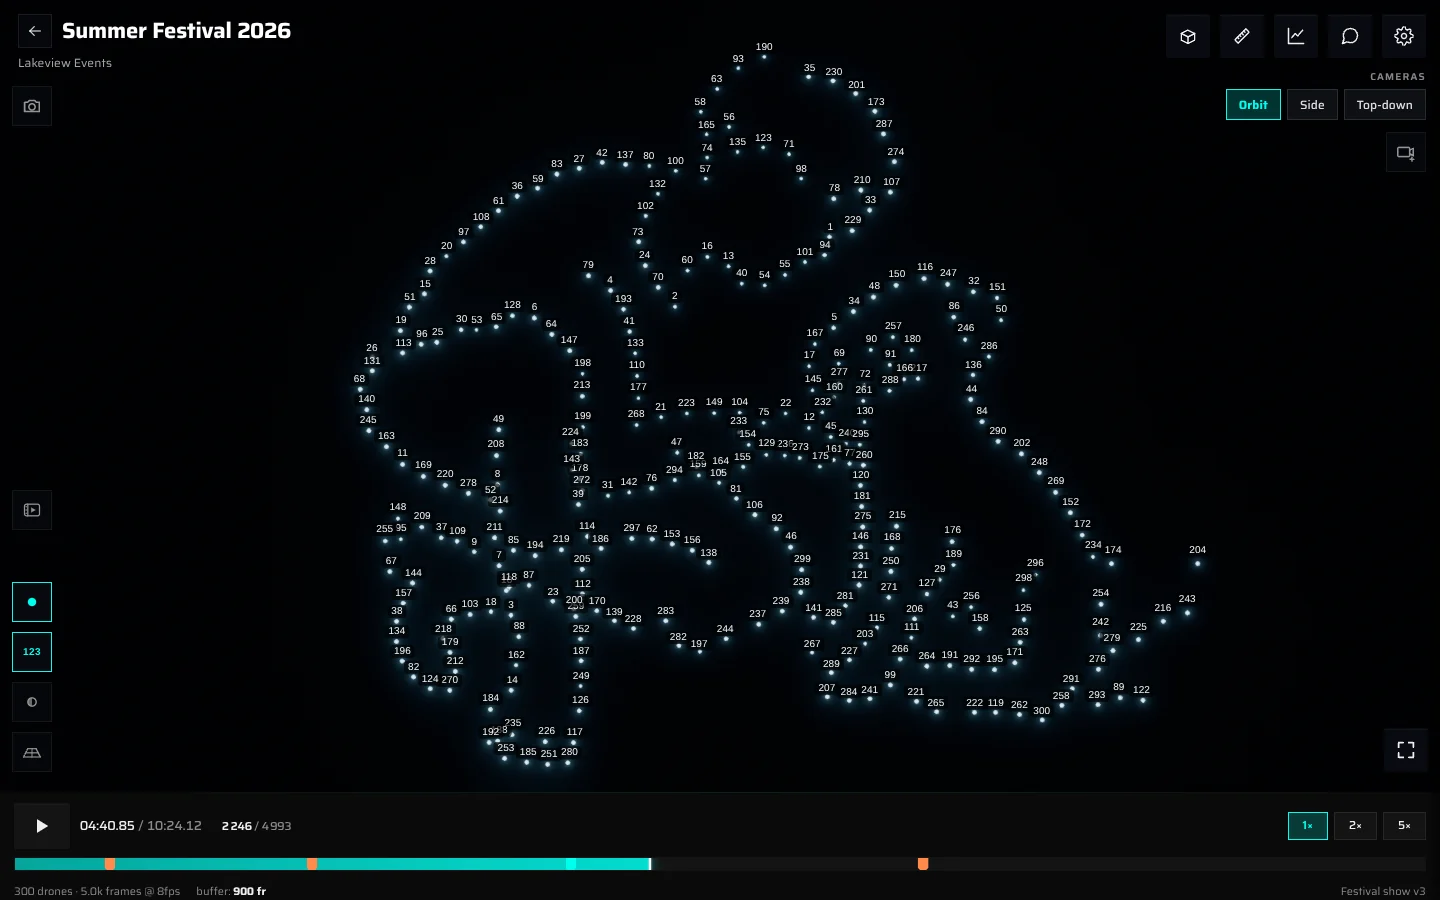
The buttons on the left of the viewer, under the render button, help you read a formation. They change only what you see; they aren't saved with the project, and your clients don't see your choices.
| Icon | Name | What it does |
|---|---|---|
| Filled dot | Highlight all drones (blue) | Paints every drone in one flat colour, whatever its programmed colour: normal drones blue, pyro drones orange, strobe drones yellow. Useful for checking the shape of a formation. |
| 123 | Show drone indices | Shows each drone's number above it. Numbering starts at 1 and matches the drone numbers in the analysis PDF. On very large shows this can slow the viewer down. |
| Half-filled circle | Tint dark drones gray (review aid) | Shows drones that are off or nearly black in mid-gray, so you can see where they are. Drones above about 10% brightness keep their colour. |
| Grid | Ground grid | Shows a grid at ground level (altitude 0) that fades out away from the show. |
Site layers#
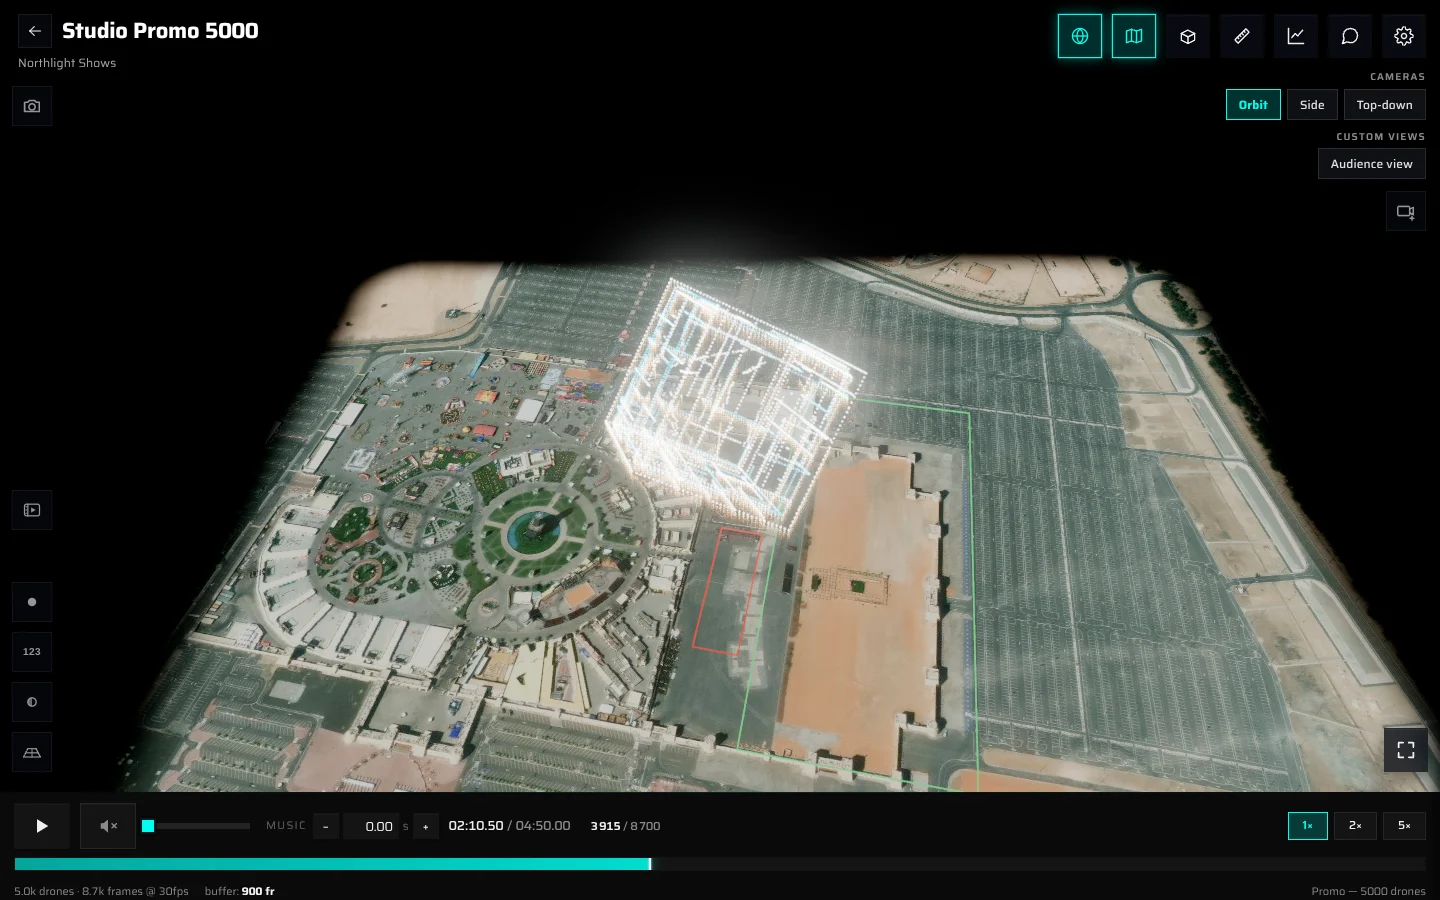
Site layers put the show in its real surroundings. You add them on the project page, under Geo & maps (see Geo and maps). In the viewer, a toggle button appears at the top right for each layer the project has.
| Button | Layer | In the viewer |
|---|---|---|
| Folded map (KML overlay) | Lines and areas from your KML or KMZ file — flight zone, no-fly zones, audience areas. | Drawn in the file's own colours, or amber where the file sets none. Needs the project's GPS anchor. |
| Globe (Satellite basemap) | Satellite imagery around the GPS anchor. | A spinner shows on the button while the imagery loads. |
| Diamond (3D scene (.glb)) | Your site model: buildings, stage, terrain. | Environment loading… with a percentage shows while it downloads. The camera can't go below the model. |
- The 3D scene is shown automatically when the project has one. Turn it off with its button if you don't need it.
- To have the KML lines or the map switched on when the viewer opens, use KML on by default and Map on by default in the Settings drawer. Visitors of the share link get the same starting state.
- Layers that are switched on appear in rendered videos. The social-card preview leaves out the KML lines and the map.
Show analysis#
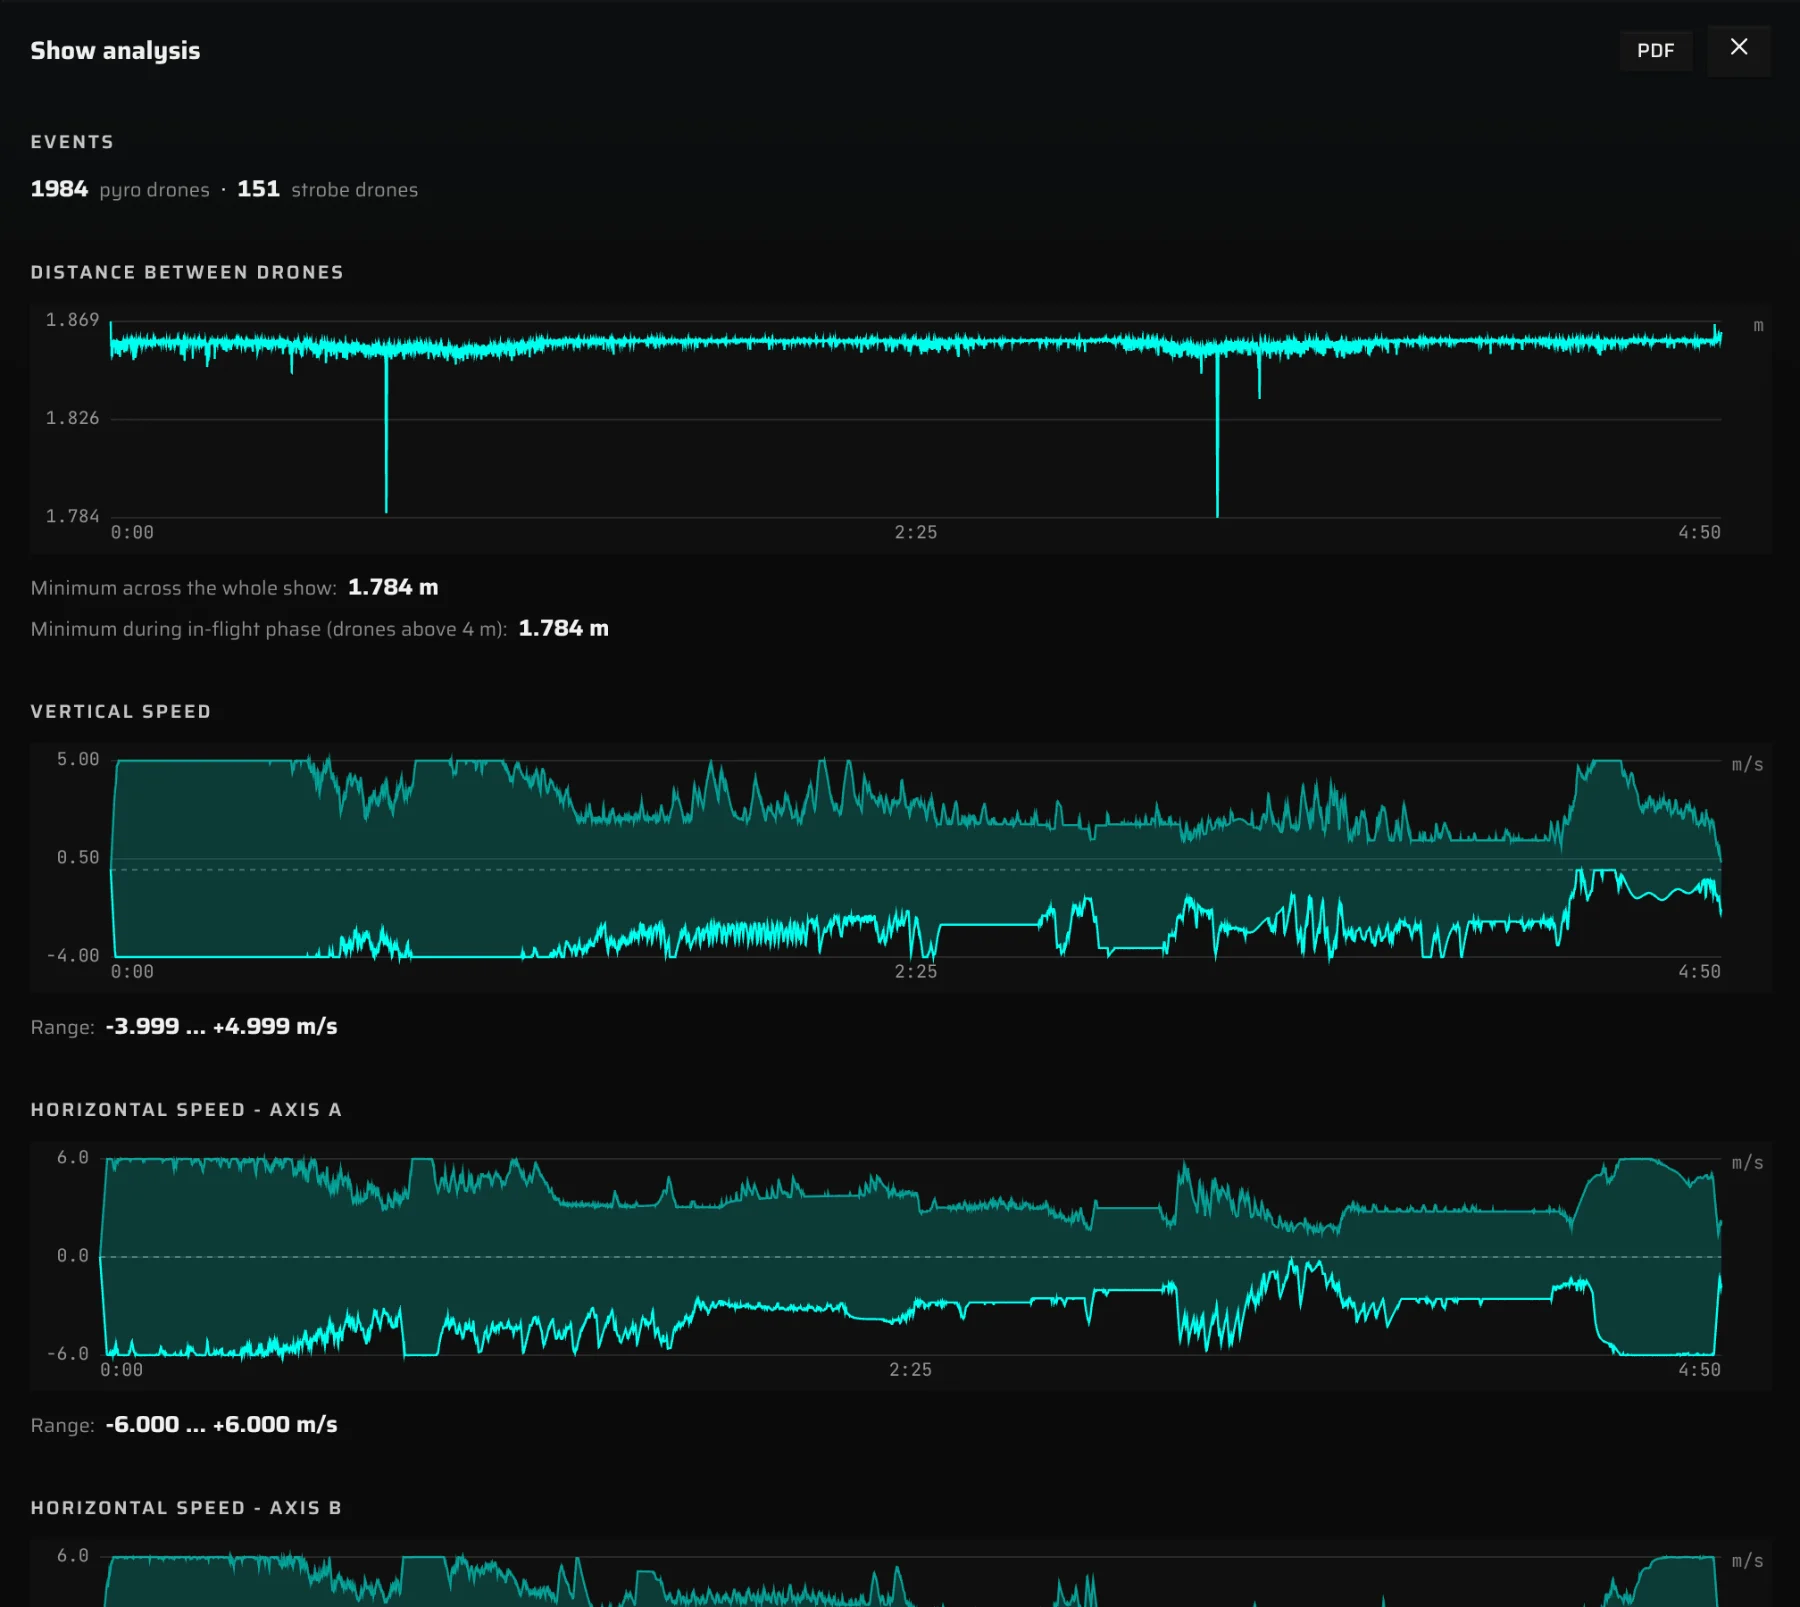
The analysis checks the show for safety: how close drones get to each other and how fast they move and accelerate. It is calculated from the original show file, for every frame at the show's own frame rate, once the show has finished processing.
Open the analysis#
Click the chart button (Show analysis). Playback pauses so you can read the numbers; it doesn't restart when you close the drawer. Close it with ✕ or by clicking outside it.
What the analysis shows#
| Section | What it measures | Summary line |
|---|---|---|
| Events | How many drones carry pyro and strobe cues. Only shown when the show has them. | Pyro drones · strobe drones |
| Distance between drones | The smallest distance between any two drones, at every moment of the show. | Minimum across the whole show and Minimum during in-flight phase (drones above 4 m) |
| Vertical speed | Up (+) and down (−) speed. The shaded band runs from the lowest to the highest value among all drones at each moment. | Range: lowest … highest, m/s |
| Horizontal speed - axis A and - axis B | Speed along each of the two horizontal axes of the show's coordinate system (X and Z), signed. | Range: lowest … highest, m/s |
| Horizontal speed - total magnitude | Horizontal speed in any direction; the line shows the fastest drone at each moment. | Peak: m/s |
| Total speed magnitude | Speed in 3D; fastest drone at each moment. | Peak: m/s |
| Vertical acceleration, Horizontal acceleration - axis A and - axis B | Same as the speeds, for acceleration. | Range: m/s² |
| Horizontal acceleration - total magnitude, Total acceleration magnitude | Same as the speed magnitudes, for acceleration. | Peak: m/s² |
The last line of the drawer sums up the show: length, number of frames, number of drones and the frame rate the analysis used.
How to read the analysis#
- Distance between drones: compare the minimum with the minimum separation your drone platform requires. The whole-show minimum includes the tightly packed takeoff and landing grid, so it is usually small. The in-flight minimum only counts drones that are both higher than 4 m, and is usually the number that matters.
- Speeds and accelerations: compare the peaks and ranges with the limits of your drones. Signed charts have a zero line: values above it go up (or in the positive axis direction), values below it go down.
- Finding a moment: each chart's horizontal axis is the show time (start, middle and end are labelled). Read the time of a dip or peak, then jump to it on the timeline. The charts themselves aren't clickable.
While the analysis is being calculated#
The show plays normally while the analysis is calculated, and the drawer updates by itself when the result is ready.
| Message | Meaning |
|---|---|
| Analysis queued - starts after conversion | The show is still processing; the analysis starts after it. |
| Analysis is being computed… | Shows a percentage, the time elapsed and an estimate of the time left. |
| Analysis failed. The show still plays, but no metrics available. | The analysis couldn't be calculated for this show. |
| No analysis for this show - it was converted before analyses existed. Upload it again to get one. | An older show; upload it again to get an analysis. |
| No motion metrics for this show | The show has a single frame or fewer than two drones, so there's nothing to measure. |
PDF report#
When the analysis is ready, a PDF button appears at the top of the drawer. It downloads a printable report (landscape A4) with the same charts and numbers. If the show has pyro cues, the report ends with a Pyro events table listing each pyro drone by number with the frames of its first five cues — handy to print and take to the launch site.
Comments#
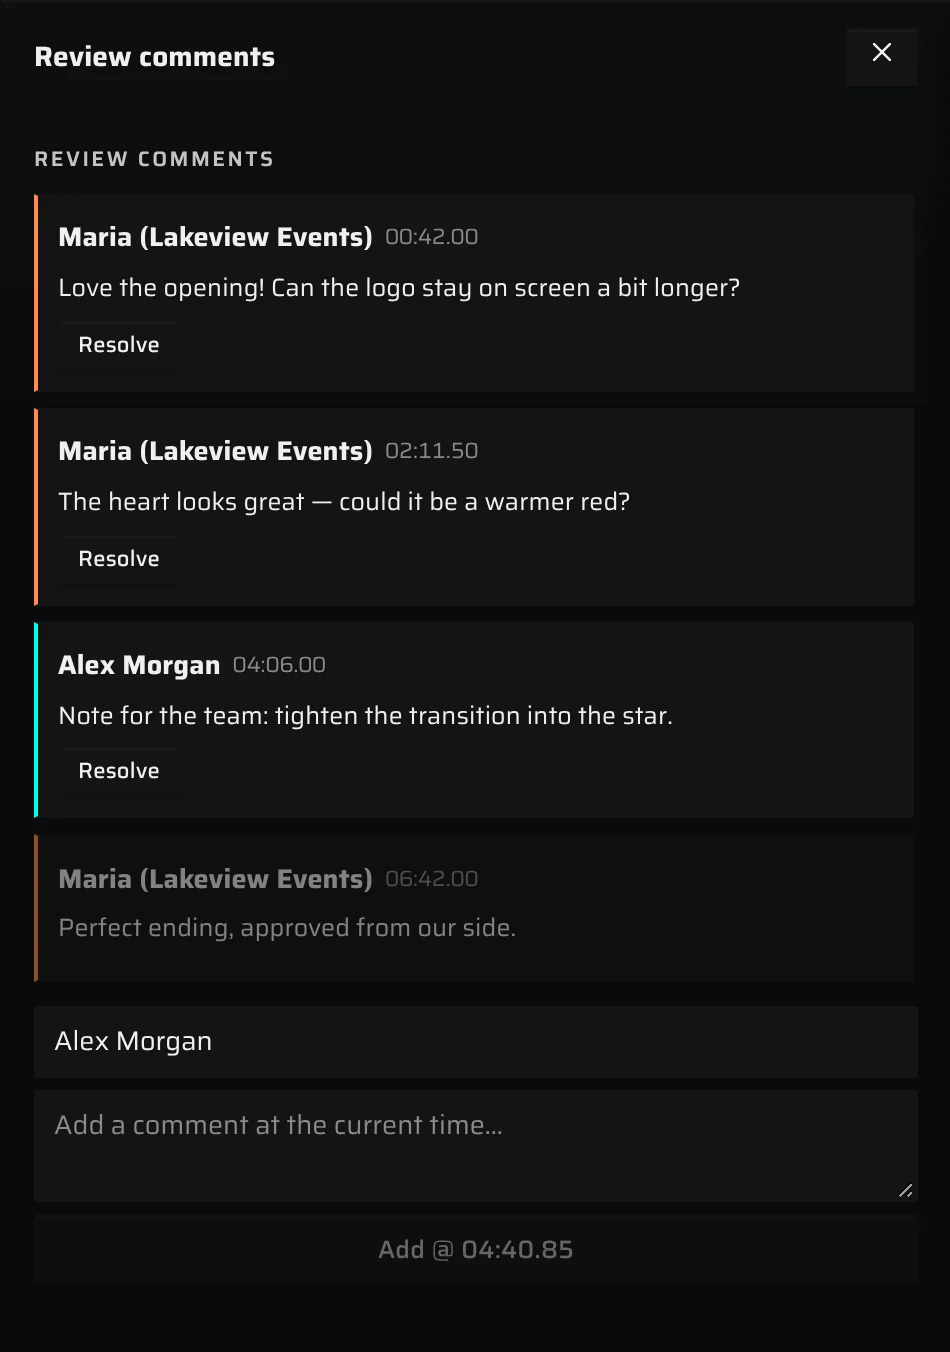
Comments are notes pinned to a moment of the show. You, your team and — when you allow it — your clients can leave them. Click the speech bubble (Review comments) to open the drawer.
- Each comment shows its author, the time it's pinned to and the text. Click a comment to jump to that moment.
- On the timeline, orange markers are your clients' comments and cyan markers are comments from your side (you or your team). In the list, the same colours mark the left edge of each comment.
To add a comment:
- Move the playhead to the moment you want to comment on.
- Check the name in Your name (your profile name is filled in).
- Type in Add a comment at the current time….
- Press Enter or click Add @ with the time (for example Add @ 01:23.45). Use Shift + Enter for a new line.
A comment can be up to 4,000 characters; a name up to 80.
- Click Resolve when you've dealt with a comment. It stays in the list, dimmed, and its Resolve button goes away.
- To delete a comment, hover over it, click the ✕ that appears at its top right, then confirm with Delete. Deleting can't be undone.
New comments from clients appear when you open or reload the viewer. For turning client comments on and what clients see, read Client comments.
Music and sync offset#
Music belongs to the project: you add one track on the project page (Music → + Add music, see Music) and every show in the project plays it. Each show keeps its own start offset against that track.
- The viewer starts muted, because browsers block sound until you interact with the page. When the music is ready, a Sound is off - tap to enable pill appears above the playback bar. Click it, or click the speaker button, to turn the sound on. The pill hides by itself after a few seconds.
- Drag the volume slider next to the speaker to set the volume. Your volume and mute choice stay the same when you switch shows.
- Music only plays at 1× speed. At 2× and 5× the show plays silently.
- When you switch to another browser tab, the music goes quiet and comes back when you return.
Adjust the sync offset#
On a computer, the playback bar shows a Music control when the project has music:
- Play the show and listen.
- Click − to start the music earlier or + to start it later. Each click moves it by 0.1 second; Shift-click moves it by 1 second. You can also type a value in seconds.
- You hear each change right away. The offset is saved for this show a moment after you stop changing it.
| Offset | Effect |
|---|---|
| Positive, for example 2.5 | The music starts 2.5 s after the show begins. |
| 0 | Music and show start together (the default). |
| Negative, for example −1.2 | When the show begins, the music is already 1.2 s in. |
The offset can be up to 300 seconds either way, in steps of 0.01 second. Visitors of the share link hear the offset you saved last. You can also set it on the project page, in the offset field of each show card — see Set the music offset.
Capture the social-card preview#
When you paste the share link into a messenger or social network, it shows a preview card with a picture. You set that picture from the viewer:
- Frame a good view of the show.
- Click the camera button at the top left, under the project name (Use the current view as this show's social-card preview).
- A tick confirms the capture.
The middle of the current view is cropped to the card format (1200 × 630 pixels). The measurement box, the show volume, the KML lines and the map are left out of the picture. There is one preview per project, so capturing from any show replaces it.
If the capture fails, a short message appears next to the button — for example Couldn't capture the frame - tap the canvas, then try again, or, after you've been signed out, a message with a Reload button. More about the card in The social preview card.
Render a video or a still frame#
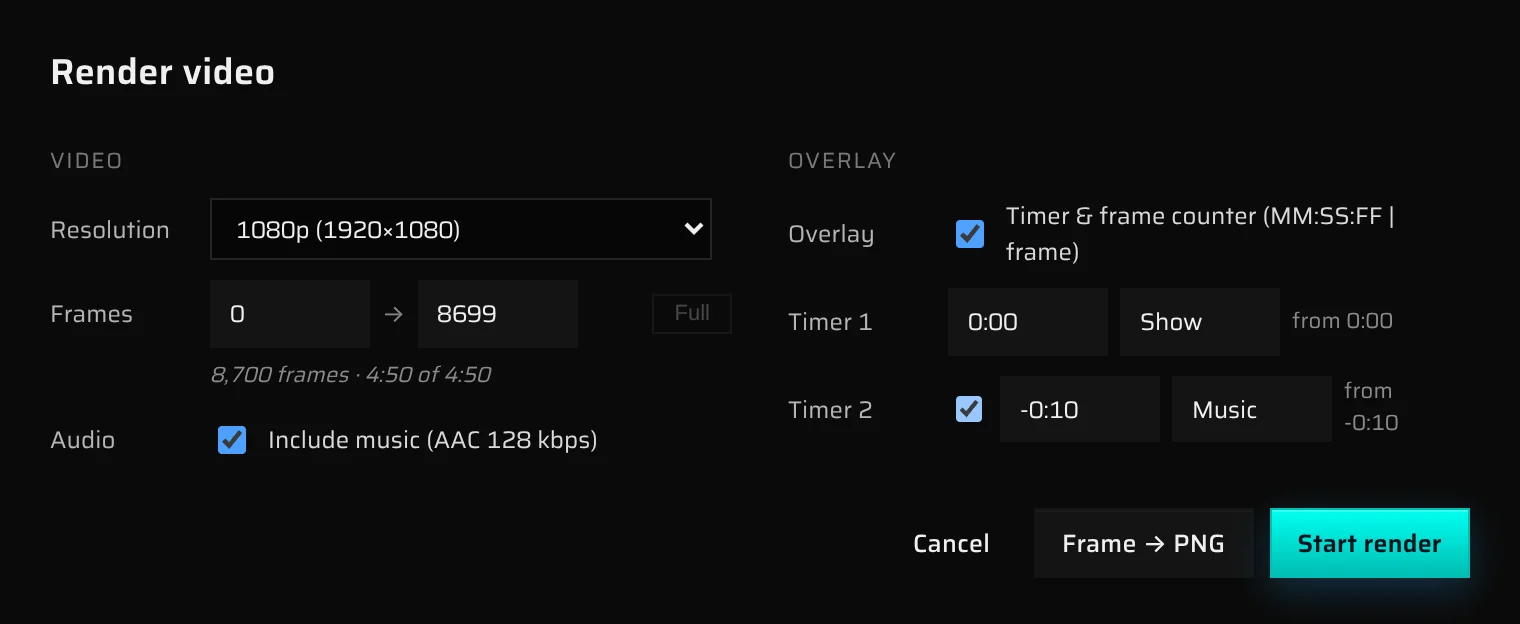
The viewer can export the show as an MP4 video, or the current frame as a PNG image. Rendering happens in your browser, on your computer — nothing is uploaded. It needs a browser that can encode video (WebCodecs): Chrome, Edge, or Safari 16.4 or newer.
Render a video#
- Set up the view: choose the camera and framing, and switch on the layers and toggles you want in the video. The video uses the current camera position and keeps it fixed for the whole video.
- Click the film button on the left of the viewer (Render video).
- Choose the options (see the table below).
- Click Start render. In Chrome and Edge on a computer, you first choose where to save the file. In other browsers, the file downloads when the render is done.
- Wait for the render to finish. The dialog shows a progress bar, the frame being rendered, the average speed and the time left. Keep the tab open while it renders.
- Click Close.
If you click Cancel during the render, the frames finished so far are saved as a shorter video, without music.
| Option | What it does |
|---|---|
| Resolution | 1080p (1920×1080), 1440p (2560×1440), 4K (3840×2160), or Print (14000×6500) — still only for large-format images. Print size can only be saved as a PNG: Start render isn't available with it. |
| Frames | The first and last frame to render. Full resets to the whole show. The line below shows how many frames and how long the video will be. |
| Audio | Include music adds the project's music (AAC, 128 kbps) with the show's sync offset. On by default; when the show has no music it reads No audio attached to this show. |
| Overlay | Timer & frame counter (MM:SS:FF | frame) burns a clock into the bottom-left corner: minutes, seconds and frame within the second, plus the frame number. On by default. |
| Timer 1 | Where the clock starts, and an optional label of up to 16 characters. Write the start as 1:00, -0:10, 90 (seconds) or 48f (frames). It only shifts the clock, not the show. |
| Timer 2 | Tick the box to add a second clock under the first, with its own start and label. |
The video has the same frame rate as the show. It's an MP4 file encoded as H.265, or as H.264 when your browser or graphics card can't encode H.265 — the viewer picks automatically. The file is named after the show, with the frame range added when you render only part of the show.
What ends up in the picture: the show as you see it, including the background, glow, site layers and the review toggles you switched on — but without the measurement box, the show volume and the drone numbers. Drones keep the same size relative to the frame at every resolution, so a 4K video looks like the 1080p one, only sharper.
Save a still frame#
Click Frame → PNG in the same dialog to save the frame currently on screen as a lossless PNG at the chosen resolution, with the timer when the overlay is on. Print size is rendered in pieces; the button shows the progress (for example Rendering 3/16…).
If the render doesn't work#
| Message | What to do |
|---|---|
| Video rendering needs Chrome, Edge or Safari 16.4+ (WebCodecs API). | Open the viewer in one of these browsers. |
| Couldn't write to the file — another app is holding a lock on it… | Close any app that may have the file open (a messenger uploading it, cloud sync, antivirus, a video player), or save to another location. |
| Disk is full — … | Free up disk space or choose another drive. |
| Browser blocked the write… | Close the dialog, open it again and choose the save location again. |
| Render cancelled — no frames had finished yet. | You cancelled before the first frame was ready; nothing was saved. |
Fullscreen and presentation mode#
On a computer, click the fullscreen button at the bottom right of the 3D view (Enter fullscreen). The viewer switches to presentation mode, made for showing the show to a client:
- Everything except the show is hidden, apart from a compact playback bar with play/pause, volume, time, speed and the timeline.
- The bar and the mouse pointer disappear after 3 seconds without mouse movement. Move the mouse to bring them back, or click an empty part of the screen to hide or show the bar at once.
- Keyboard shortcuts keep working.
- Press Esc to leave fullscreen.
On a phone or tablet, the fullscreen button is at the right end of the playback bar. In fullscreen, an ✕ at the top right takes you back (Exit fullscreen). On an iPhone the fullscreen button isn't shown, because Safari on iPhone doesn't allow web pages to go fullscreen.
On a phone or tablet#
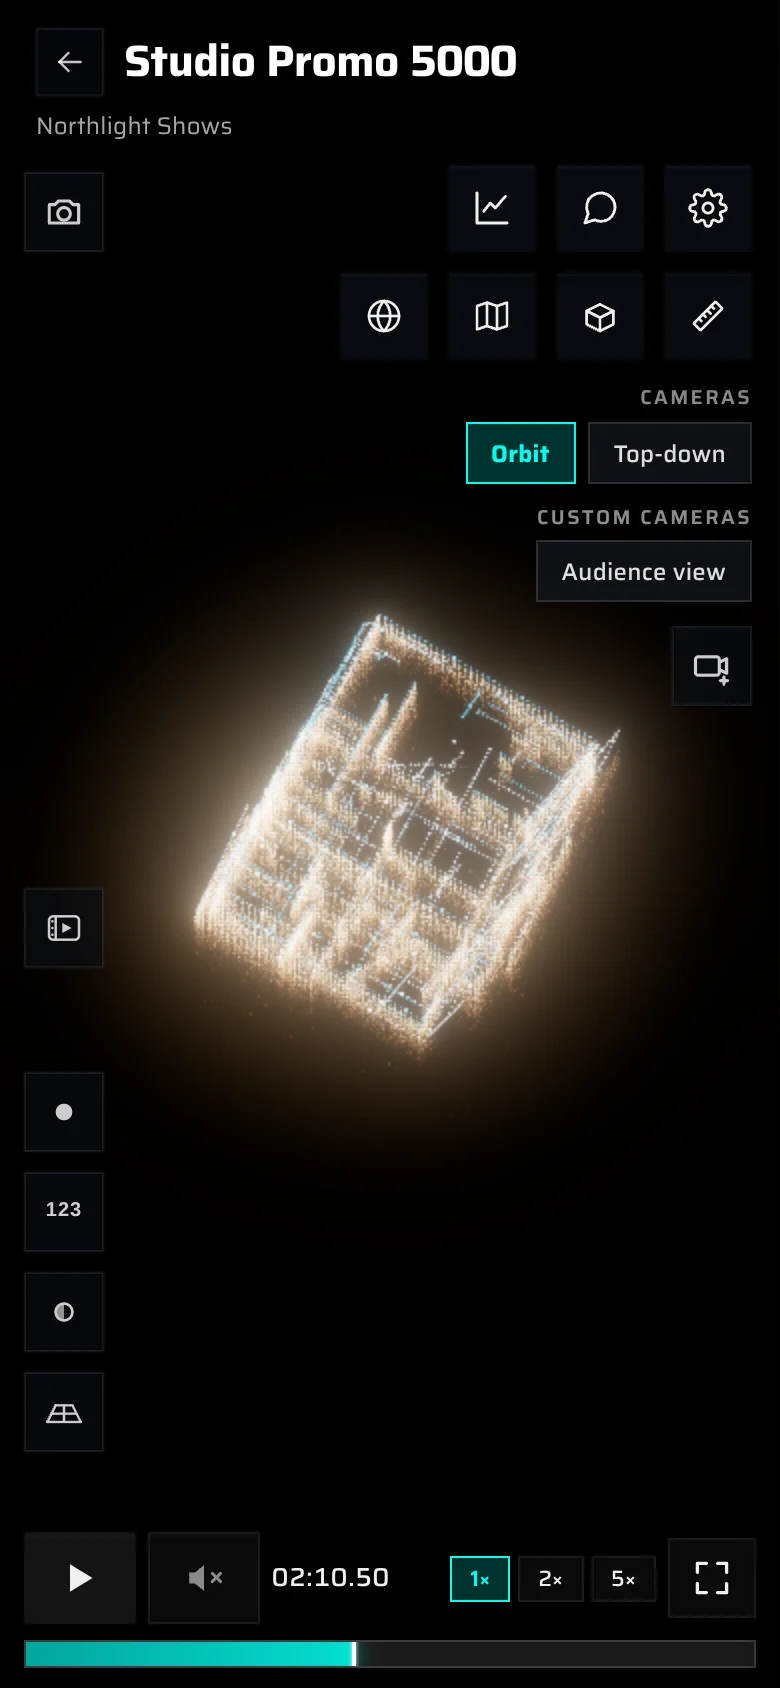
The viewer works on phones and tablets, in portrait and landscape. It switches to its touch layout on touch-screen devices and on narrow windows.
Controls hide by themselves: buttons, chips and the playback bar fade out after 4 seconds. Tap an empty part of the show to bring them back; tap again to hide them.
Touch gestures#
| Gesture | Action |
|---|---|
| Drag with one finger | Rotate the view |
| Pinch, or drag with two fingers | Zoom and pan |
| Double-tap the right half of the screen | Forward 10 seconds |
| Double-tap the left half of the screen | Back 10 seconds |
| Press and hold the left half of the screen | Play at 3× speed while you hold (without sound) |
| Tap the timeline | Jump to that moment |
Dragging along the timeline doesn't scrub — tap the point you want instead.
What changes on a small screen#
- On very narrow screens, the speed buttons become a dropdown.
- The total length, the frame counter, the volume slider and the Music offset control are hidden. The speaker button still mutes and unmutes; set the offset on a computer or on the project page.
- In portrait, the tool buttons wrap onto a second row when they don't fit in one.
- Drone dots are drawn at half size so the show looks similar to a computer screen, and the viewer draws up to 30 frames per second to keep the phone responsive.
- The analysis drawer fills the whole screen; the settings and comments drawers slide over most of it.
- With the ruler on, the size label appears in the middle of the screen.
Performance and slow connections#
The viewer streams the show, so it starts playing before the whole show has downloaded.
- Streaming. The viewer downloads the part of the show just ahead of the playhead. Jumping far ahead can briefly show Buffering… while that part arrives.
- Background download. After about 10 seconds of watching, the viewer downloads the rest of the show in the background, if the show isn't too large for the device and the connection is fast. It skips this on mobile data, with the browser's data saver on, or on connections slower than 4G — then it keeps streaming only what you watch.
- Return visits are faster. Your browser keeps the downloaded show and music, so opening the same show again starts sooner.
- Music has to download completely before it can play. The show plays (muted) in the meantime. WAV and FLAC tracks are played from a smaller compressed copy made automatically, so viewers wait less; your original file stays unchanged.
- Automatic quality. If the frame rate drops, the viewer lowers its drawing resolution to keep playback smooth, and raises it again when there's headroom.
- Big shows. Drone numbers, the show volume and large 3D site models take extra effort. Switch them off if the viewer feels slow.
- Offline. If your connection drops, a banner reads You appear to be offline. Attempting to connect... and disappears when you're back online.
The status bar#
The thin bar at the very bottom of the viewer (you see it; share-link visitors don't) shows how the viewer is coping:
| Item | Meaning |
|---|---|
| fps | Frames drawn per second: green at 55 and above, yellow from 30, red below 30. |
| ms / frame | Time spent drawing each frame. |
| drones, frames @ fps | Drone count, number of frames and frame rate of the show. |
| buffer | How many frames are downloaded ahead of the playhead, or fetching… while the viewer waits for data. |
| Show name | The show playing, or the loading progress. |
If something goes wrong#
| Message | Meaning |
|---|---|
| Project unavailable | The project was deleted, or it belongs to another account. Go back to your projects list. |
| Please sign in again | Your session has expired. Sign in to continue. |
| Service is having a moment | A problem on our side. Wait a minute and try again. |
| Can't load this project right now | Check your connection and try again. |
| Could not load show | The show couldn't be opened. Reload the page; if it keeps happening, contact contact@droneshow.store. |
| Analysis unavailable: … | The analysis couldn't be loaded; the reason follows the colon. |
Something missing or unclear? Write to contact@droneshow.store.