Pre flight and export
Place the show on site, set up takeoff and landing, run the flight simulation and export flight files for your drone system.
Pre flight is the last stage of the Show Builder. Here you put the show on the real launch site, plan how the drones take off and land, check the whole flight against your fleet's limits, and download the flight files for your drone system. Use it once the show itself is designed (see Show Builder basics) and you are preparing it for a real performance.
Open Pre flight#
Click Pre flight in the Builder header, next to Design. While the tab prepares the flight, the viewport shows Building takeoff & landing…, and Loading map… while the satellite map loads.
Pre flight always plays the full flight on one timeline: the takeoff, then the show, then the landing. You don't build the takeoff and landing by hand. The Builder rebuilds them automatically whenever something they depend on changes: the placement, the matrix, the takeoff settings, or the show itself in Design. The tab opens paused at the start.
Everything you set here (site, placement, drone type, matrix, takeoff and landing) is saved with the show, just like your Design work.
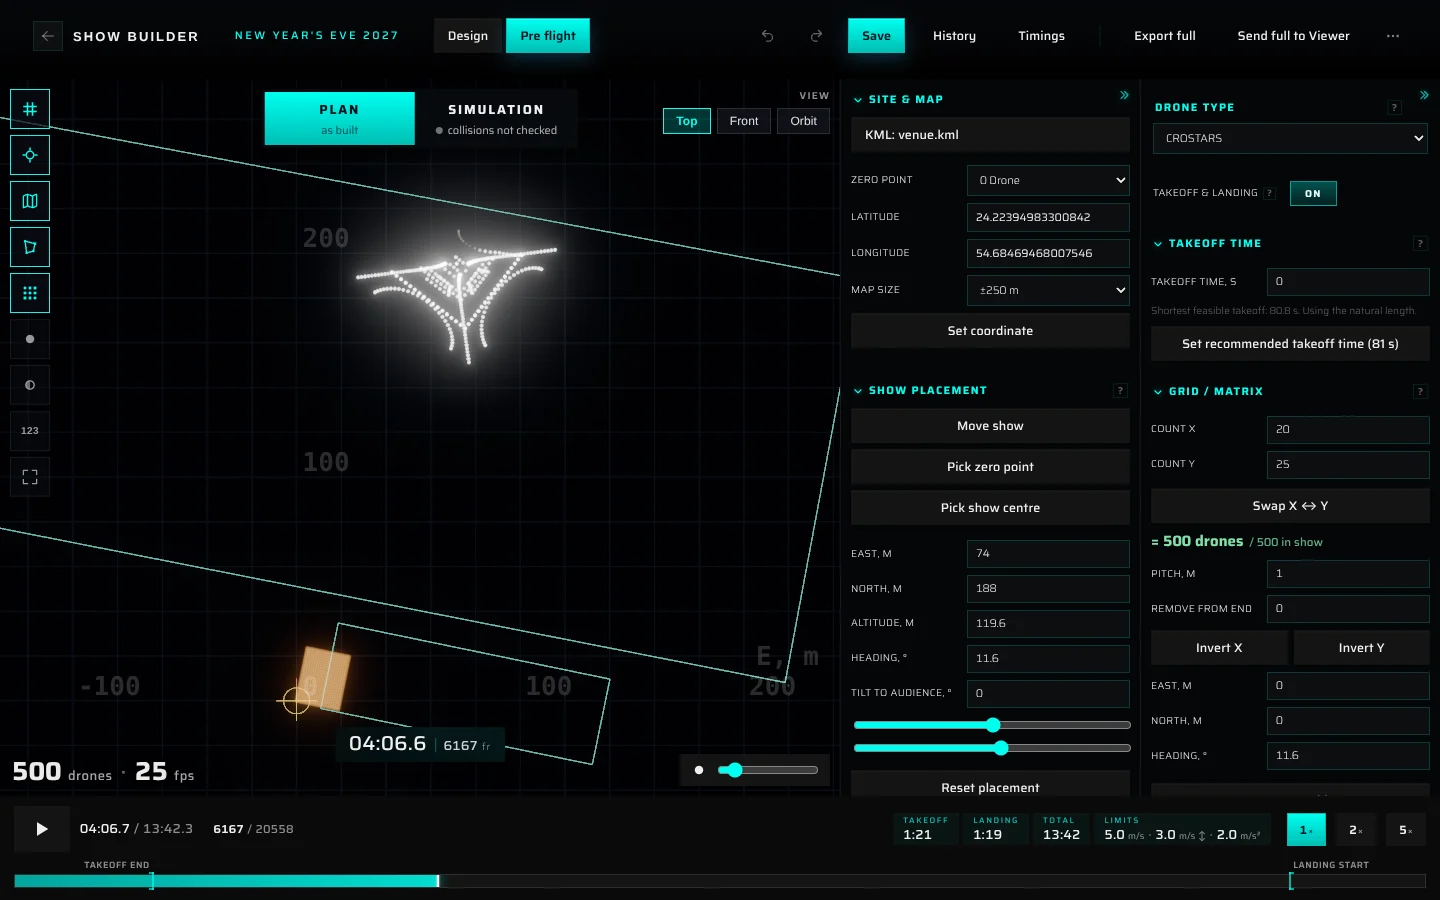
| Area | What it is for |
|---|---|
| Viewport | The launch site with the show placed on it |
| Plan / Simulation (top centre) | Switches between the flight as planned and the simulated flight. It also shows the simulation status |
| View (top right) | Top, Front and Orbit cameras |
| Icon column (top left) | Display toggles for the map, grid, matrix, drone colours and labels |
| Site & placement column | Where the site is and where the show stands on it |
| Takeoff & landing column | Drone type, matrix, takeoff time, climb, and the lights for takeoff and landing |
| Transport bar (bottom) | Play, scrub, playback speed, flight durations and the show limits |
Arrange the settings columns#
- Drag a column's left edge to make it wider or narrower.
- Click the fold button (») at the top of a column to fold it into a slim strip. Click the strip to open the column again.
- Click a section heading (for example Site & Map) to fold or unfold that section. Sections you don't use can stay folded.
The Builder remembers column widths and folded sections on this computer.
Find your way around the viewport#
Choose a view#
Use the View buttons at the top right:
- Top: a flat plan view with north at the top, like a map. Use it to place the show and the matrix.
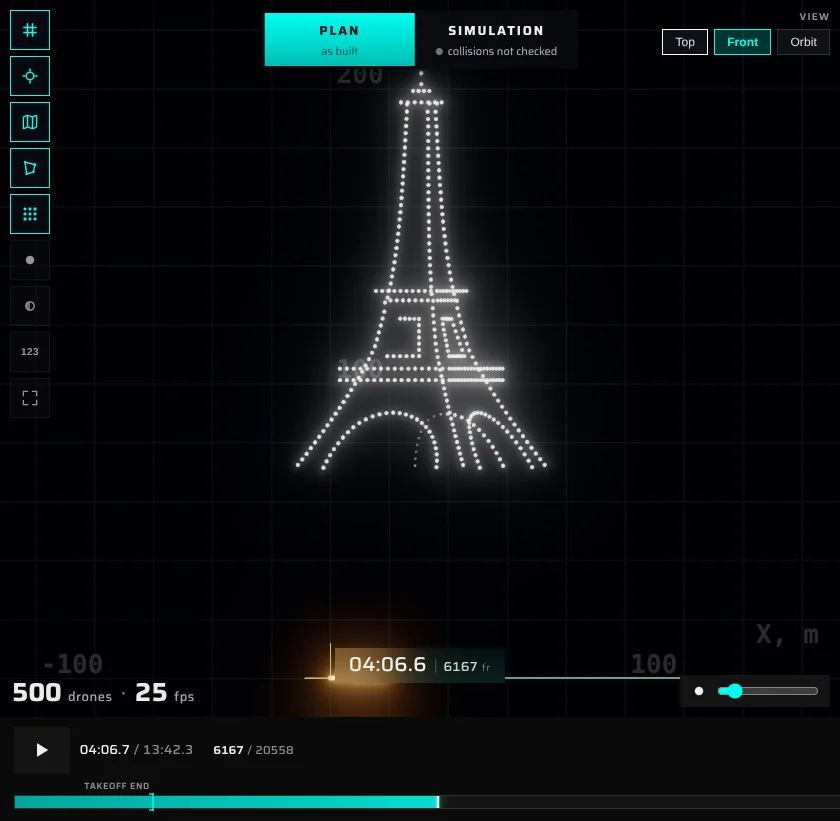
- Front: a flat side view that faces the front of the show. With Heading 0° you look north, with east to the right. Use it to check altitude and tilt.
- Orbit (Pre flight opens in it): a free 3D camera that circles the show.
| Action | Top and Front | Orbit |
|---|---|---|
| Move the camera | Drag with the left or right mouse button | Right-drag |
| Rotate | — | Left-drag |
| Zoom | Mouse wheel (zooms toward the cursor) | Mouse wheel |
| Touch | One finger pans, pinch zooms | One finger rotates, pinch zooms |
Display toggles#
The round buttons in the top-left column switch display aids on and off. Hover over a button to see its name.
| Button | What it shows | Default |
|---|---|---|
| Coordinate grid | A ground grid with metre labels (E, m / N, m in Top, X, m / Alt, m in Front). The grid gets finer as you zoom in | On |
| Origin marker | The zero point (the launch coordinate). Its red tick points north | On |
| Satellite basemap | The map image under the site | On |
| Site outline (KML) | The KML/KMZ outline you loaded | On |
| Takeoff matrix | Markers for the takeoff slots on the ground | On |
| Pure white | Draws every drone in white | Off |
| Tint dark drones gray | Shows drones that are off (dark) in gray, so you can still see them | Off |
| Drone indices (123) | Number labels on the drones and on the matrix slots, starting from 0 | Off |
| Deviation | Only in the Simulation view: colours drones by how far the simulation moved them from the plan (see Read the results) | Off |
| Fullscreen | Shows the viewport alone, full screen. Press Esc to return | — |
The readouts in the corners of the viewport:
- Bottom left: the number of drones and the show's frame rate, for example
500 drones · 25 fps. - Bottom centre: the playback position on the full flight (minutes:seconds.tenths) and the frame number.
- Bottom right: a slider for the size of the drone dots.
The Builder remembers your view, map size, toggles and dot size, and they follow you to other devices.
Set up the site#
The Site & Map section tells the Builder where in the world the show is. You need a site location to see the satellite map.
Load a KML or KMZ site plan#
- Click Load KML/KMZ….
- Choose a
.kmlor.kmzfile. For a.kmz, the Builder reads thedoc.kmlinside it, or the first.kmlit finds. - The site outline appears on the map. The centre of all its points becomes the launch coordinate, and Latitude and Longitude fill in.
- To put the zero somewhere else, pick it in Zero point: Centre of the KML, one of the file's named points, or a corner of one of its shapes (listed under the shape's name, for example Flight area p1). Custom coordinates lets you type your own below.
The button then shows the file name, for example KML: venue.kml. Each show keeps its own site file. Loading another file replaces it. To hide the outline without removing it, use the site outline toggle.
Type the coordinates#
- Enter Latitude (−90 to 90) and Longitude (−180 to 180) in decimal degrees.
- Click Set coordinate, or press Enter in either field.
- Choose Map size: how much map to load around the launch coordinate: ±250 m (default), ±500 m or ±1000 m.
If you load a KML file and then type coordinates, the outline stays where it is on the ground and the map re-centres on your coordinates.
Move the zero point#
To move the zero point to another spot on the map:
- Switch to Top or Orbit. You need a site location first.
- Click Pick zero point. The button changes to Picking zero… (Esc).
- Click the map at the new spot.
- Check the new coordinate in the Move the zero point? dialog and click Move zero point.
The show and the KML outline stay where they are on the ground. The origin, the grid and the map re-centre on the new zero point, and Latitude / Longitude update. The takeoff matrix keeps its offsets from the zero point, so it moves along with it.
Place the show#
The Show placement section moves and turns the whole show as one piece. It never changes the figures themselves.
| Field | What it does |
|---|---|
| East, m / North, m | Moves the show east or north of the zero point |
| Altitude, m | Raises or lowers the show |
| Heading, ° | Turns the show clockwise as seen from above (slider from −180° to 180°). The show turns around the centre of its drones at the moment shown in the viewport, so it rotates in place |
| Tilt to audience, ° | Leans the whole show toward the audience (positive values) or away from it (negative), around its centre. Range ±45° |
The front of the show faces the audience. With Heading 0°, the audience stands south of the show and looks north.
Until you place the show yourself, Altitude follows the show automatically: the lowest drone of the whole show stays 15 m above the ground (5 m for EVSKY and FLYSTACK). A tall figure therefore lifts the whole show. Once you move the show, type a value or pick a centre, the altitude stays where you put it.
Other ways to move the show:
- Move show: drag the show across the map (Top: east and north; Front: sideways and up/down). The button shows Moving… (Esc). Press Esc to stop. Not available in Orbit.
- Arrow keys: in Top and Front, arrow keys nudge the show by 1 m. Hold Shift for 10 m or Alt for 0.1 m. In Top they move it east/west and north/south. In Front they move it sideways and up/down. Arrow keys don't work in Orbit or while you're typing in a field.
- Pick show centre: click the button, then click the map. In Top, the show's centre moves to that spot and the altitude stays the same. In Front, the click sets the altitude of the show's centre. Confirm in the Move the show? dialog with Move show. Not available in Orbit.
- Reset placement: puts the show back on the zero point with East, North, Altitude, Heading and Tilt all at 0, after you confirm. Set Altitude again afterwards: at 0 m, the lower half of the show is below the ground.
If the tilt brings drones close to the ground, a note appears: Tilted, the lowest drone is at … m - raise the altitude.
Choose the drone type#
The Drone type list at the top of the Takeoff & landing column sets the hardware profile. It decides the shape of the takeoff and landing, the matrix defaults, the frame rate the drones expect, and which flight file you can download.
| Drone type | Frame rate | Takeoff and landing | Flight file in the Simulation panel |
|---|---|---|---|
| HighGreat (HG) | 30 fps | Fully configurable matrix, layers and expansion | Universal formats |
| EVSKY | 24 fps | Fixed profile: 2.1 m pitch, single layer, straight takeoff, landing fans out ×1.2 at 5 m | EVSKY flight task (.essp files) |
| FLYSTACK | 24 fps | Fixed profile with the EVSKY takeoff shape | Alembic (.abc) |
| CROSTARS | 25 fps | Configurable, like HighGreat | Per-drone CSV files |
| Drotek IO2 | 24 fps | A grid of drone families | Universal formats |
The universal formats (Skybrush CSV, PATH3, VVIZ) and the PDF report are available for every drone type. See Export flight files.
What happens when you switch:
- EVSKY or FLYSTACK: the matrix pitch becomes 2.1 m and the takeoff uses a single layer. The Takeoff & Landing movement section is hidden because these drones fly a fixed profile.
- FLYSTACK also applies the FlyStack speed preset to the whole show (24 fps, 2 m spacing, 5.5 m/s horizontal and climb, 3 m/s descent, 2.25 m/s² acceleration). CROSTARS applies the Crostars preset (25 fps, 1.6 m spacing, 5 m/s horizontal, 3 m/s up and down). The show is solved again with the new limits, the same as picking a Speed preset in Design. Ctrl+Z undoes the preset change.
- Drotek IO2 sets the IO2 takeoff profile: 2 m straight up, then an expansion ×1.3 over 5 m, then into the figure. You can edit these values afterwards.
- HighGreat (HG) keeps your matrix as it is.
FPS mismatch#
If the show's frame rate doesn't match what the selected firmware expects, a red ⚠ FPS MISMATCH box appears, for example: The project runs at 25 FPS, but EVSKY firmware expects 24 FPS — otherwise the show plays at the wrong speed on the drones.
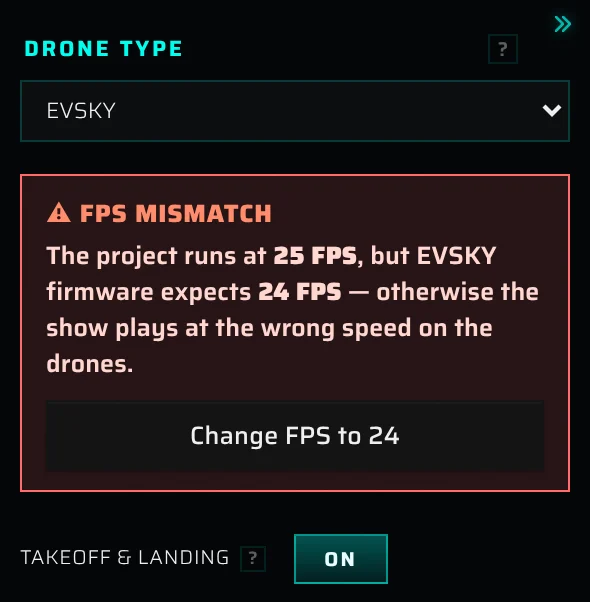
Click Change FPS to 24 (or the rate shown). The whole show is solved again at the new frame rate, and you can undo this. Transition durations in seconds stay the same. A transition that was exactly at its minimum may become too short, and Design then marks it (see Transitions that are too short).
Plan the takeoff and landing#
Turn takeoff and landing on or off#
The Takeoff & landing switch is on by default. Turn it off if you only need the show itself. Then there is no matrix, no climb and no landing. The plan, the simulation and every export cover just the show, which starts and ends where it does in Design.
Reserve the takeoff time#
Takeoff time, s reserves a fixed time for the takeoff so the figures keep their agreed times, for example a show synced to music or a timing table agreed with the client.
- 0 (default) means automatic: the takeoff takes the shortest time the show limits allow, and it is added in front of the show. Everything after it starts later by the length of the takeoff.
- With a reserved time, the first figure starts at the same moment in the full flight as in Design (a takeoff Blackout bridge adds its own time on top, see Lights for takeoff and landing). If the reserve is longer than the takeoff needs, the drones fly proportionally slower to fill it.
- If the reserve is shorter than needed, the takeoff is sped up past the show limits to fit. A yellow note warns you: Not enough time — the takeoff needs about 41.0 s and was sped up past the show limits to fit 30 s.
Under the field, a note shows the Shortest feasible takeoff. Click Set recommended takeoff time (N s) to set the shortest time that keeps the takeoff within the limits.
This is the same value as the takeoff placeholder in Design: the striped block at the start of the timeline. So Design and Timings already count it in the figure start times. See Takeoff placeholder.
Set up the matrix#
For HighGreat (HG), CROSTARS, EVSKY and FLYSTACK, the Grid / Matrix section sets the rectangle of takeoff positions on the ground. The slots show as markers on the ground. Turn on the drone indices (the 123 button in the icon column) to see their numbers.
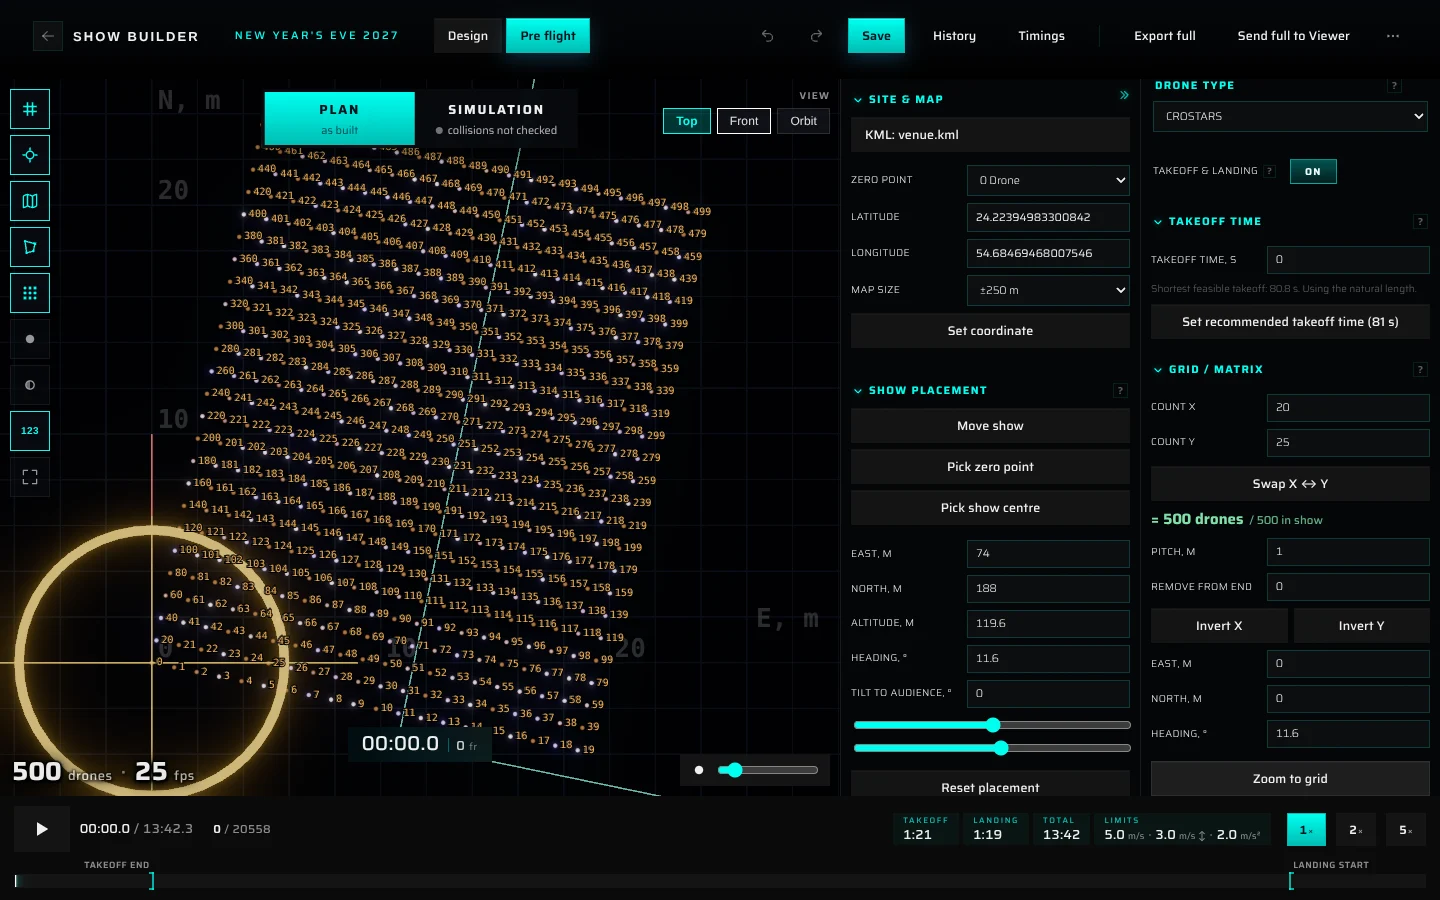
| Control | What it does |
|---|---|
| Count X / Count Y | Drones per row and the number of rows |
| Swap X ↔ Y | Swaps the two counts |
= 500 drones / 500 in show |
Matrix capacity compared with the drones in the show. Green when there is room for every drone. Red with — not enough! when there isn't |
| Pitch, m | Distance between neighbouring slots |
| Remove from end | Removes slots from the end of the numbering, which leaves a partial last row |
| Invert X / Invert Y | Mirrors the numbering along that axis |
| East, m / North, m | Position of the matrix from the zero point. For HighGreat and CROSTARS this is where slot 0 (the first drone) stands, and the matrix extends from it. For EVSKY and FLYSTACK it is the centre of the matrix |
| Heading, ° | Turns the matrix clockwise |
| Zoom to grid | Switches to Top and fits the matrix to the screen |
Slots are numbered row by row, starting from slot 0. Until you change the matrix, it is sized for your fleet: close to square, with a multiple of 10 drones per row (for example 20 × 15 for 300 drones) and a 1 m pitch (2.1 m for EVSKY and FLYSTACK). Once you edit it, the Builder keeps your matrix exactly as it is, even if the drone count changes later. If it no longer fits, the readout turns red.
Each drone lands on the same slot it took off from. The drone numbers follow the matrix: drone 0 stands on slot 0, drone 1 on slot 1, and so on. The exported flight files use the same order.
Set up the Drotek IO2 grid#
With Drotek IO2, the ground layout is a grid of drone families (small clusters of drones) instead of a single rectangle.
| Control | What it does |
|---|---|
| Drones per family | 1 to 8 drones in each family. Changing it suggests a new ideal layout for your fleet straight away |
| Families X / Families Y | Number of families along each side. Swap X ↔ Y swaps them |
= N drones / M in show |
Grid capacity compared with the drones in the show. Red with — not enough! when it is too small |
| Remove drones | Leaves places empty so the grid holds exactly your fleet. Families are never removed: each keeps at least one drone, and the empty places are the last places of the last families in the numbering. A summary below the field shows the result, for example 22 × 6 + 2 × 4 (22 families of 6, 2 families of 4) |
| Apply ideal layout | Shown when your grid isn't ideal, with a suggestion such as Ideal for 140 drones: 6 × 4 × 6 = 144, remove 4. It picks the smallest grid that seats the show and is no more than twice as long as it is wide. Once applied, ✓ Ideal layout for N drones. appears |
| Family step, m | Distance between the family centres (default 1.6 m). Drones within a family always stand 0.35 m apart (0.3 m in a family of 5) |
| Angle, ° | Turns the whole grid counter-clockwise as seen from above. This follows the IO2 convention, unlike Heading elsewhere, which turns clockwise |
| East, m / North, m | Centre of the grid from the zero point |
| Reset grid for N drones | The ideal grid for your fleet with step 1.6 m and angle 0°, centred on the zero point |
IO2 drones lift off one family place at a time: drone 1 of every family first, then drone 2, and so on. Each layer starts 170 frames (about 7 s at 24 fps) after the previous one, and the landing mirrors this. IO2 drones don't have to land on the slot they took off from.
Climb, layers and expansion#
The Takeoff & Landing movement section is available for HighGreat (HG), CROSTARS and Drotek IO2. EVSKY and FLYSTACK fly a fixed profile, so the section is hidden for them.
Climb & layers. The drones don't all lift off at once. They lift off in layers:
- Layer step splits the matrix into layers. Step N makes N × N layers: with the default step 2 there are 4 layers, and drones of the same layer are every second slot along each side. Default (2) appears when you change the value and resets it.
- Each drone lifts off gently, climbs straight up to Climb alt, m (default 20 m) no faster than the show's vertical speed limit, then flies to its place in the first figure. The first layer takes the top of the figure.
- The next layer starts once the previous one is Layer gap, m higher (default 3 m).
- For Drotek IO2 the field is Vertical climb, m (min 2). IO2 layers follow the family places (see above), so there's no layer step or gap.
If drones of one layer would lift off closer together than the show's minimum distance, a warning appears: Drones of one layer lift off 1 m apart - closer than the 1.6 m minimum. Use step 2 or more, or the collision sim will flag the takeoff. Raise Layer step to the suggested value, or increase Pitch, m.
Expansion stage (off by default; on for Drotek IO2). Turn on Enabled to add a stage after the climb:
- Stage height, m (default 4 m): how much higher the drones rise during the stage.
- Expand factor (default 1.3): how much the matrix spreads out around its centre.
- Tilt to show, °: tilts the spread-out layer toward the show. Positive values lower the edge nearest the show.
After the expansion stage, the drones fly into the figure. The landing mirrors it: the layers form at the expanded matrix, contract, and then drop straight down.
Lights for takeoff and landing#
Takeoff & Landing lights sets what the drones show while they take off and land. Each side has its own effect. Click the Effect tile to open the effect library over the upper part of the view. It works the same way as in Design (see The effect library).
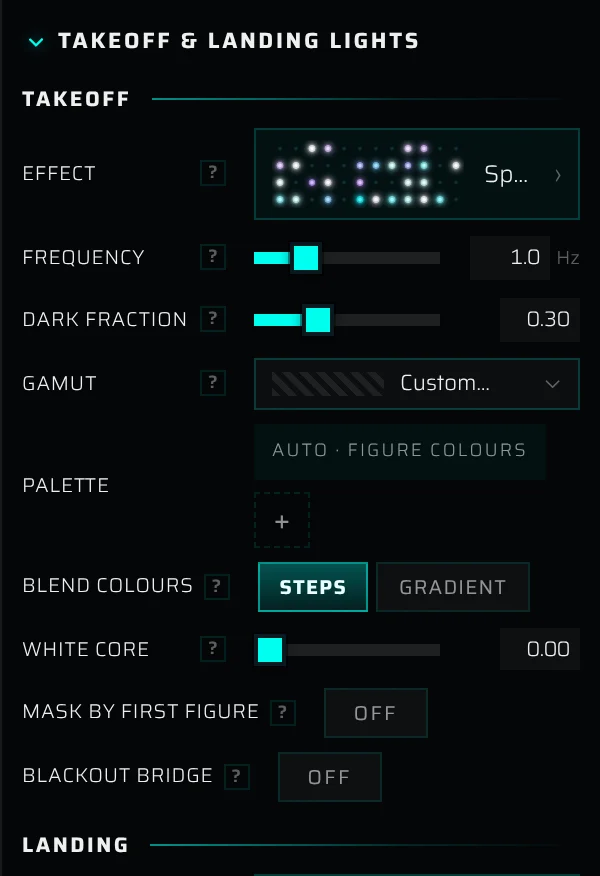
- Takeoff: the effect runs from dark toward the first figure's colours. The default is Sparkle in the first figure's own colours. Choose Lights off for a dark takeoff.
- Landing: the effect runs from the show's last colours toward dark. The default is Sparkle in the last figure's colours. Lights off makes the drones go dark right after the show.
- Mask by first figure / Mask by last figure: drones that are dark in the first (or last) figure stay dark during the takeoff (or landing), so the effect lights only the drones the figure uses. Mask source decides which frames of that figure count: Whole figure, First frame or Last frame.
- Blackout bridge (takeoff, off by default): the drones arrive in the first figure, the lights fade to black, stay dark for Dark time, s, and fade back in as the show starts. This adds about 2 s plus the dark time before the show.
- Blackout bridge (landing, on by default): the last 2 s of the show fade to black, the drones leave fully dark for Dark time, s, then the lights fade into the landing effect over 2 s.
The two Dark time, s fields are one setting (default 2 s): changing one changes the other. Without a bridge, the last second of the takeoff blends into the show's first colours, and the first second of the landing blends out of the show's last colours.
Play the full flight#
The transport bar at the bottom plays the whole flight: takeoff, show and landing.
- Click the play button to play or pause. Click or drag on the bar to jump; this also pauses playback.
- 1×, 2× and 5× set the playback speed.
- The readout shows the current time and total length, then the current frame and the frame count.
- Two markers on the bar show Takeoff end and Landing start.
Pre flight plays without music. Check music sync in Design.
The readouts on the right of the transport bar:
| Readout | What it means |
|---|---|
| Takeoff | From the matrix into the first figure, including a takeoff blackout bridge |
| Landing | From the last figure back down to the matrix |
| Total | The full flight: takeoff, show and landing |
| Limits | The show limits: horizontal speed · vertical speed · acceleration. The simulated flight stays within them. They come from the show parameters in Design (see Show parameters) |
| Deviation | Only in the Simulation view: the largest distance between a drone in the limits check and its planned position |
Takeoff, Landing and Total appear only when the flight has a takeoff: Takeoff & landing is on and the matrix has room for every drone.
Check the flight in Plan and Simulation#
The switch at the top centre of the viewport chooses which version of the flight you see:
- Plan (as built): the flight exactly as the Builder put it together.
- Simulation: the flight as drones that respect the limits would fly it. Before you run the collision simulation, this is the result of the automatic limits check. After a finished collision simulation, it's that result.
Pre flight checks the flight in two ways:
- The limits check runs automatically in your browser after every change. It takes a moment. Each drone follows its planned path, but its speed and acceleration are held within the show limits. Where the plan asks for more, the drone falls behind and catches up as soon as it can. The Deviation readout and colours show how far the drones fall behind.
- The collision simulation runs on our servers when you start it. It keeps every pair of drones at least the minimum distance apart, within the same limits, and tells you whether the show is ready to fly.
The Simulation button is greyed out until the limits check has run for the first time. The line under Simulation shows the status:
| Status | Meaning |
|---|---|
| preparing… | The first limits check hasn't finished yet |
| collisions not checked | No collision simulation has been run yet |
| uploading N% | Sending the flight to the server |
| starting… | The run is queued and about to start |
| running N% | The collision simulation is working |
| N collisions | The last run finished with collisions left |
| collision-free | The last run finished without collisions |
| failed | The last run didn't finish |
Run the collision simulation#
- Click Simulation at the top centre. The Collision sim panel opens on the right of the viewport.
- Choose a mode: Light (for simple shows), Middle (if there are complex transitions; the default) or Crazy (extreme cases). Stronger modes work harder to untangle dense crossings and take longer.
- Click Run collision sim.
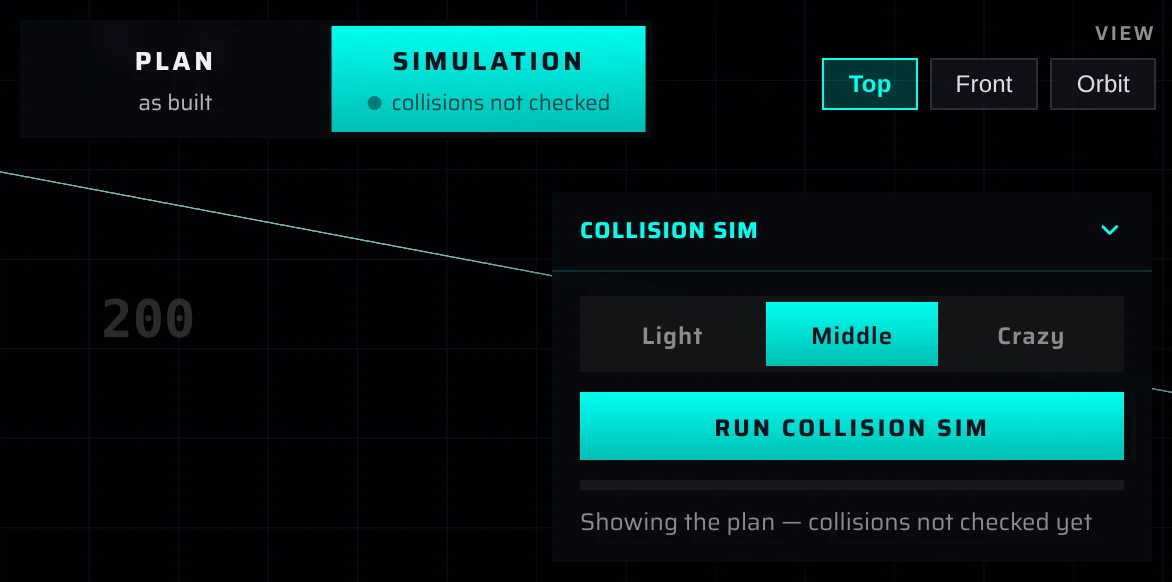
The simulation always checks the full flight as Pre flight shows it, including the takeoff and landing, with the show's minimum distance, speed and acceleration limits.
While it runs:
- The progress bar and status line show the stage: Uploading to server N%, Preparing the simulation job…, Solving N% · 2m 10s left (with an interim collision count) and Importing result N%.
- If collisions remain after a pass, the simulation automatically runs extra passes on its own result. The percentage may start over.
- Click Cancel to stop the run.
- You can keep working, or even close the Builder. The run continues on the server, and its result is saved with the show for the next time you open it.
The button label tells you where you are: Run collision sim (never run), Simulating… (in progress), Re-run sim (finished and up to date) and Update sim (the plan changed since the run). Running the same flight again, for example in another mode, starts faster because the flight doesn't need to be uploaded again.
| Status line | What it means |
|---|---|
| Showing the plan — collisions not checked yet | No run yet |
| No collisions - this show is ready to fly (with a ✓) | The flight is collision-free. Flight-file exports are now available |
| N collisions remain (min 1.42 m) | The run finished, but some drones still come closer than the minimum distance. The closest pair is shown in brackets |
| Plan changed — re-run to update | After the run, you changed how the drones move (the show, the placement, the matrix or the takeoff and landing), the show limits or the mode. The STALE badge shows in the panel header. Click Update sim |
| Cancelled | You stopped the run |
| The simulation was interrupted. Please run it again. | The run was cut off on the server. Run it again |
| The simulation took too long and was stopped. Try running it again. | The run hit the time limit |
| Couldn’t reach the server. Check your connection and try again. | A connection problem |
| The simulation couldn’t finish. Please try again. | Any other failure. If it keeps happening, contact support |
Click the panel header to fold the panel.
Read the results#
Held within fleet limits. After a collision-free run, the panel lists the limits the simulated flight keeps: Min separation (≥ the minimum distance), Horizontal speed, Vertical speed (up ↑ and down ↓) and Acceleration. These are the show's limits from Design.
Figures vs plan. After a finished, up-to-date run, the panel measures how far the simulated flight moved away from the plan, figure by figure, including the takeoff and the landing. A drone counts as off when it is more than 0.7 m from its planned position.
- The summary reads, for example, 2 of 9 figures come out bent (drones >0.7 m off the plan). or All 9 figures hold their shape (within 0.7 m). While it measures, it shows Measuring… N%.
- Each row shows the figure, the time of its worst moment, the share of drones that are off, and how far off they are in metres. Only the second half of each figure's hold is judged, when the drones should have settled into the figure. The dot is green (under 2% of drones off), amber (2 to 7%) or red (7% or more).
- Click a row to jump to that figure's worst moment.
- By default the list shows only the bent figures, worst first. Show all N lists every figure, and Only the bent ones goes back.
- If the simulated flight doesn't start where the plan does, for example because the placement changed after the run, a note asks you to re-run it for exact numbers.
A small delay doesn't count as bending: each moment is compared with the closest matching moment of the plan, up to 1 s earlier or 0.5 s later.
Coloured bands on the transport bar. In the Simulation view, after a finished run, coloured stretches under the bar mark each figure in green, amber or red. Hover over a band to see, for example, Heart: 4% of drones off by >0.7 m, max 1.3 m.
Deviation colours. In the Simulation view, turn on the Deviation toggle in the icon column to colour each drone by its distance from the plan at that moment: green on the plan, yellow at 0.35 m and red from 0.7 m. It works for the limits check and for a finished collision run.
Fix problems the checks report#
| What you see | What it means | What to do |
|---|---|---|
| Red — not enough! under the matrix, and Takeoff: matrix has 280 slots for 300 drones — playing the show without takeoff. | The matrix has fewer slots than the show has drones, so there is no takeoff or landing | Increase Count X / Count Y, or lower Remove from end. For Drotek IO2, click Apply ideal layout |
| ⚠ FPS MISMATCH | The show's frame rate isn't the one the firmware expects | Click Change FPS to N, then check Design for transitions marked Not enough time |
| Not enough time — the takeoff needs about … s | The reserved takeoff time is too short, so the takeoff breaks the limits | Click Set recommended takeoff time (N s) |
| Drones of one layer lift off … m apart - closer than the … m minimum | The takeoff layers are too dense | Raise Layer step to the suggested value, or increase Pitch, m |
| Tilted, the lowest drone is at … m - raise the altitude. | The tilt brings drones close to the ground | Raise Altitude, m |
| Takeoff: takeoff is … s — truncated to … s (or Landing: …) | The takeoff or landing is longer than the Builder allows and was cut short | Bring the matrix and the show closer together, or use fewer layers (a lower Layer step) or a smaller Layer gap |
| A large Deviation, or red drones with the Deviation toggle on | The plan asks for more speed or acceleration than the limits allow, usually because a transition is too short | In Design, transitions that are too short are outlined in orange and say Not enough time · needs … s. Make them longer, or right-click one and choose Set to minimum time. See Transitions that are too short |
| N collisions remain | The collision simulation couldn't separate every pair of drones | Re-run in a stronger mode (Middle, then Crazy). If collisions remain, give the drones more time: lengthen the transitions around the figures that Figures vs plan marks, and check the takeoff layer warning |
| Amber or red figures in Figures vs plan | The simulation bent that figure to keep within the limits or avoid collisions | Click the row to see the worst moment, then lengthen the transition into that figure in Design. For Takeoff or Landing, raise the takeoff time, spread the matrix or adjust the layers |
| Plan changed — re-run to update | The result is out of date | Click Update sim |
Export flight files#
What to export for your fleet#
| Drone type | Flight file in the Simulation panel | Also available |
|---|---|---|
| EVSKY | EVSKY flight task: a .zip of per-drone .essp files |
Universal formats, PDF report, Export full (.usd) |
| FLYSTACK | FLYSTACK export: an Alembic .abc file |
Universal formats, PDF report, Export full |
| CROSTARS | CROSTARS flight task: a .zip of per-drone CSV files |
Universal formats, PDF report, Export full |
| HighGreat (HG), Drotek IO2 | No dedicated flight task. Use a universal format (Skybrush CSV, PATH3 or VVIZ) or Export full, whichever your pipeline reads | PDF report |
Exports on the Free plan#
A Free account exports up to 3 different shows. What counts as exporting a show: a flight file from the Simulation panel (EVSKY, FLYSTACK, CROSTARS, the universal formats) and Export full or Export design. Once a show is exported, you can download it again, in any format and after any change, as often as you like. Send to Viewer, Client link and the PDF report don't count.
On a Free account the export section of the Simulation panel shows how many shows you've exported, for example "Free account: 1 of 3 shows exported." When you try to export a fourth show, a dialog says so and offers See plans. Core and Premium export any number of shows.
A Free account also exports only shows built from the library's starter figures and your own figures. If a show still uses a figure from the full library (an older show, for example), the export says which figures and offers See plans; swap them with Change figure (see Starter figures on the Free plan).
Download flight files from the Simulation panel#
Flight files are made from the collision simulation. The export section appears in the Collision sim panel only when the last run is finished, up to date and collision-free (No collisions - this show is ready to fly). A flight that still has collisions can't be exported as flight files.
- In the Simulation view, run the collision simulation until it reports no collisions.
- Scroll down in the panel to the export section.
- Click the download button for your fleet, or choose a universal format and click Export (.zip).
The button shows Building… N% (Converting… for Alembic) while the server prepares the file. Then the download starts. Downloading the same file again is quick until you run the simulation again.
| Export | Button | What you get |
|---|---|---|
| EVSKY flight task | Download flight task (.zip) | One .essp file per drone (1.essp … N.essp). Positions at 8 fps, colours at 12 fps |
| FLYSTACK export | Download Alembic (.abc) | One Alembic point cloud: one point per drone with its colour on every frame, at the project frame rate (24 fps for FLYSTACK) |
| CROSTARS flight task | Download flight task (.zip) | One CSV per drone (1.csv … N.csv) at 25 fps, all the same length, with no time column. Columns: uavid,lon,lat,alt,r,g,b,land_flag. lon, lat and alt are metres east, north and up from the zero point, not degrees. r g b are 0–255 (0,0,0 = light off). land_flag is 0 while flying and 1 once the drone has landed for good |
| Universal formats → Skybrush CSV | Export (.zip) | One CSV per drone (Drone 001.csv …): Time_msec,x_m,y_m,z_m,Red,Green,Blue, in metres with x east, y north and z up, every frame at the show frame rate (8 fps for EVSKY) |
| Universal formats → PATH3 | Export (.zip) | One binary .PATH3 file per drone (DSS-001.PATH3 …), Z up, 1 cm steps (coarser if drones fly more than about 320 m from the zero point). You choose the sample rates, see below |
| Universal formats → VVIZ | Export (.zip) | One .vviz file (JSON) for Finale 3D / Verge: X east, Y up, Z north. Positions 8 times a second, colours at the full frame rate (12 fps for EVSKY) |
| Safety report | Download report (.pdf) | See The safety report |
PATH3 sample rates. When you choose PATH3, pick the rates for Positions and Colours. The choices are whole divisions of the show's frame rate (for 24 fps: 24, 12, 8, 6, 4, 3, 2, 1), so every sample lands exactly on a show frame. The defaults follow typical DSS files: positions at about 4 fps, and colours at half the show's frame rate where that divides evenly.
All per-drone positions are in metres from the zero point, not GPS coordinates. Drones are numbered from 1 in matrix order: file 1 is the drone that takes off from slot 0. The drone indices in Pre flight start at 0, so index 0 is file 1. With Takeoff & landing off, the drones keep their Design numbering.
Downloads are named after the show, the format, the drone count and the date, for example Gala_Skybrush-CSV_300dr_2026-11-04.zip or Gala_PATH3-4-12fps_300dr_2026-11-04.zip.
The safety report#
Download report (.pdf) builds a printable safety analysis of the simulated flight. It's the same report the 3D viewer makes for uploaded shows. It covers the show length, drone count and frame rate, the minimum distance between drones (over the whole show and in flight), and the ranges and peaks of vertical and horizontal speed and acceleration.
Export full and Export design#
The export button in the Builder header downloads a binary USD file (.usd): one point per drone, with its position and colour on every frame at the project frame rate. The 3D viewer and other USD tools can read it.
- In Design, the button is Export design. It exports the show as designed, without takeoff and landing, in the show's own coordinates. A reserved takeoff time is included as a dark hold at the start.
- In Pre flight, the button is Export full. It exports the full flight (takeoff, show and landing, or the show alone when Takeoff & landing is off) in site coordinates: metres, with the zero point at the origin, Y up and north along −Z. Drones are in matrix order.
Which version of the flight Export full (and Send full to Viewer) delivers depends on where you are:
| Where you are | What you get |
|---|---|
| Simulation view, after a finished collision simulation | The collision-simulated flight from the last run, even if collisions remain (file name ends in -simulated.usd; EVSKY shows come out at the simulation's 8 fps) |
| Plan view, or Simulation before a collision run has finished | The limits-checked flight: speed and acceleration within the limits, collisions not resolved |
| The limits check is still running or out of date | The Simulation isn't ready dialog. Choose Wait, or Export plan to export the raw plan, which may exceed the speed and acceleration limits |
While the export runs, the button and a progress badge show the stage: Packing the show, Uploading (with a percentage, time left and size), Converting to USD, and Downloading. If the connection stalls, the export stops with a message; check your connection and try again.
If the takeoff couldn't be built, for example because the matrix is too small, Export full shows Nothing to export yet: The full flight isn't ready — check the takeoff matrix (enough slots?) and wait for the rebuild.
Send the full flight to the 3D viewer#
On the Pre flight tab, Send to Viewer becomes Send full to Viewer. It publishes the full flight (takeoff, show and landing) to the show's project in the 3D viewer, so you and your client can review the whole flight there. The steps, progress and dialogs are the same as for a Design send; see Sending a show to the viewer.
- Click Send full to Viewer. The Builder saves the show first.
- Watch the button: Sending…, Queued…, Converting N%, Ready ✓.
- In Show is ready in the viewer, click Open project, or Stay here to keep working.
What is different about a full-flight send:
- It sends the same version as Export full (see the table above): the collision-simulated flight if you are on the Simulation view after a finished run, otherwise the limits-checked flight. If the limits check isn't ready, you get the Simulation isn't ready dialog first.
- The music travels with the show and starts with the flight. To keep the figures on the music, reserve the takeoff time (see Reserve the takeoff time). With an automatic takeoff, the figures start later than the music by the length of the takeoff.
- The site coordinate becomes the project's GPS anchor, so the viewer's map lines up (see GPS anchor). The KML file isn't copied. Upload it to the project if you need it there (see KML overlay).
Each send is added to the project as a new show. Earlier ones stay untouched. Sending counts toward your account's projects, shows and storage. If the send is refused, Send to Viewer failed shows the reason.
Timings and the full flight#
Timings in the Builder header lists the running order of the figures (see Show timings). It follows the Design timeline: a reserved takeoff time appears as its first row, Takeoff (placeholder). An automatic takeoff (takeoff time 0) and the landing aren't in the table. Their lengths are in the transport bar of Pre flight (Takeoff, Landing, Total).
Drone-count limits#
Each show has a fixed number of drones, which you choose when you create it. Your account sets the most drones a show can have: see the table in Who can use the Builder. If you pick more drones than your account allows, a dialog explains it and the count is set to your limit. 10,000 drones per show is the system maximum; the Builder doesn't export larger shows.
Other messages#
| Message | What it means | What to do |
|---|---|---|
| Enter a valid latitude (−90…90) and longitude (−180…180). | The coordinate is out of range or not a number | Use decimal degrees, for example 24.2239 and 54.6847 |
| That file is too large to read the site plan… | The KML/KMZ file is too large for the Builder to read | Simplify the file, or export only the outlines you need |
| KML contains no coordinates / KMZ contains no .kml document | The file has no outline the Builder can read | Check the file in your mapping tool and export it again |
| Simulation isn't ready | The limits check is still running or out of date | Click Wait and try again in a moment |
| Nothing to export yet | The full flight couldn't be built | Check the matrix capacity and the message at the top of Pre flight |
| Export failed (header) | The export couldn't finish, for example because the connection stalled | Check your connection and export again |
| Export failed — please try again. / Report failed — please try again. (panel) | The server couldn't build the file | Try again. If it keeps failing, contact contact@droneshow.store |
| Send to Viewer failed | The show couldn't be sent, for example because of an account limit | Read the reason in the dialog. If it names a limit, delete an old project or show, or write to contact@droneshow.store |
| Conversion failed | The show was sent but the viewer couldn't convert it | Click Open project to see the error and retry there |
Something missing or unclear? Write to contact@droneshow.store.